Xequence
MIDI Workstation
MIDI meets Mobile.
Quickstart Guide
![]() © 2017 Seven Systems Cross-Platform Media Limited
© 2017 Seven Systems Cross-Platform Media Limited
iPhone and iPad are trademarks of Apple Inc., registered in the U.S. and other countries.
MIDI meets Mobile.
![]() © 2017 Seven Systems Cross-Platform Media Limited
© 2017 Seven Systems Cross-Platform Media Limited
iPhone and iPad are trademarks of Apple Inc., registered in the U.S. and other countries.
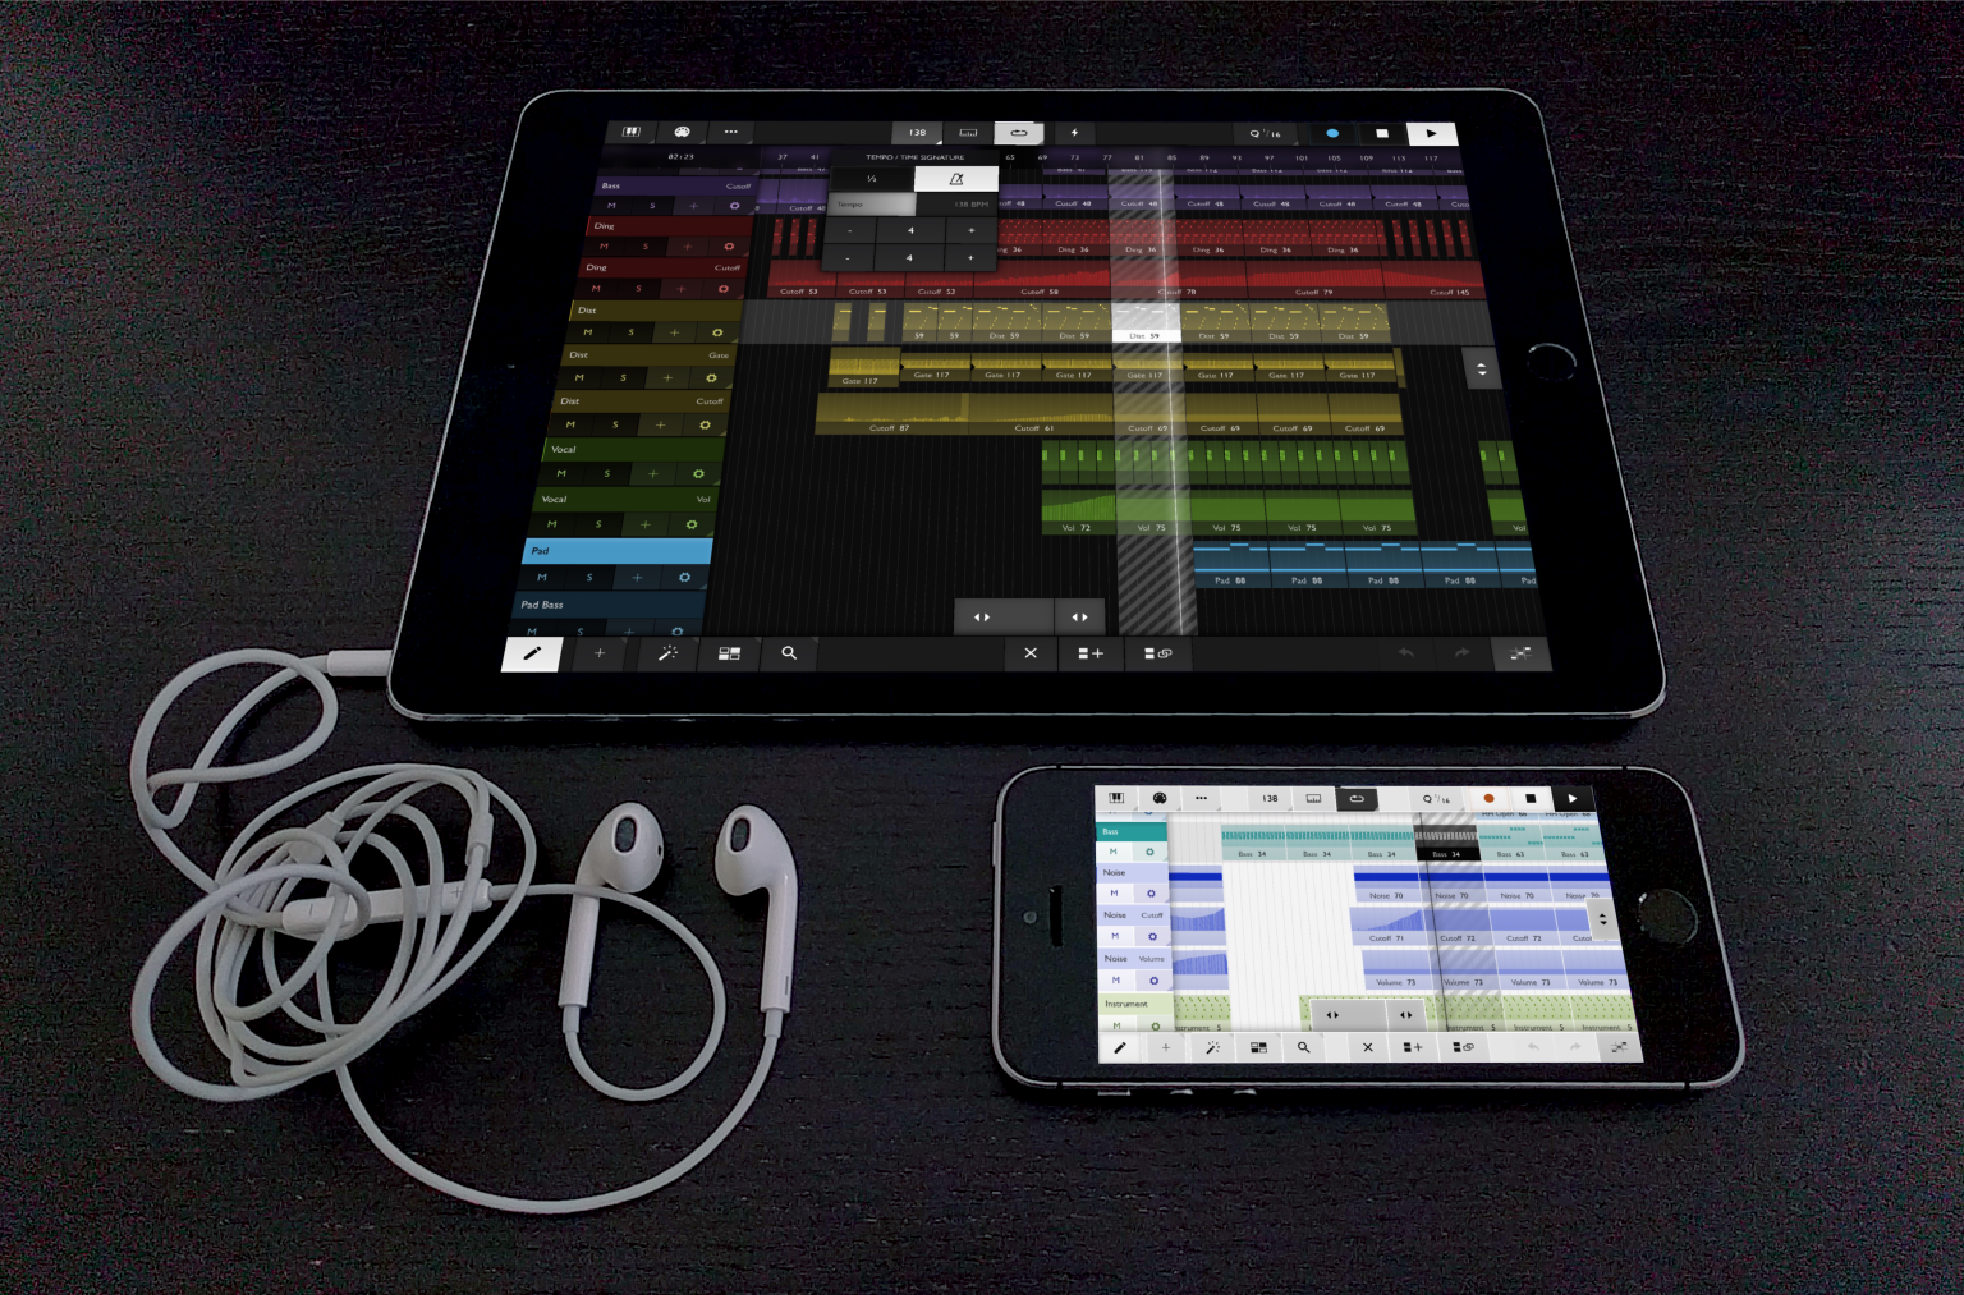
Xequence is a highly professional, fast & stable MIDI sequencer, arranger & controller for iPhone & iPad. It can be used to record, edit and arrange notes and controller movements, both using other apps that support Virtual MIDI / CoreMIDI (in effect, all of them), or external MIDI hardware like synthesizers, control surfaces etc.
It can also sync with other apps and devices using Ableton Link and can act as a MIDI Sync master, so that other apps or hardware can slave to Xequence, meaning that they run in perfect sync with it (they start when you press play in Xequence, they stop when you press stop, they move their song position if you move it in Xequence, etc.).
Xequence has full and rock-solid Audiobus support for all applicable Audiobus features.
This guide only gives you an overview over important concepts and features in the app so that you can use it effectively and to its full potential. It does not document all available features.
For the rest, Xequence contains extensive in-app "hints" that pop up whenever you touch a button or area for the first time.
The following diagram gives you an overview about how MIDI routing between MIDI Input apps / controllers, tracks, instruments, and MIDI-capable instrument apps / hardware works.
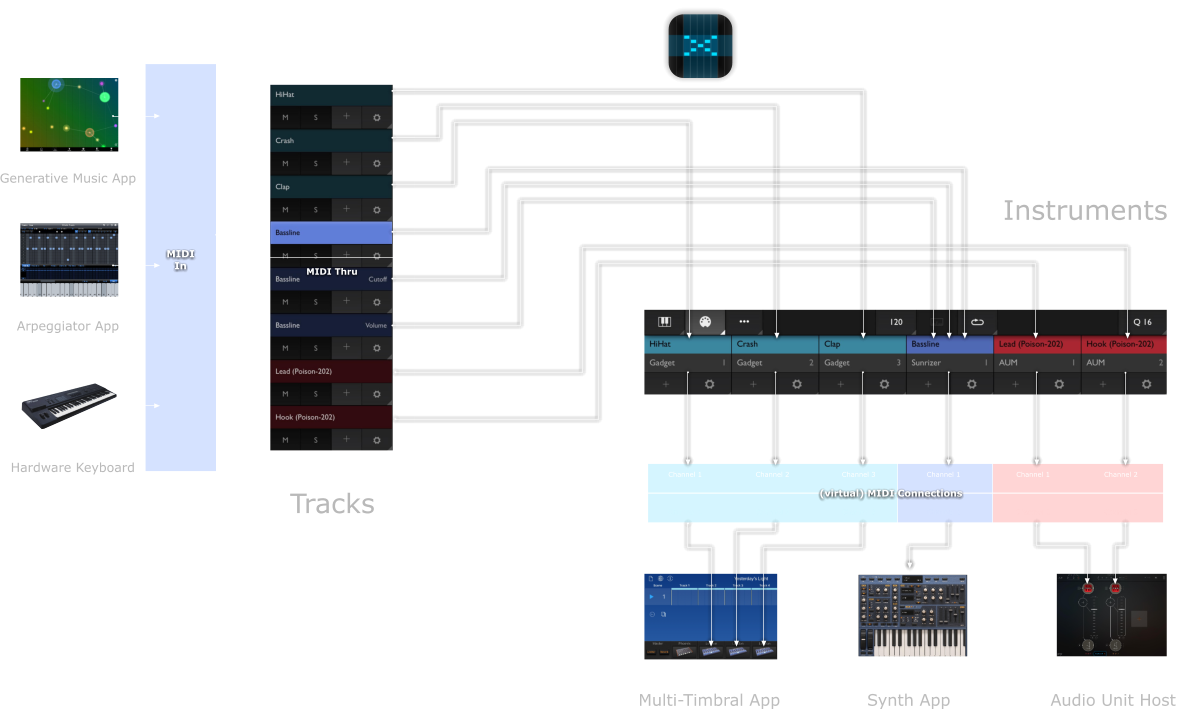
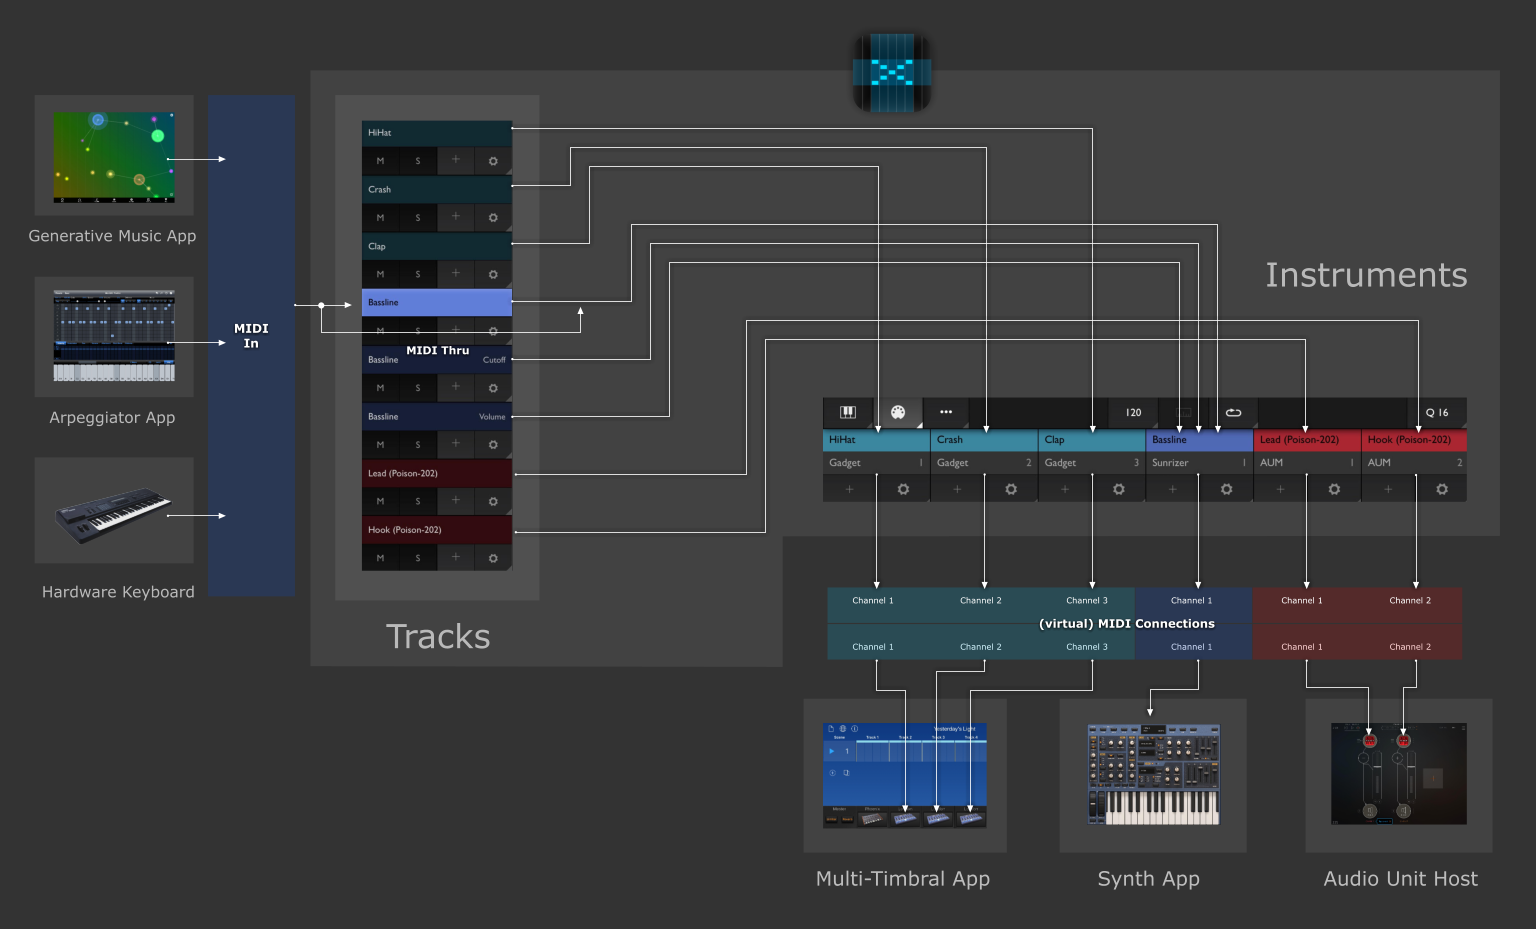
An instrument in Xequence represents a connection to something that actually produces sound, for example:
Any time you want to add a new sound (timbre) to your project, you would create a new instrument.
Instruments have the following main settings:
Here you can select the app (or MIDI output) whose sounds you want to use for this instrument. This is saved with the project and when you reload it, all connections will automatically and reliably be remade, either at load or when the corresponding app is launched.
If you use Audiobus, it appears as a destination here, too. See the separate "Audiobus" chapter for more information.
For multi-timbral synths (apps or hardware that can produce multiple different sounds at once), each sound is assigned one of 16 channels. Select the same channel in your synth and in this menu. If you only use one sound in the synth app or it doesn't support multiple sounds, just leave both at 1 or set the synth to Omni.
Another use case for channels is AUv3 hosts like AUM: As AUM only appears as a single app in Xequence, but can host multiple instruments, you would use channels to separately connect to them: In AUM, enable the "AUM Destination" MIDI Source for the plugin, and in "Channel Filter", enable just one of the channels, for example, 3. Then in Xequence, select AUM as the MIDI destination, and channel 3. This way, you can host up to 16 separate instruments in AUM and create corresponding instruments in Xequence.
For the Audiobus destination, the channel selector is replaced by a port selector for selecting one of Xequence's 16 Audiobus MIDI Outs.
Turn this on if (and only if) you want the timeline of an external DAW (for example, BeatMaker 2 — this is most useful if you want to use audio tracks in your project) or an external pattern sequencer / drum machine (for example, Ruismaker) to run in sync with Xequence.
Xequence sends the following sync information:
Note that if you want an external app to sync to Xequence, you have to create a "dummy" instrument for it (with the "Send Sync" option enabled) even if you do not use any of its sounds (if you do use some of its sounds, just turn "Send Sync" on in one of the instruments. Sync is not channelized, so if you use the same app for several instruments on different channels, if you turn on "Send Sync" for one of them, it will turn on for all of them.)
There are two modes:
Each instrument can have up to 3 controllers, also known as CCs (up to 12 via In-App Purchase). These can be used to modulate parameters like filter cutoff, pitch, etc. in apps or synths that support it (i.e., nearly all).
To switch to the next page of controllers, tap on the right arrow button.
As you will probably only use a very small subset of all available CCs for each instrument, you can set them up once here, and only those will be shown in the Keyboard and Controller editor views, so you don't have to scroll through a mile long list of all controllers (more than 100) each time. The little "Keyboard" button decides if the corresponding controller will be available on the Keyboard screen when tapping the "CC" button there.
Many apps use the same controllers for similar things (e.g., CC 74 for "Filter cutoff"), so we have included a selection of "standard" controllers in the menu which work with many apps. However, please check in your corresponding app or synth what CCs it uses for what parameter.
If the CC you want to control from Xequence is not included in the menu (say, you use a drum synth which uses CC 88 for the "Pan" knob of the HiHat), you can tap the "#" button and enter the controller number (in this case, 88) manually.
Each controller has further options:
If Xequence detects controllers during recording that are not yet configured on the target instrument of the track being recorded to, a dialog will appear offering to add those controllers automatically.
In Xequence, "colors belong to instruments", i.e., you can assign a color to each instrument, and that color will then be used for all user interface elements (tracks, pianoroll notes, keyboard keys, etc.) that affect that instrument.
For example, if you create an instrument for your bassline synth, and assign it the color "Blue":
This always gives you a sense of context.
The Arranger uses tracks to separate the parts (some call them clips or patterns) for the different instruments.
For each instrument you create, you need at least one track to contain the parts that have the notes and controllers that make up the song.
You can also create multiple tracks for the same instrument. This is very useful if you want to record both notes and controllers, as this way, you can keep them neatly separated: create one track for the notes, then create another track below it (the "+" button) for the first controller, another one for the second, etc.
Note: You can record both notes and controllers on the same track into the same parts and then switch between them in the Pianoroll / Controller editor, but this is not recommended as it is much easier to work with separate tracks.
The "M" button mutes a track, i.e., its events won't be played back anymore. If the "S" button is active on one or more tracks, those tracks are soloed: only events on those tracks will be played back.
We designed the Arranger so that you can only scroll vertically by swiping in the editor area on the right, not on the tracklist. This is on purpose: We wanted the "M" and "S" buttons to react instantly when tapped, however, in order to detect if a touch is meant to be a swipe (scroll) or a tap, Xequence would first have to wait until the finger is lifted or moved.
The editing area to the right of the tracklist contains your arrangement, i.e. all the parts (also called patterns or clips) that make up the complete song. It is played from left to right.
There are two modes for selecting parts, using either tap or rectangle selection:
Any number of program changes (instruction to another synth which preset to use) can be inserted per track. Xequence also has robust support for Bank Select.
To insert a program change:
To edit an already existing program change, just double-tap it as you would a regular part, or with the program change selected, tap the bottom-right "Edit" button.
Program changes use backtracing just like controllers, i.e. when the song position changes, Xequence automatically searches for the nearest previous program change and sends it to the instrument.
Xequence's keyboard controller is very versatile and offers a highly configurable, scale-aware keyboard with over 70 included scales selectable from almost a dozen categories (a chromatic scale (all notes) and "normal" mode with black keys are also included). It can be either single or dual and can be "velocity sensitive" (tap a key's bottom for full velocity, or the top for nearly no velocity). Two velocity curves are available on the Settings screen. The key size is freely adjustable using the "Width" slider.
The keyboard always controls the instrument of the currently selected Arranger track, or, if launched while in the Pianoroll / Controller editor, the instrument of the track whose part is being edited.
In music theory, scales are selections of notes that work well together and give off a certain "mood".
A full octave contains 12 semitones. Most scales, like the Major or Minor scales, contain only 7 of those, which work well together. There's also scales with less notes, like the Pentatonic scales, which contain only 5 notes.
There's 2 special options in the Scales menu:
Xequence has sophisticated support for fully customizable drum pads and editing. You can try all editing features for free; however, to actually play the drum pads, a one-time In-App Purchase is required (the AUv3 plugin does of course not have this requirement and comes with everything included). Please see the dedicated "Drum Maps" chapter for more details.
We also include a large selection of factory drum maps for all kinds of apps and gear so you can start drumming right away.
Alternatively, if you would like to use and edit drums without drum maps, use the Chromatic scale, as it contains all notes and you're guaranteed not to "miss" any drum sounds your destination instrument / app might play on some note.
Two toggles in the bottom toolbar of the keyboard screen control the scrolling / gliding behavior of the keys:
All controllers of the current instrument that have the "Keyboard" toggle enabled can be shown to the left by tapping the "CC" button.
On iPad, you can choose to either display them vertically stacked (uses less screen space and you can "twitch" them more easily), or next to each other (the "|||" button). Choose whichever mode is more usable in your situation. This setting is saved per instrument.
To move a controller, just touch it and then slide up or down (it will start from the current value, not the value where you first touched it). You can reset a controller to zero by double-tapping it. Controllers that have the "Return" option enabled will return to zero once you lift your finger.
Xequence offers a palette of advanced ways to use controllers while playing live, outlined below.
All controllers can also be moved by rotating your device. Enable this option by tapping on the menu button above the slider, and then tap the "Landscape Phone" icon.
The first controller will be moved by rotating your device towards or away from you. If you enable Motion Control for more than one controller, the next axis that will be used is the "around the device itself" axis, and the next one would be the "tilt the device around its vertical center line" (if that makes any sense!).
A controller can also act like a button and thus be "played" like a keyboard key. Enable this mode by tapping the menu button above the slider, and then the "Pulse" icon.
In this mode, when tapping the slider anywhere, the controller will immediately jump to the value at that position (for example, if you tap it right at the top, it will jump to 127), and when you release your finger, it will jump back to the position it was at before activating Gate mode.
There's at least two use cases for this mode:
Note that when recording in this mode, controller data is quantized according to the "Q" setting at the top (including the "Ends" toggle there), just like keyboard keys. Of course, you can turn "Q" to "Off" if you do not want quantization in this mode.
In this mode, touching a key will set the corresponding controller depending on the vertical position where you touched the key (or keys). This is done before playing the actual note, so the target synth has time to adjust the controller's value before playing the sound. This mode is very useful for synths that do not support mapping velocity to controllers, etc.
In this mode, the controller can be moved by sliding your finger up and down on a key (or keys) after touching the key.
This mode combines the previously mentioned two modes.
Currently, if you record controller movements live, existing controller data on the track / in parts is not automatically erased, but only new events are added instead. So, if you want to "overwrite" controller data you recorded previously, it is best to delete the corresponding parts (or events, if you record into the Controller Editor) first.
We plan to add a "Replace" recording mode in the future, which will automatically erase existing controller data as soon as you touch the controller slider or enable motion control.
Xequence automatically finds the nearest previous controller event in the part that is at the current song position, and uses that for displaying the slider and also sends it via MIDI. So, no matter what, when you set the song position, you will always get correct controller values (event chasing only works inside parts for now, so if there is no part at the current song position, the controller value won't change.).
Xequence has a sophisticated drum map and editing system:
To switch into drums mode, select a track with an instrument that is assigned to a drum synth, go to the Keyboard screen, tap the keyboard selector button in the lower left corner (it will either show a single or dual keyboard icon), and in the dropdown menu, select the top option (drum map icon).
Xequence will load the "General MIDI" map by default, which contains the 47 standard GM drums including their names and notes.
You can configure any map layout from 1x1 (a single large drum pad) to 8x8 (64 pads) and anything in between by tapping the number buttons on the right hand side of the bottom toolbar.
When you resize a map that already has drum pads assigned and the new map size is smaller than the previous one, Xequence will try to keep the visual layout and shrink the map size horizontally so that the existing pads stay centered, and vertically so that bottom pads stay at the bottom.
If this is not possible, there can be two scenarios: If in theory, the existing pads would be able to fit the new size (say, you have 35 drum pads and you select 6x6), but not with the current visual layout, then Xequence will offer you to automatically compact the map so that all drum pads still exist, but without their previous layout. Otherwise, say if you have 30 pads assigned, but the new map size is 3x3, then Xequence will ask to discard those drum pads that cannot fit in the new size.
If you select a larger size, then existing pads will stay centered at the bottom, and new grid cells will be added at the top and/or to the left/right.
To start editing a map, activate Edit mode by tapping the "Edit" toggle at the bottom.
You can then:
This menu offers various features that affect the entire drum map:
Xequence comes with a selection of preset drum maps that have the corresponding notes, labels and layout for various popular drum machines or synths.
Tap the "Maps" button in the lower left corner to choose a preset.
You can also save your own presets, which will be available in all Xequence projects. Just take an existing drum map, edit it as desired, and then tap "Save" in the Maps menu (you will be prompted for a name). You can also delete saved maps, and filter the list of maps.
To rename a map, just "Save" it under a new name, and then delete the old map.
Drum maps are stored in Xequence's Documents folder in the "Drum Maps" subfolder. They have the extension ".xeqdrums". These can easily be copied between your various devices using the iOS Files app and will be automatically detected and added to the "Maps" menu by Xequence.
Note: This currently does not apply to the AUv3 plugin, where user drum maps are currently not accessible externally. We're working on that!
Double-tap a part to open up the Pianoroll editor.
This editor lets you draw or edit notes (move, change lengths, transpose, etc.), their velocities (loudness), and controllers (CCs). Selecting and navigating around the view works the same as in the Arranger.
When you're done editing, just tap the checkmark button at the bottom right to exit the editor.
The editing grid can be changed by tapping on the button with the grid icon in the bottom toolbar. When moving notes or changing their length, movement will be constrained to this grid (for example, if it is set to "16", notes will move by 16th notes, and the length of notes will change in increments of 16th notes).
The "Rel" (relative) toggle changes how notes snap to the grid: normally, Xequence will make sure that all notes always stay on the selected grid no matter what. However, in "Rel" mode, notes will actually move in grid size increments, but not necessarily snap to the grid. So, for example, if you have a note that starts one 16th note away from the beginning of the part, and you have the grid set to "4", if you now move the note one increment to the right, it will actually end up one quarter note plus one 16th note from the beginning, not one quarter note.
Tap the "note" button at the bottom left. A menu will pop up that shows all data types that can be edited:
The global clipboard can be accessed by tapping the "+" button at the bottom left to open the Clipboard and Insert menu.
This clipboard works inside the same part, across parts or even across projects so you can copy and paste notes or controller data from one project into another.
The following options are available:
When editing a part, only those notes (and "mini keyboard" keys) which are part of the instrument's scale are shown (for drum instruments, the equivalent applies). If you switch to another scale / drum map after already having recorded or drawn notes and the new scale / map doesn't contain all of the pitches of the existing notes, a warning dialog ("Wrong scale") will pop up, offering you to disable the scale (or you can switch to a different scale that does contain all used pitches).
You can of course use different keys or scales throughout the song, as the scale and key are merely an "input mode" in the keyboard screen. However, you may encounter the aforementioned "Wrong scale" warning when opening the Pianoroll editor and some of the pitches in the edited part are not contained in the scale that is currently selected in the instrument (the scale selected in the keyboard screen is remembered per instrument).
To avoid having to switch scales and keys all the time for editing, you can just create one instrument per scale / key, and set each of them to the same MIDI destination and channel, but choose different scales / keys in the keyboard screen. For each scale / key you want to use throughout the song, also create a track and assign it to the matching instrument, and then just make sure to use the correct track for each scale / key. You can also name the instruments or tracks accordingly (for example, "Bass E Maj" and "Bass D Maj") so that you see at a glance which track to use for recording.
When transposing selected notes using the vertical handle, transposition is always scalar, i.e. all recorded notes always stay inside the current instrument's scale. For example, when you transpose one step upwards, one note might get transposed 1 semitone, while another might get transposed by 2, always ensuring that all transposed notes are still part of the scale.
If the instrument played by the part being edited is in "Drum map" mode, the corresponding drum names will be shown on the left instead of the note names.
PolyHymnia is an advanced generative music module. It can create complex melodies and chord progressions automatically using tweakable algorithms.
The results are mostly very musical, and PolyHymnia includes several "Auto-Generate Settings" features that will produce interesting results even if you don't want to learn the individual settings and options it offers yet.
All settings can be changed live while playing and are saved in the corresponding part, so you can always come back later and tweak the algorithm you used to create a part's notes.
Note: PolyHymnia comes free with Xequence so you can try all its settings and features. However, the generated sequences are only available while PolyHymnia is open. If you would like to use and edit PolyHymnia's results further, please get the one-time In-App Purchase.
Note: It is best to set a scale on the instrument you will be using for PolyHymnia so that generated pitches are more predictable and "go along" nicely. For a start, a Hexatonic or even Pentatonic scale will work best (choose the scale as you normally would, in the Keyboard screen).
You can find PolyHymnia in the Pianoroll editor. Just create an empty part by using Draw mode (a length of 4 bars is a good start), and tap the edit button in the lower right corner to open the pianoroll editor.
Next, tap the "+" button in the lower left corner, and choose "PolyHymnia".
You will now see a sequence of notes generated using the default settings (which are actually quite boring). Note that PolyHymnia by default replaces the currently selected notes, and keeps doing that each time you change one of its settings, so you can keep tweaking and have the contents of the part update automatically. If you would instead like to add another set of notes without overwriting the existing ones, just deselect all notes before changing settings or tapping "Add / Update".
The first thing you'll want to do is set a reasonable pitch range. To do that, go to the "Pitch" tab, enable "Sync to view" if not yet enabled, and then pinch and scroll the pianoroll (while keeping PolyHymnia open) so that the colored area roughly covers 2 octaves in a useful pitch range.
This tab contains the most often used options and actions, so we will discuss this first:
PolyHymnia uses advanced mathematical algorithms to generate musical sequences. The algorithms and parameters available are basically the same for all four properties, and they can be edited separately in the corresponding tabs.
Each tab consists of basically three sections:
Each operator has four or more settings:
The current output value (at the current song position) of each operator is visualized by a LED next to it. Negative values are shown in inverted color.
Likewise, the summed output value of all operators of the current tab is visualized by a LED below the "Offset" slider, and also at the top of its respective tab button.
The "Pitch" tab is special because it offers an interactive way to set the range of generated notes (pitches).
As soon as you open PolyHymnia, you will see a colored area in the Pianoroll editor. This area shows the range of pitches that PolyHymnia can generate. If you enable "Sync to view" and then zoom in and out vertically by pinching in the editor (or just scroll vertically), you can adjust this range freely. The center key will have a little arrow on it.
The most interesting results can be achieved by having the root note of the current scale either at the bottom, top or at the center of the selected pitch range.
This tab controls the lengths of the generated notes. You can select a minimum and maximum length at the top, which will be mapped to the values generated by the operators.
This tab controls the distance (pauses) between generated notes. Sequences generated by PolyHymnia never overlap. If you don't want pauses between notes at all, just set both "Min" and "Max" to "Off".
Regardless of the settings in the "Length" and "Distance" tabs, PolyHymnia always quantizes all generated notes to the editing grid (set in the bottom toolbar of the pianoroll editor).
This tab controls the velocities of the generated notes. The values generated by the operators are mapped to the velocity range set by the "Min" and "Max" sliders at the top. If you do not want any velocity variation at all, just set both sliders to the same value (double-tapping a slider will set it to the default velocity configured in settings).
All settings are saved into the corresponding part once you leave the pianoroll editor. That means that you can come back at any later point and re-open a part that contains a PolyHymnia sequence, and when opening PolyHymnia, all settings will be where you left them. Note though that if you manually edit notes after closing, PolyHymnia will not be able to recognize the existing notes as a sequence it generated, and thus will add a new sequence on top once you open it. To avoid that, select all notes before opening PolyHymnia, as it always replaces the current selection.
Xequence comes with a demo project that contains various interesting melodies created with PolyHymnia, along with their settings so you can tweak them further.
Tap on the "..." button at the top left, navigate to the "Demos" folder, and then load the "PolyHymnia Demos" project. Each track contains a part generated with PolyHymnia. You can assign a sound source on the instruments screen, and then just solo each track in succession to hear the corresponding sequence.
To edit and tweak, just double-tap a part, open PolyHymnia, and start modifying settings.
Xequence has a very flexible Metronome with two basic modes:
Xequence always uses the root key of the current instrument for playing the metronome (if the instrument is in E, it will play E4 for bars and E3 for beats).
The slider sets the project tempo in BPM. The "½" toggle can be used to temporarily set the tempo to half the displayed value, which can be very useful during recording in fast (e.g., EDM) music.
The next two dials set the time signature (upper dial 3, lower dial 4 = 3/4). All time signatures should work, but if you find a problem using a particular one, please let us know.
Press the Record button to start live recording. This will record:
Recorded notes will be quantized automatically according to the settings in the "Q" menu in the top toolbar (you can choose the "Off" option if you do not want quantization, or if you want to quantize manually later).
Recorded controllers will not be quantized, except if the controller is in "Gate" mode. You can always quantize controllers after recording them by using the "Magic Wand" menu in the Controller editor.
If you start recording while in the Arranger, or in the Keyboard screen and you previously had the Arranger open, then a new part will be created on the currently selected track, and all events will be recorded into it. The part will be automatically trimmed, or deleted on stop if no events were recorded.
If you start recording while editing a part in the Pianoroll editor or had the Pianoroll editor open before switching to the Keyboard, then everything will be recorded into the currently open part. No new part will be created.
Normally, Xequence will merge all MIDI from all sources onto the current track. However, it is also possible to record from multiple sources simultaneously onto separate tracks (requires a one-time In-App Purchase). Please see the "Multitrack Recording" chapter for more details.
If you press Record while Xequence is stopped, the song position will be moved backwards by one or more bars (configurable in the Settings screen) so you have time to prepare. Any events (notes, controller movements) that arrive while in count-in will only be recorded if you are recording into the Arranger. If you're recording into the Pianoroll, events during count-in will be dropped.
If you enable the "Always during Count-In" option in the "Metronome" section under "MIDI / Recording" in Settings, then the metronome will automatically be enabled during count-in so that you can "get into the rhythm" even if there isn't anything recorded yet to guide you.
Xequence has advanced, fully automatic multi-track MIDI recording available as an optional In-App Purchase. If you are interested in this functionality, please go to the Settings screen by tapping "..." in the top left, then in the "Shop" tab, tap on "Multitrack Recording".
Important: Multitrack recording is only available on the Arranger screen, not in the pianoroll or controller editors!
To enable, tap the "Two arrows" icon in the top right corner. Also, be sure to enable all MIDI sources that you would like to record from. Go into Settings ("..." at the top left), and then in the "MIDI / Recording" tab, tap on "Sources" and enable all desired sources.
For multitrack recording, it is good practice to configure your source apps (or hardware MIDI ports) to present themselves as a MIDI source rather than having them send to "Xequence Destination". This is to ensure that Xequence can see them all separately including their names, which is helpful in auto-naming recorded parts (see below), and to avoid having to use separate channels.
You can see that you configured your sources correctly if they appear as separate, named buttons in the "Sources" panel, and the MIDI In LED flashes even if "Xequence Destination" is disabled in the "Sources" panel.
Multitrack recording in Xequence is fully automatic and "just works".
After enabling the multitrack recording toggle, just hit the Record button and send MIDI from multiple sources.
You should see Xequence automatically add a new track for each combination of a source and MIDI channel as soon as data from the various sources arrives, including live previews of the recorded data.
The newly created tracks remember their source and channel, and on the next recording, the tracks will be re-used (no redundant tracks will be created). The track settings (target instrument, swing, etc.) are copied from the currently selected track and can be changed as desired after recording.
The parts that are created during multitrack recording are automatically named according to the source and channel. You can remove or change the name by selecting them, tapping on the "Magic Wand" menu, then on "Name", and then just leave the name empty and tap "OK".
Note: tracks that are automatically created during multitrack recording have an explicit recording source set (see below). These tracks will always be "armed" for recording, even while they're not selected.
For multitrack recording to work with Audiobus inputs, a separate MIDI lane must be created in Audiobus for each input (source) you would like to record. Each lane must contain your corresponding source app (and appropriate sub-output, if any) as its input, and Xequence with a separate MIDI In selected as its output.
Although Xequence adds and configures the sources of tracks as needed automatically during recording, you can also configure sources manually:
Note that any track that has a multitrack recording source selected will always be "armed" for recording, even when it is not the selected track. This is different to single-track recording, where only the selected track records.
The Song Loop feature can be used to play a certain part of the arrangement over and over again. As soon as the loop's endpoint is reached, tt simply rewinds the song position to the loop's beginning. The looping is "perfect", i.e., no timing offset or jitter when wrapping around.
The loop can be set in various ways:
Please read this section carefully, as it is central to the way arranging in Xequence works:
All parts in the arrangement show a number on them, which is like a "group number" in that all linked parts show the same number. This lets you easily see at a glance which parts are linked to others.
Also, whenever you open a linked part in the Editor, a brief message "xx linked" will pop up, informing you of the fact that the edits you're about to do will affect several other parts as well.
If you have several parts selected that share the same data (for example, three parts with number 77), and you use the "Copy" (not "Copy and link") button, then the new parts will be independent of the originals, however, they do still maintain their "linkedness" between each other. So, the three copied parts might then, for example, all have the number 78.
If you would like all of the copies be independent of all the others, see below.
If you later on decide that you do want to independently edit a linked part, you can select it and then choose "Unlink" from the "Magic Wand" menu. This will make all selected parts independent of all the others. For example, if you have three parts selected that all have the number 152, after using "Unlink", they might have the numbers 153, 154 and 155, so they are all independent.
The global clipboard can be accessed by tapping the "+" button at the bottom left to open the Clipboard and Insert menu.
This clipboard works even across projects so you can copy and paste parts from one project into another.
The following options are available:
Parts in Xequence each have an invisible "Loop" switch which can be turned on or off for one or more parts by selecting them and then choosing "Loop on" or "Loop off" from the "Magic Wand" menu.
When a part's "Loop" switch is on:
Looping parts is a very powerful feature, for example:
As mentioned, looped parts stop looping when they hit another part on the same track. So, if your hihat line is supposed to end at some point, just draw a short empty part there, and you're done (see the red part in the image).
If you decide you want to make changes to the repeated parts (delete some of them, move them, or edit the notes only in some of the parts), then you can use "Convert loops to parts". This will convert the loop into actual (but still linked to the original) copies. You can now move them around, delete some of them, etc.
Note, however, that these parts are still linked to the original, so editing the notes inside them will modify all converted parts and the original. If you want to change the data of only one single part of them, select it and then choose "Unlink" from the "Magic Wand" menu, which will make it a truly independent copy (it will also get assigned a new number, visible on the part).
Xequence can receive MIDI data from other apps or hardware keyboards / controllers. This means that you can, for example:
For this to work, you would first need to enable MIDI Out in the other app, and, depending on the app, choose Xequence Destination as the destination for MIDI Output. You might also need to enable "Background audio", again depending on the app, so that it stays active in the background when you switch back to Xequence. If you use a class-compliant external keyboard or controller, it also depends on the particular device, but many work out of the box.
In Xequence, go to the Settings screen ("..." at the top left), and in "MIDI / Recording", enable "MIDI In". Then tap on "Sources", and enable "Xequence Destination" if not yet enabled.
Now try sending notes or controllers from the other app or device. The "MIDI In" button should flash when you press keys or move controllers in the other app or device. You can also try to record notes or controllers into the Arrangement or Pianoroll, and check if they have been recorded correctly.
If you don't get any blinking or notes / controllers being recorded, try selecting the MIDI Source explicitly:
Some apps or devices need a different approach and you have to enable them explicitly as inputs in Xequence.
To do that, go to the Settings screen again, and tap on "Sources". In the popup, your other app or device should have a button (which is deactivated). Activate it, and now again try sending notes from the other app or device and see if the MIDI In button blinks and events get recorded.
If this doesn't work either or your other app or device doesn't appear in the "Select MIDI sources" popup, please drop us a mail so we can investigate further!
Xequence can also record controller (knob, etc.) movements from external apps or devices. Controllers whose CC number has not yet been set up on the instrument of the track being recorded to will be added automatically to the instrument if "Auto-add controllers" is enabled on the Settings screen.
If that doesn't make any sense just yet, read on:
The screenshot shows an instrument that has controllers (CCs) 74 and 7 set up. As far as Xequence is concerned, only those controllers exist which are actually set up in an instrument. However, as long as "Auto-add controllers" is enabled on the Settings screen, Xequence will detect each new incoming controller that has not yet been set up on the instrument of the track being recorded to, and add it automatically.
A list of all newly detected controllers will be shown after recording finishes.
If you disable "Auto-add controllers", then "unknown" incoming controller data will simply be discarded.
MIDI Thru is a feature that lets you use Xequence as a central "hub" for your MIDI setup.
If you enable MIDI Thru, all MIDI notes and controllers that are received by Xequence are immediately forwarded to the instrument on the selected track, and thusly, to the MIDI destination configured in that instrument.
This means that if you setup your MIDI source (hardware MIDI keyboard, Arpeggiator app, etc.) to only send MIDI to Xequence and not to the actual synth apps or external synths, while enabling MIDI Thru in Xequence, you will never have to change any MIDI connection again, because your keyboard, Arpeggiator etc. will always automatically play the instrument on Xequence's selected track.
Needless to say, Xequence will of course also record the notes received as well.
So, to recap:
Now, your external keyboard or app acts as the "Master controller" for all of the other synths/instruments configured in Xequence. Select a different track, and your keyboard plays that track's instrument. Boom!
Xequence can import and export standard MIDI files (.mid), including notes, controllers, track names, program changes and information like BPM and time signature.
To import a MIDI file:
You can change various options for the import:
When you tap "Import", Xequence loads the MIDI file as a new project (it does not append it to the currently open song). This way, you can first clean up the imported data as necessary, and then use Xequence's Global Clipboard (described earlier in this manual) to copy and paste any number of parts from any number of tracks into another project, as desired.
Note that the MIDI file format does not support splitting the data into parts, so most of the time, you will end up with one long part per track after import. Xequence tries its best to trim the created parts at the beginning and end and also split it according to "Markers" potentially stored in the MIDI file. However, some manual cleanup will be required.
The currently open project can be exported as a MIDI file. For each of the project's instruments, one MIDI file track will be created. Only instruments which actually get used in the project (i.e., which have corresponding tracks with events on them) will be exported.
The following options are available when exporting:
After export, the file will be placed in Xequence's "Documents" (in the subfolder you exported it to) and can be accessed through the iOS Files app for use in other apps.
Important notice: Please note that Xequence only exports separate tracks per instrument and not per arranger track! So if you have multiple arranger tracks pointing to the same instrument, they will be merged to a single track in the MIDI file! This is a common pitfall especially after doing a Multitrack Recording, where immediately after the recording, all automatically added tracks will initially point to the same instrument.
So for each arranger track that you want to be exported to a separate track in the MIDI file, please make sure that it points to its own separate instrument.
Xequence supports full integration with Audiobus including:
To use Xequence along with Audiobus:
To use a Xequence instrument with your newly created Audiobus MIDI lane:
You can now set up an arranger track and point it to your Audiobus instrument, and use it like any other MIDI instrument.
Xequence will also display the name(s) of the destination app(s) connected to the instrument's Audiobus MIDI lane, so you can immediately see on Xequence's instruments screen (and in the arranger!) what you are sending to. Of course, you can still assign your own instrument and/or track names, if desired.
Some apps, for example apeMatrix, are Audiobus-capable and can host multiple other apps, but only expose a single Audiobus MIDI input port. As Audiobus does not use MIDI channels, it might seem impossible to use more than one sound / destination app through such an app through Audiobus (Xequence -> Audiobus -> apeMatrix -> [Multiple Hosted Apps].
However, this is very easy to do by just routing the MIDI directly to the multi-timbral app, bypassing Audiobus:
The Audiobus sidebar can be used to switch quickly between all connected apps. It also exposes transport controls (Play, Stop, Rewind, Record, etc.) for all apps that support them (Xequence included).
To show or hide controls for a particular app, tap its icon.
Xequence is the first Audiobus-enabled app that can automatically detect the sidebar and move its own control widgets / handles out of the way if necessary.
Xequence has full support for Audiobus Presets. When saving a preset in Audiobus, the entire current state of the Xequence project, including its filename and any changes made since the last save, is stored.
You can thus share your entire setup and Xequence project easily via Audiobus. There's no additional setup or steps required. The device on which the preset is opened does not even need access to the project file.
Note: Should you encounter a situation where loading an Audiobus preset does not restore the corresponding Xequence project correctly (nothing seems to happen in Xequence), please just try loading the preset again. If this doesn't help, please send us the preset and we will take a look at it and if the problem is in Xequence, fix it in an update.
Xequence can be loaded into the destination / receiver slot (on the right / bottom side) of up to 8 Audiobus MIDI lanes as well, thus receiving any MIDI data that might be sent / filtered by other apps on those lanes.
To receive MIDI from an Audiobus MIDI lane:
Any MIDI data arriving via an Audiobus MIDI lane should now be recognized by Xequence in the usual manner, including the ability to record it. Of course, if MIDI Thru is enabled, Xequence will also pass along this data to the target instrument of the currently selected track.
If any of the other sources in the "Sources" panel is also enabled, Xequence will merge all events automatically.
Xequence supports full synchronisation with all other Audiobus-enabled apps. This should normally work automatically without you doing anything special.
Should this not work as expected, try the following:
You can access and manage all of Xequence's files with the Files app from your home screen.
After launching the Files app, tap on "On My iPhone" or "On My iPad", and then on "Xequence". You can freely move, copy and rename files / projects locally or between your devices.
Xequence includes a Demo project with the fitting name "Alpha" (we actually used it during alpha testing!) which you can load from the "Project" tab in the Settings screen ("..." at the top left) so that you can quickly get a feel for the possibilities and handling in Xequence.
Of course, if you hit play, you won't hear anything or not what we intended, as Xequence doesn't have built-in synths.
However, the entire project was produced using sounds from Korg Gadget, and we have put the corresponding Gadget project online, which you can download, load into Gadget, and then actually fully work with the demo project.
The Gadget project is at:
http://seven.systems/xequence/downloads/KorgGadgetDemoProject.zip
Unfortunately, this is slightly complicated, however, it works!
You should now actually hear the project as it was intended to sound.
Note: The Gadget project uses some synths which are In-App Purchases, so if you haven't bought those, you might have a few drums / sounds missing.
Let's say you want to use three instruments from Gadget in Xequence, on three separate tracks:
Let's say you want to use three separate instances of Poison-202 in AUM, on three separate tracks:
This will let you use StepPolyArp to play and record any Xequence instrument, including recording the arpeggiated notes:
You can now go back to StepPolyArp, and whichever track is currently selected in Xequence, that track's instrument will automatically be played by StepPolyArp, and its notes recorded, if you tap the Record button.
The above combination is very useful to get a complete, integrated control, composition, arrangement & mixing environment:
To set this up, we recommend the following steps:
To save your project, all you need to do is tap the folder icon in the bottom right corner of Audiobus, and then save a new Preset.
Everything is saved into this single preset: All Audiobus settings, the entire Xequence project, all connections between the apps, and the complete AUM setup! This can then even be shared easily using cloud services, and restores on any other device with a single tap. No saving is required neither in AUM nor Xequence: the Audiobus preset contains all necessary data.
You can also use Xequence's MIDI sync feature to have StepPolyArp automatically play in time with Xequence when you press keys in StepPolyArp, so that recordings are always in perfect sync.
To do that:
StepPolyArp will now acquire the BPM and relative song position from Xequence whenever you hit play, and play in sync with it.
Xequence sends its MIDI data in advance with so-called timestamps which are accurate to a few nanoseconds. However, many apps that receive MIDI (synths, hosts, etc.) do not utilize these timestamps or discard them. Instead, they try to receive MIDI events in real time, which is less accurate, especially under high system load.
If you notice this problem with an app, please contact the app developer and tell them to listen for incoming MIDI events in advance and use their timestamps to insert the generated audio with sample-accuracy. They're also welcome to contact us directly in order to get further help in implementing these changes.
MIDI files exported by Xequence contain one track per instrument, not per arranger track! So if you have multiple arranger tracks that point to the same instrument, these will be exported to a single track in the MIDI file.
To solve this problem, just create one separate instrument per track you want to export separately, and assign the corresponding tracks to their respective instruments.
There is no marker track per-se, but it is quite easy to get very similar functionality:
You now have a labelled overview of the different sections of your song.
You can also loop any of your sections by tapping the corresponding "marker part" and then tapping on the "Loop" menu and then on "Selection".
Yes. However, to give your receiving synths more time to switch to the corresponding preset, you can "pull" the program changes backwards in order to send them early enough:
If you moved parts on top of one another or recorded a new part on top of others, there's several easy ways to untangle them:
Just open the part by double-tapping it, then start recording. While the Pianoroll or Controller Editor is open, Xequence will record into that part without creating a new one.
As Xequence does not generate the audio itself (it is generated by the apps that are controlled by Xequence through MIDI), it is not possible to mixdown directly in Xequence.
However, it is quite easy to do a mixdown if you host all your sound generators in an app that can record its master channel.
For example, if you use AUM to host your instruments, you can just arm recording on your master channel, and then tap "Play" in Xequence, and wait until the song has played completely.
Back in AUM, you can then find the recorded file under "Recordings" in its "Files" section in the menu, crop it, and you have the mixdown ready.
Transport or other remote control is currently not available. However, you can control Xequence via the Audiobus sidebar while Xequence is loaded in an Audiobus MIDI lane, and by extension via the Audiobus Remote app. Also, Xequence is compatible with Ableton Link.
To enable Glissando / Glide, just tap on the "knotted arrows" toggle in the bottom toolbar on the keyboard screen. Note that this mode is currently only available if a scale is selected. When you are in "Black keys" mode, Glissando / Glide is disabled (this may be improved in a future update).
Xequence has a MIDI timing resolution of 192 PPQ.
Not directly, but you can use a tool like MIDIFlow to re-map the different notes from a drum map to different MIDI destinations. Select MIDIFlow (or another app that can process MIDI) as the MIDI destination for your drum instrument, and then configure your MIDI processor to route the MIDI to different destinations depending on note or note range.
It actually works the other way around: For each synth app or other destination that you would like to use in Xequence, you create an instrument on the Instruments screen (the MIDI button at the top left).
Then tap on the instrument's cogwheel, and on "Select MIDI Destination" (or if the instrument already has another MIDI destination assigned, tap on that). Your target app should then be listed there for selection. Just tap it.
If your target app isn't listed in the menu, make sure that the app stays active in the background. Many apps have a "Background audio" or similar toggle which enables this behavior.
If this doesn't help either, then the target app has an incomplete MIDI implementation and is unfortunately not compatible with Xequence (or any other app that looks for MIDI destinations). Please let us know about such an app so we can contact the developer and help them to correct this problem.
Xequence can currently only be the master, i.e. send MIDI sync (clock, SPP, start, stop, continue) to other devices / apps.
However, if you don't need absolute song position synchronization, then you can use Ableton Link sync to get phase and tempo synchronization by enabling Ableton Link in Xequence and all other apps you would like to use.
Parts imported from MIDI files often are very long and contain a lot of notes / controllers in a single place, because Xequence has no way of knowing how to structure the imported data. When editing such a part, Xequence has to process a lot of data at once and this may result in slowness or even crashes.
To avoid this problem, please split very long parts into smaller pieces before editing. To do that, just place the song position pointer at a spot where a split would make sense, select one or several parts that should be split there, then from the "Magic Wand" menu, select "Split". Repeat this until you have chopped up the data into small enough parts that can be easily edited.
Some MIDI files also contain markers, which Xequence can use to automatically split imported parts. To enable this, enable "Split by markers" in the MIDI import settings.
On the keyboard screen, tap on the current scale's name (for example, "A Minor") to open the scales menu, and then select "Black keys".
Note that the ramp feature uses the current grid setting to define the ramp's resolution. For the highest possible resolution, set the grid to "Off" before using the ramp feature.