Your route to the perfect master
This is a detailed step-by-step guide on how to use Trinity, from loading your raw audio file, optionally loading a reference track, adjusting the EQs, levels, dynamics and stereo width, all the way to exporting the final master for distribution or personal enjoyment.
It is suitable for beginners and advanced users alike.
Note that this is only a guideline; a lot depends on the kind of music you'll master, your personal taste and the technical quality of the input file.
Prepare your raw input file
First of all, whatever software or hardware you're using to create your music, make sure to export / record / mixdown a stereo (2 track) audio file from the master channel.
Do not use any FX or plug-ins in the master channel. All global processing will be done in Trinity.
Make sure that there is no clipping, i.e. adjust your master level so that the master never reaches 0 dBFS (red) in your DAW or recording software during the entire length of the song. If your software only supports 16-bit WAV for export, make sure that the master isn't too quiet either.
Whenever possible, adjust the export, mixdown or recording settings so that an uncompressed file is created, ideally WAV (24-bit is better than 16-bit, and 32-bit floating point is better than 24-bit). If your software only supports compressed formats (like MP3 or M4A), these files will be usable too – but the quality of the master won't be as good.
Try to adjust the sample rate so that it matches the final sample rate you want for your mastered track so that Trinity doesn't have to do any unnecessary conversions, which would slightly decrease quality. 48 kHz is probably the best bet for today's platforms.
Finally, save the audio file where it can be accessed by your iPad's or iPhone's "Files" app (and thus, Trinity) or, if you're on a Mac, anywhere you can access with Finder.
Launch Trinity and import your audio
All screenshots show the iPad / Mac version with a wide window. On iPhone and with narrower windows, you will get a tabbed user interface consisting of 5 tabs that can be switched.
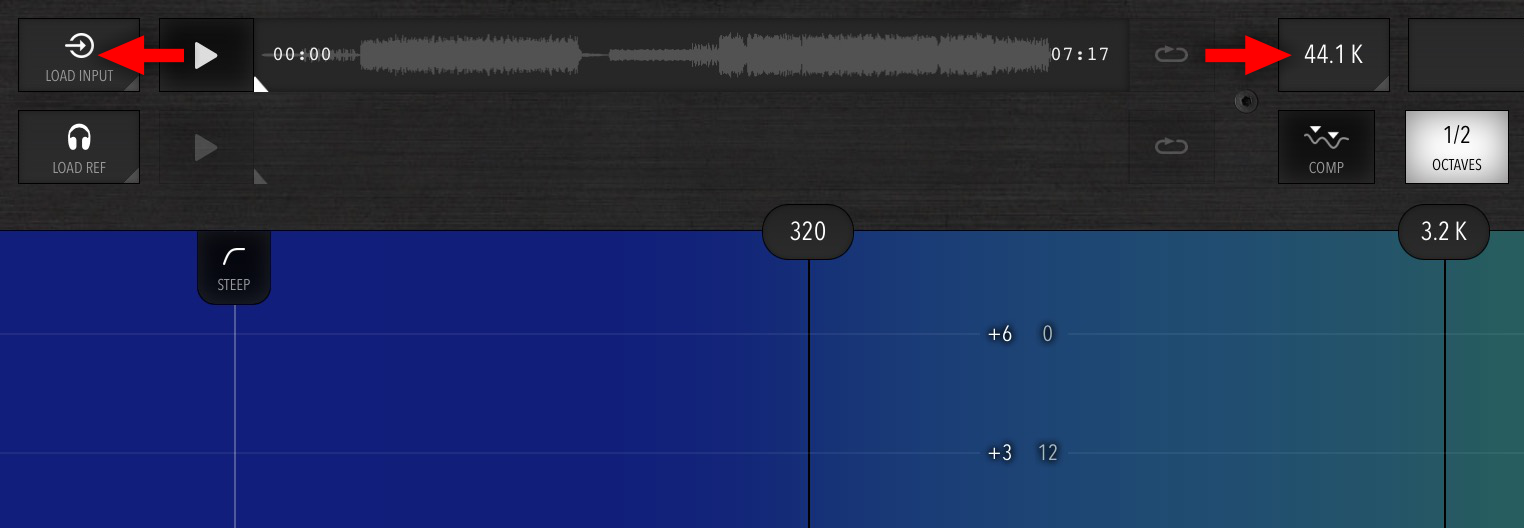
Before importing your audio, set the project sample rate by clicking on the sample rate menu at the top center. This rate will also be used for exporting the final master. It should also be the same rate that you used when exporting or recording the file in your DAW so that no unnecessary conversion takes place.
Click Load Input to load the audio file (mixdown) you created earlier. A file selector will pop up.
The file will automatically be normalized to 0 dBFS.
Optional: Load a reference track
Trinity lets you work with another track (for example, a commercial recording or other song whose sound you like) as a guide for adjusting the sound of the mastering chain.
So, if you know a good reference track to use, click on Load Ref.
Get started
Before getting started, let's make sure we have reasonable defaults:
- Load the Default preset by clicking on the Preset menu, going to the Factory tab and selecting Default.
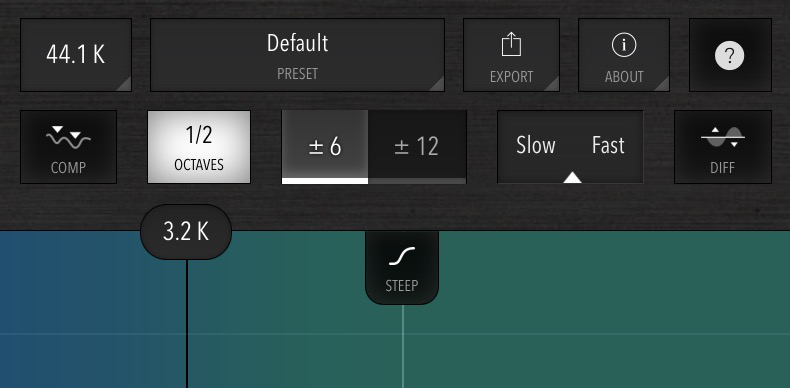
- Set the vertical range of the spectrum analyzer and EQs to +/- 6 dB.
- Check that 1/2 Octaves is turned on so we get a smooth horizontal spectrum display for spectrum matching.
- Double-click on the Slow / Fast slider to set it to medium speed. This slider determines how quickly the spectrum analyzer reacts to changes in the frequency distribution.
Pre-Normalizing
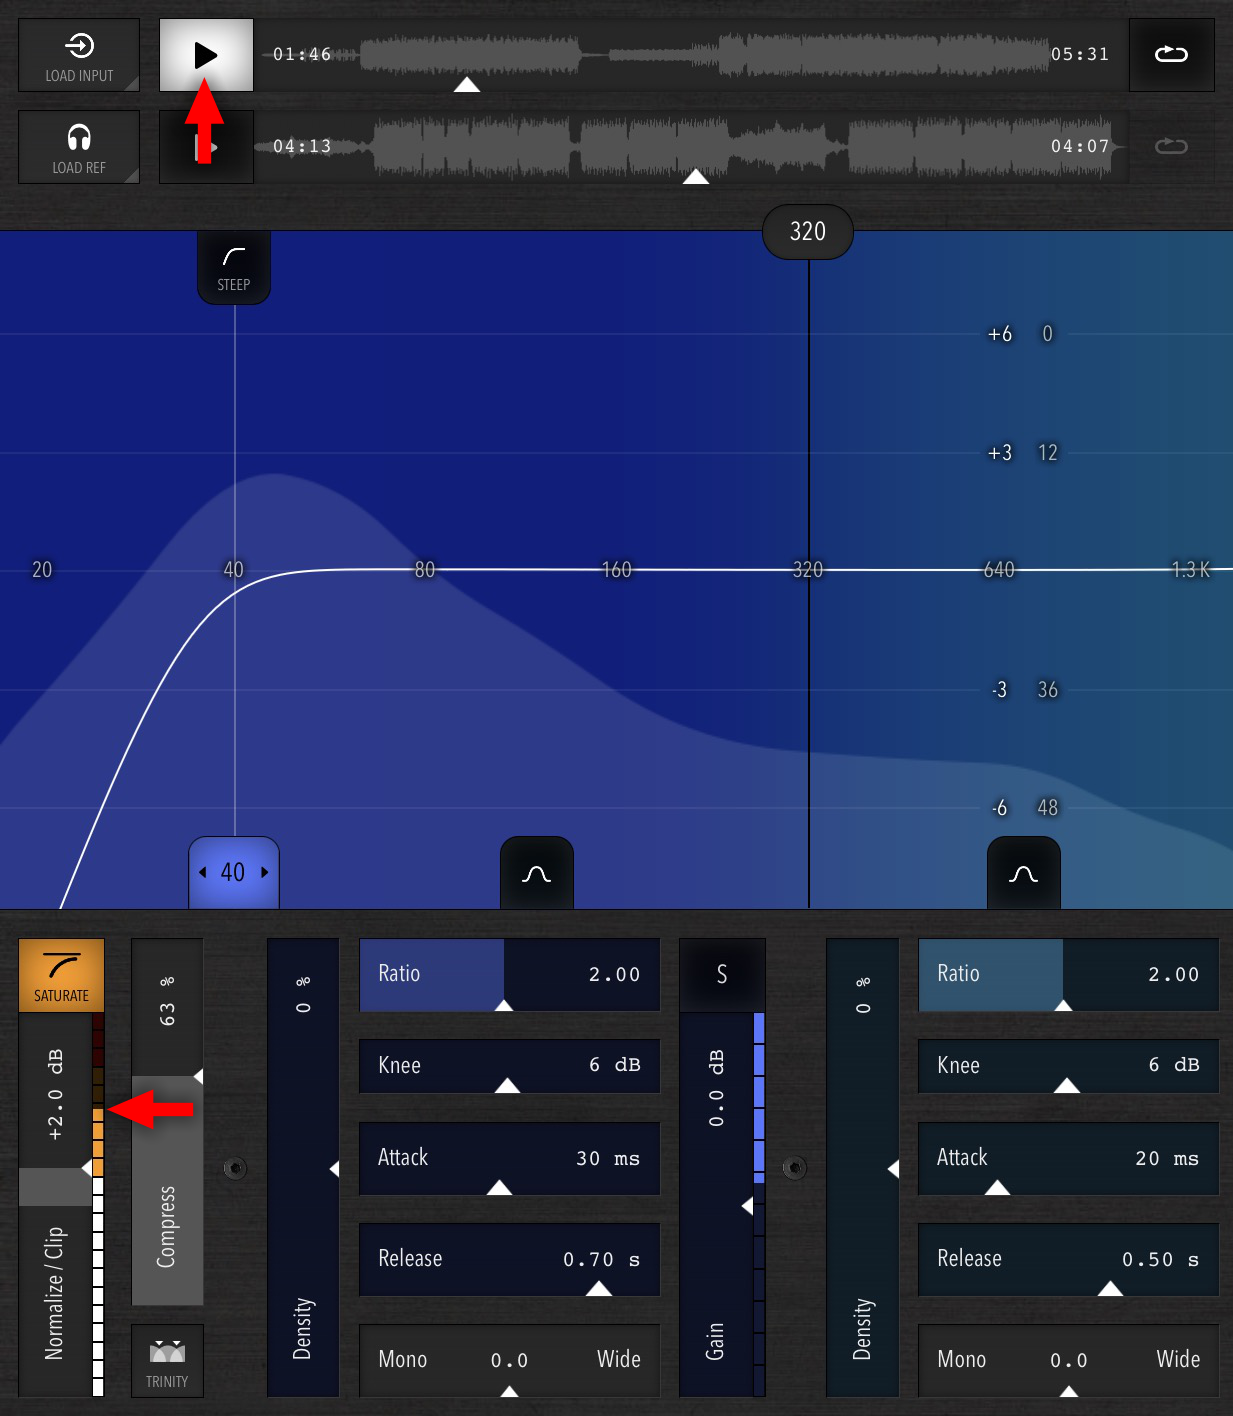
Now it's time to get the levels right. Click the Play button on your input file to start the adjustment process.
In the tabbed user interface, switch to the "Low", "Mid" or "High" tab to reveal the two normalizers. They apply to all three bands so it doesn't matter which tab you switch to.
Watch the level meter on the left / upper Normalize / Clip slider. Adjust the slider so that the meter stays mostly in the orange (saturation) range, but only rarely touches the red (one or two grid divisions max).
The realtime normalizer serves several purposes:
- Bring the signal into a nominal range so that the multiband compressor's controls know what's coming in and work as intended.
- Remove or soften loud unwanted transients that can occur in the signal, which can needlessly reduce available headroom and cause unwanted sudden compression spikes. In the orange range, transients get softened. In the red, they get completely flattened.
- Add some loudness and warmth thanks to the analog-style saturation. If you instead prefer a clean, unprocessed sound, you can turn off the Saturate toggle above the slider. Note that you can still hard-clip transients by bringing the signal slightly into the red range.
If you don't want any alteration of the signal at this stage, just make sure to turn off Saturate and pull the slider low enough so that the red LEDs never light up.
Even if you use Saturate, as long as the level stays in the white range, the normalizer is still completely linear and transparent.
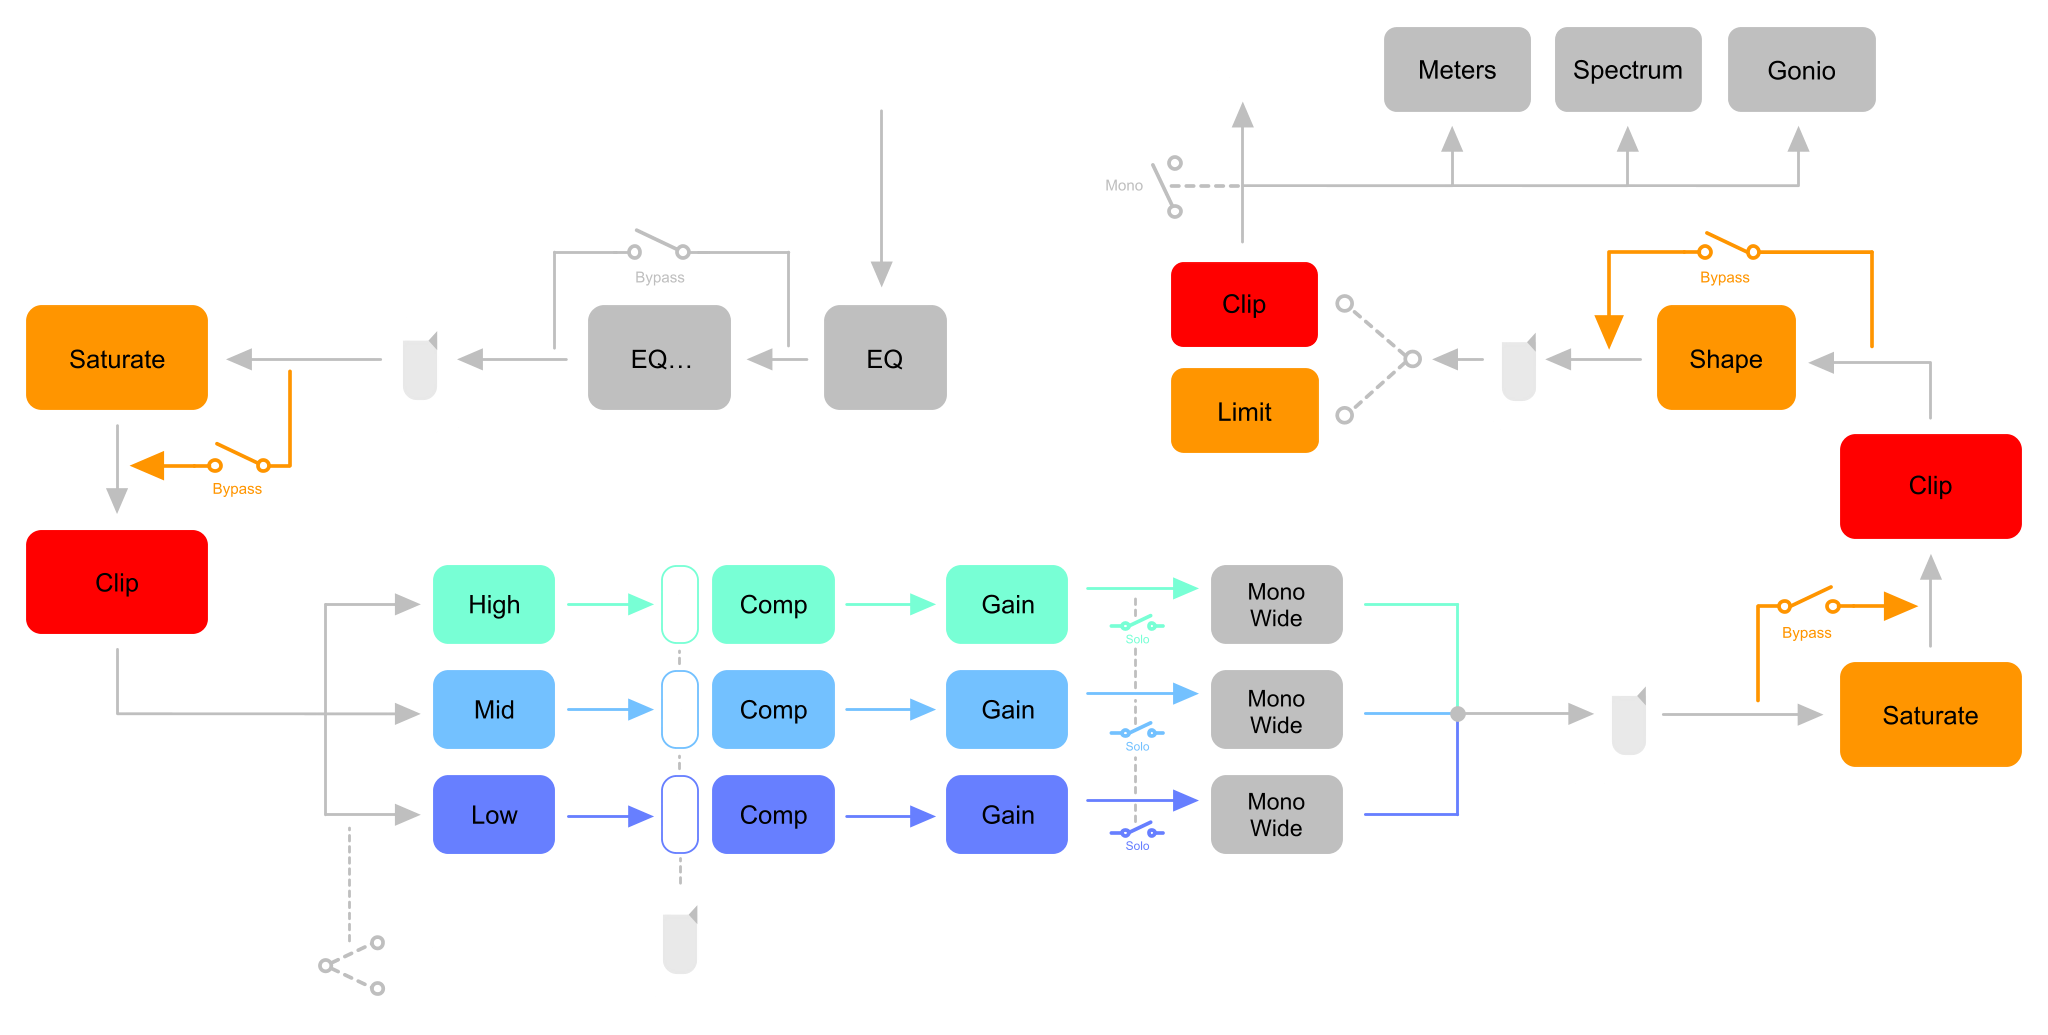
The Multiband Compressor
A compressor increases the overall density of the music. It can also be used to add "punchyness" and attack to drums and other instruments. A three-band compressor like the one in Trinity is special because it compresses the bass, mid and treble frequencies separately, with each frequency range having completely separate adjustments. This provides a large amount of control and avoids most disadvantages of traditional (single-band) compressors in mastering.
The controls for the bass range are blue, the mid range is cyan, and the treble range is shown in green.
In the tabbed user interface, you can switch between the three bands using the "Low", "Mid" or "High" tabs.
Adjustment
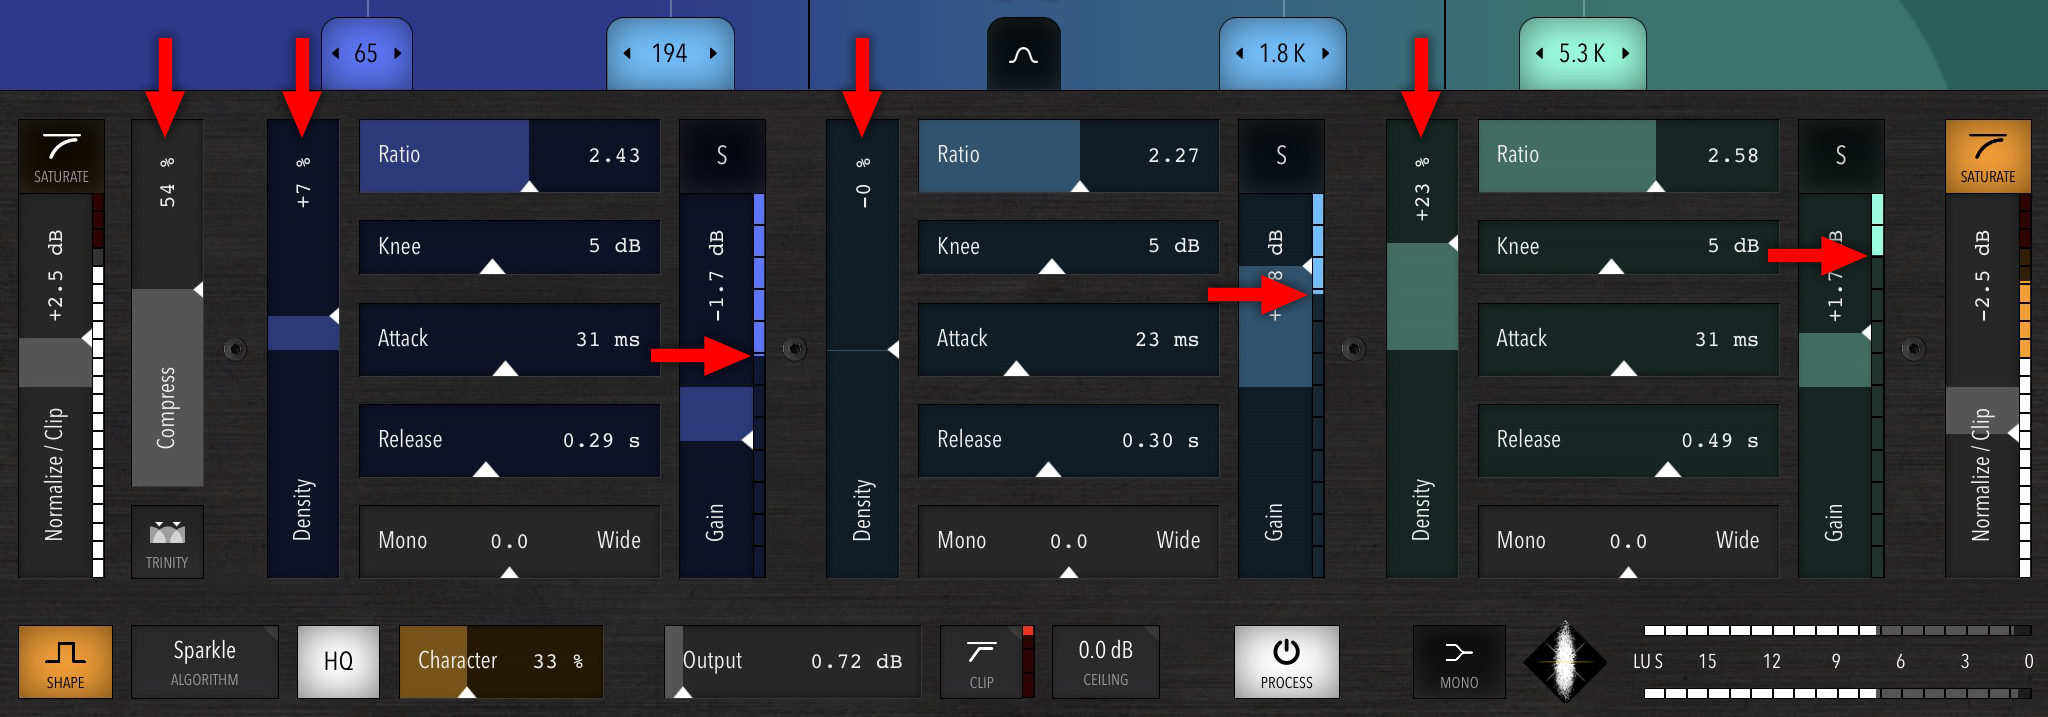
The Compress slider controls the overall amount of compression of all three bands.
Set this slider so that the gain reduction meters next to the Gain sliders for each band show roughly 3 - 6 dB (one segment is 1 dB) of gain reduction (compression).
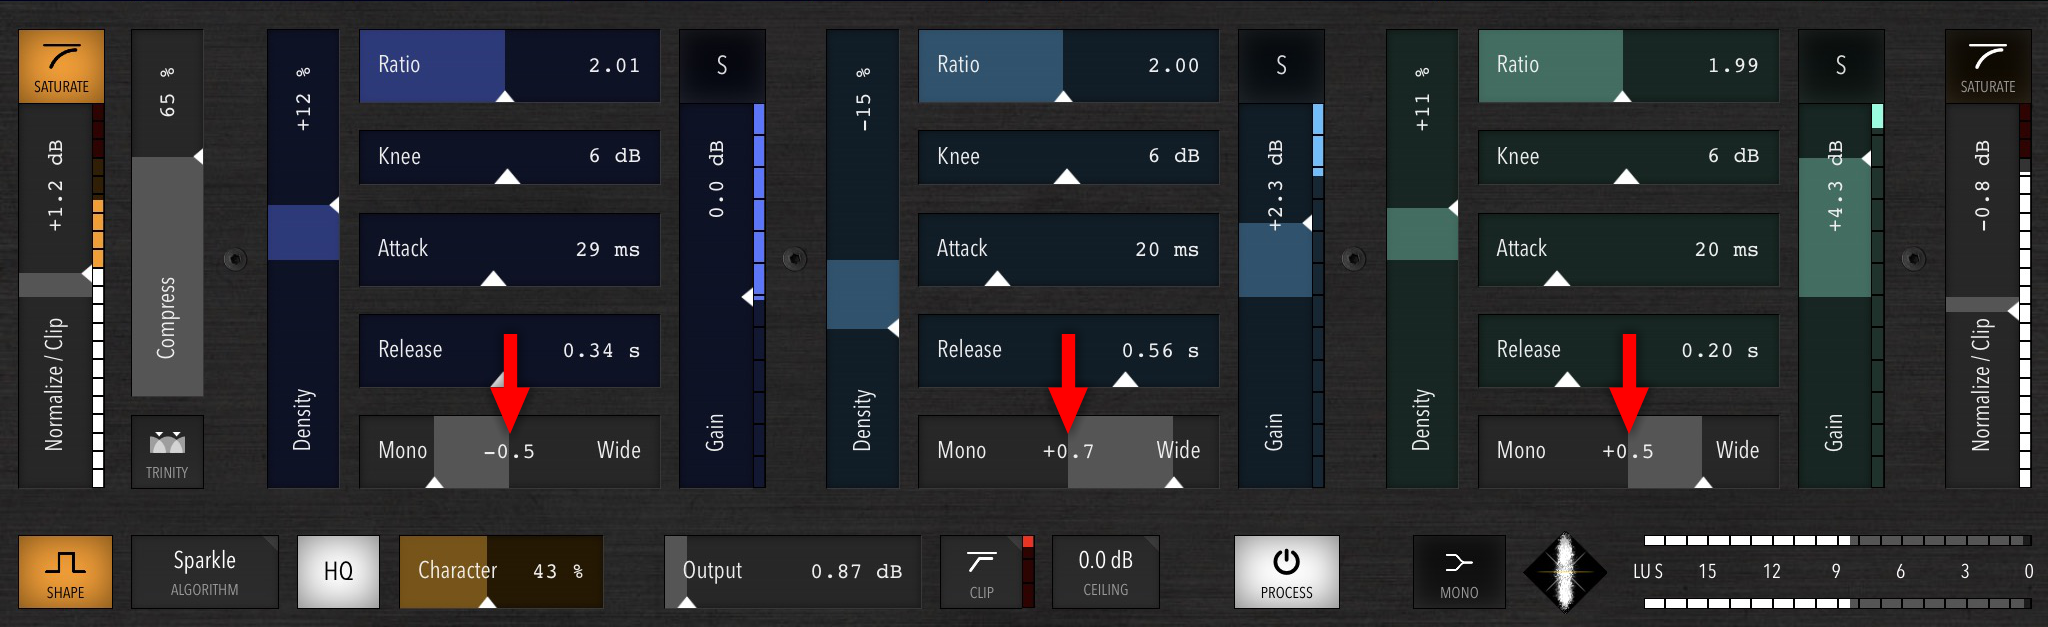
In general, the bass range can benefit from slightly more compression than the mids, and the highs should generally not be too compressed (see red arrows in picture). However, this also is very dependent on taste and musical style.
Fine-tuning the compressor
To fine-tune the amount of compression for each band separately, use the Density slider in each band until each meter shows roughly the amount of compression outlined above.
The following additional controls are available, separately for each frequency range:
These controls are a bit more advanced, so if you're not interested in fine-tuning the compression itself right now, you can skip this section, or try some of the presets in the Preset menu at the top instead. All presets whose names start with "Compression" only affect the individual compressor bands, not the rest of your settings.
- Ratio: Sets the strength of the compression. If this is set to eg. 2, then a 2 dB increase in input signal level will only result in a 1 dB increase after the compressor. A setting of 3 means that even a 3 dB increase in input will only allow a 1 dB increase in output, etc.
- Knee: Trinity has a fully adjustable 'Knee' per band. If this is set to a non-zero value, when the signal level rises above the compression threshold, the compressor will not apply the full compression ratio immediately, but instead gradually increase the ratio from 1 over the 'Knee' range so that a smoother onset of compression can be achieved.
- Attack: Adjusts how quickly the compressor will start reducing a loud signal in its band. Especially in the higher bands, a longer attack is useful for preserving transients (especially on drums). In general, a longer attack preserves "punchyness", but might also cause distortion later in the signal chain. Trust your ears.
- Release: Controls how quickly the compressor releases the applied compression after the input signal goes below the threshold again. Longer release times help to reduce audible 'breathing' (rapid changes in compression ratio) in the output.
While making adjustments to each band, you can enable its Solo toggle (the 'S' button) to listen to only the frequency range that is affected by that band. This gives you an extremely precise way to hear the effect of your adjustments for each band in isolation.
Post-Normalizing
When you're happy with the compressor settings, head to the Normalize / Clip slider to the right / bottom of the compressor. This works the same as the normalizer on the left / top side that you adjusted earlier, and can be used in the same way: now that the signal is compressed, make sure that it's again at a nominal level (orange range). If you do not want any further analog coloration, disable the Saturate option and make sure the signal only rarely touches the red range. This can still be used to hard-clip the occasional overshoot that can occur after joining the three frequency bands back together. Overshoots can also occur because the compressor doesn't start adjusting the signal level immediately (for example, when a loud kick drum hits) due to its Attack setting.
Frequency Balance
Now that you have reasonable overall levels and compression, it's time to get the spectral balance of your master right, using a combination of adjusting the outputs of the three compressor bands, and equalization (EQ).
As a visual guide, Trinity offers a Spectrum Analyzer that shows the intensity of frequencies, from the bass on the left (blue) to the treble range on the right (green). The higher the moving filled curve, the louder the sound around that frequency.
There are two separate vertical scales shown near the center of the analyzer:
The right scale (-48 - 0 dB) shows the range of the spectrum, i.e. the filled curve that represents the frequencies in the currently playing track. You can shift the displayed spectrum up and down to bring quieter parts into view. Double-click to reset.
The left scale shows the range that the EQs are currently set to (+/- 6 or +/- 12 dB, toggle above the analyzer). This scale is also used for showing the spectral differences in Differential Spectrum mode, so that any adjustments you make using the EQs are reflected 1:1.
In the tabbed user interface, you can scroll the spectrum horizontally by dragging to reveal the entire frequency range.
Using Spectrum Matching
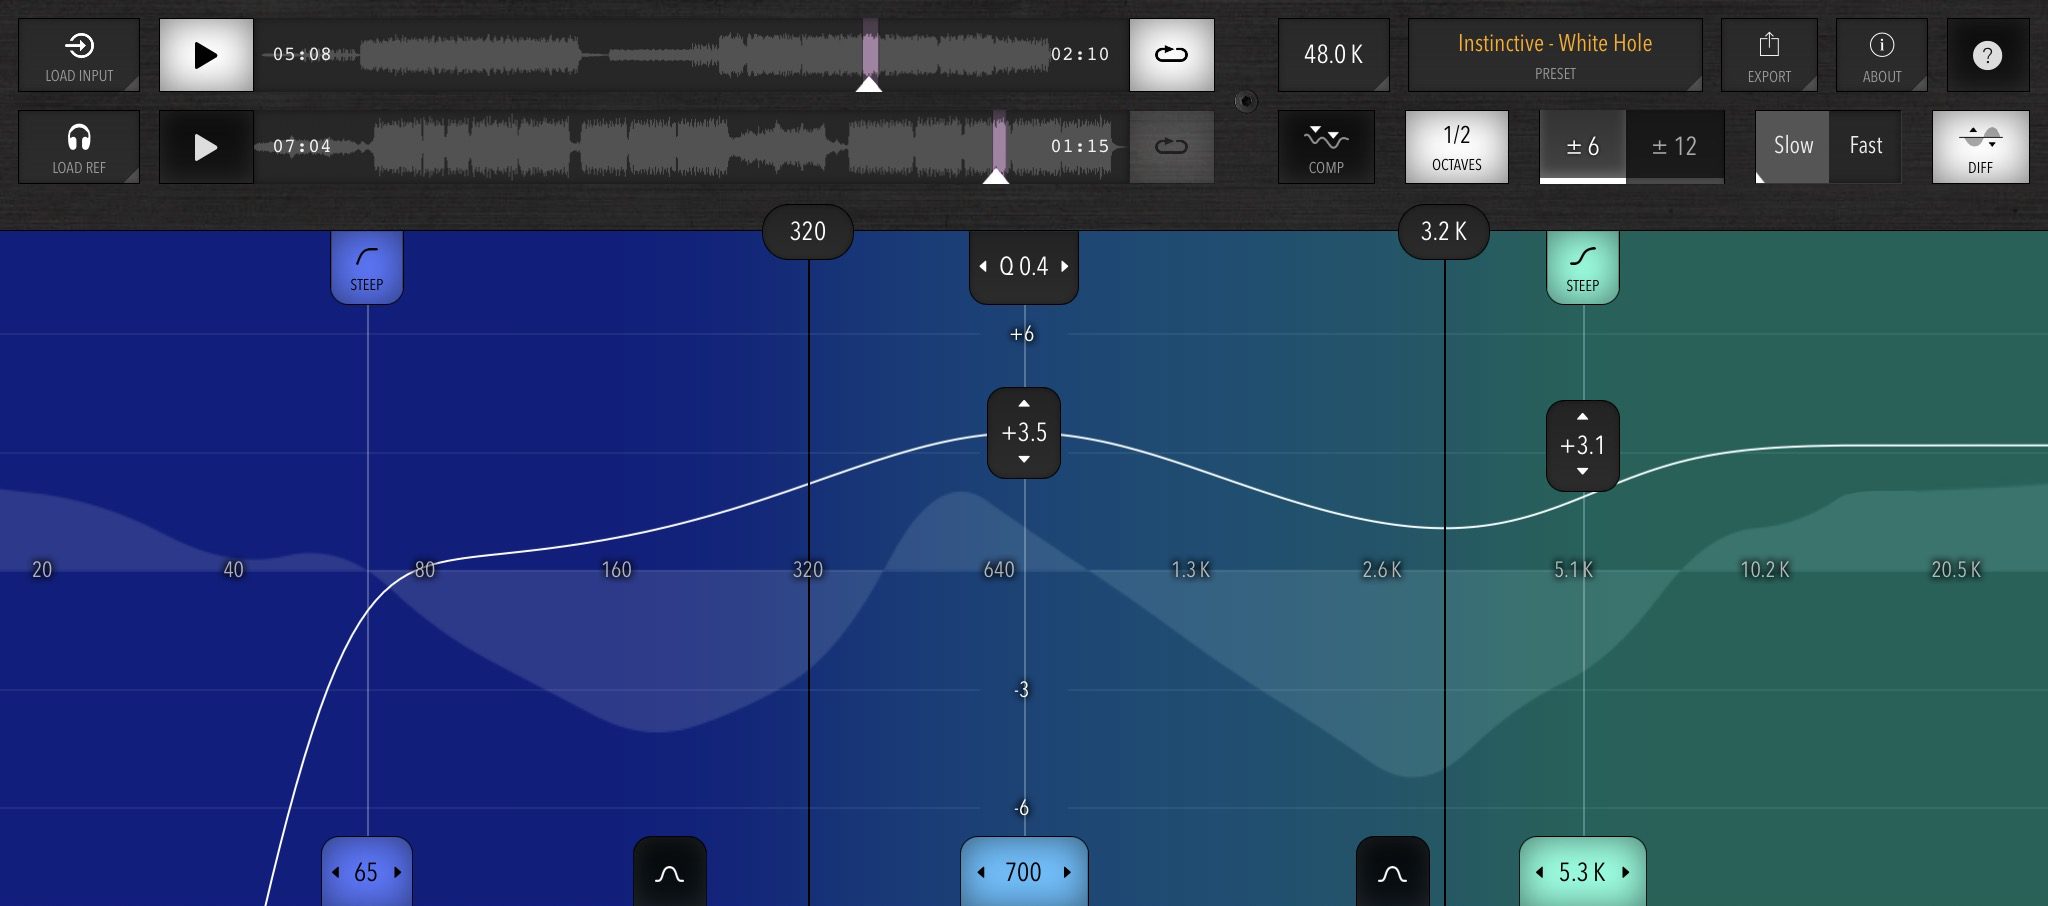
The easiest way to get a good spectral balance (and overall sound and density) is to use a reference track, eg. a song that has been professionally produced and whose sound you would like to achieve.
So if you've not loaded one yet, click Load Ref at the top left and load a track.
You can now quickly switch back and forth between both tracks by either clicking on the Play buttons or directly onto each timeline, allowing you to easily and immediately compare the sound of both tracks at various sections.
Setting a Loop
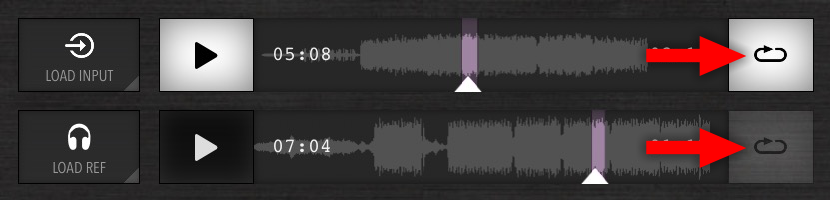
To avoid constantly rewinding to the same spot in each track, you can just set a loop that automatically repeats the section you want to focus on while matching.
Start playback where you want the loop to begin, then wait until the point where you want the loop to end, then click the Loop button. Trinity will now automatically loop that section of the track.
Do this for both tracks. Find a section that is musically and sonically similar in each. Don't make the loop longer than a few seconds.
You can also loop the entire track seamlessly, for example if you're just mastering a short drum loop. To do this, activate the Loop button while the track is not playing.
Showing the Differential Spectrum
The Differential Spectrum feature is very useful if you don't want to fully trust your ears or don't have the best monitoring situation, and thus want a more "scientific" tool to make sure that your frequency balance is right.
To use it:
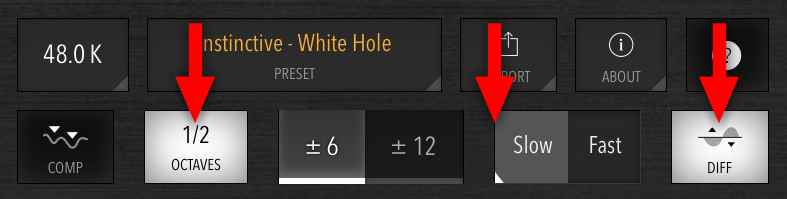
- Enable 1/2 Octaves so that the frequencies are smoothed out. We don't care about distracting fine detail, but the overall frequency distribution.
- Set the Slow / Fast slider to the leftmost setting (Slow). The analyzer will then "remember" the average spectrum of the last few seconds so that any momentary changes in the music don't distort the overall frequency distribution we're seeing.
- Finally, enable the Diff toggle.
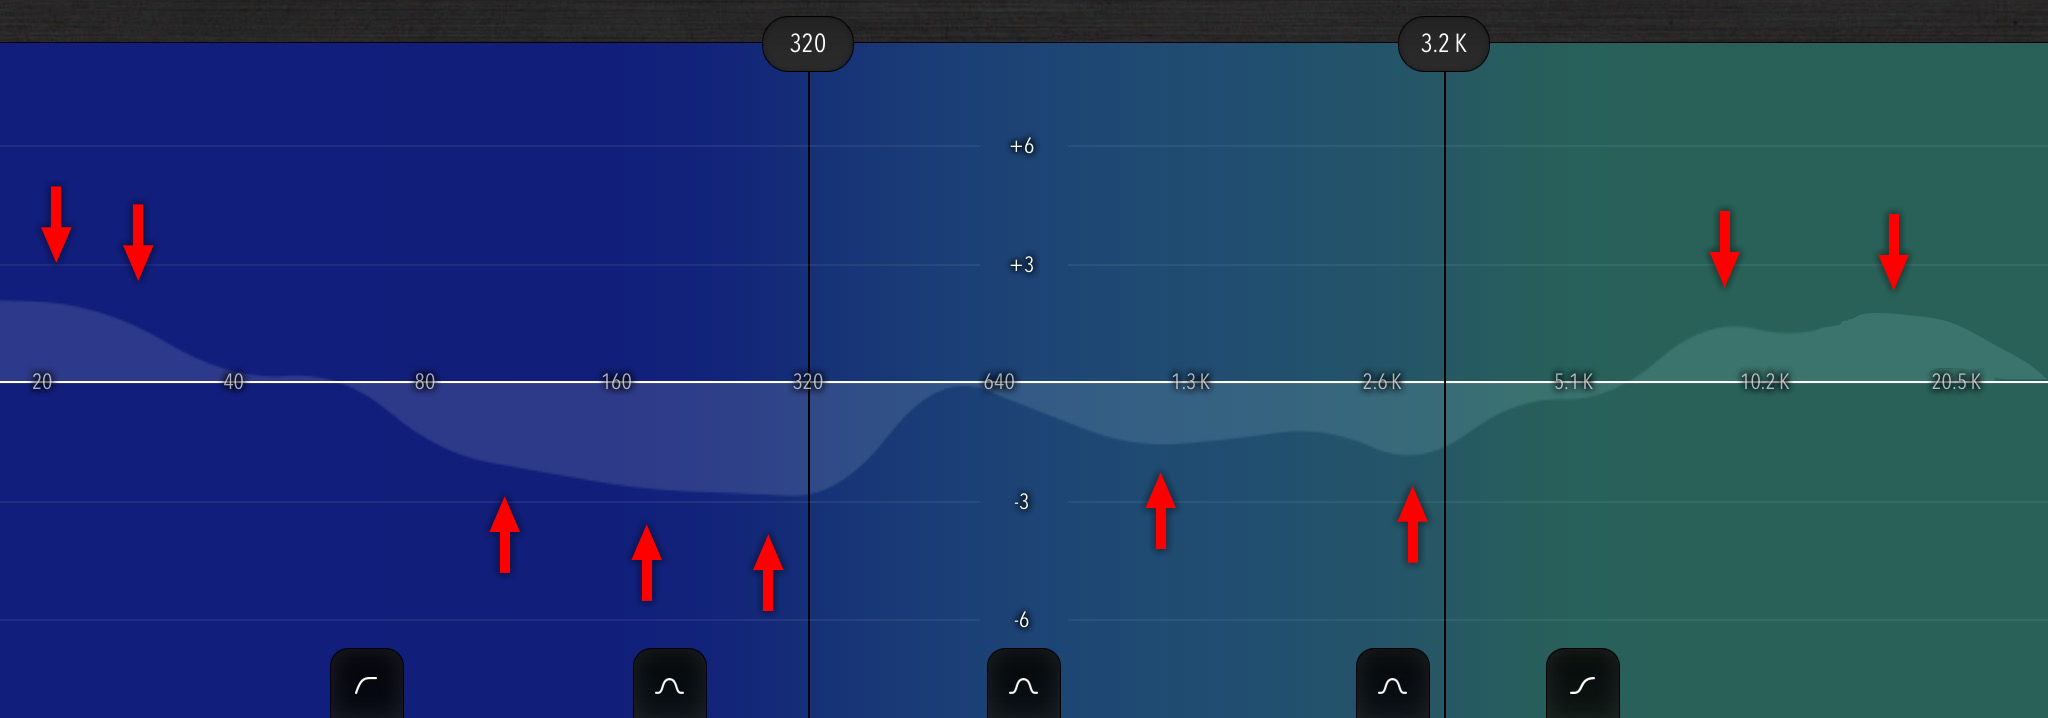
The analyzer will now show the differences between the last few seconds that the reference track has been playing, and the last few seconds of the spectrum of the (processed) input track.
Frequencies that are louder in the input track are above the center line, those that are quieter are below.
The goal of the matching process is to make sure that most differences stay below around +/- 3 dB (the vertical scale in dB is in the center of the analyzer).
For details on how to achieve this, read on.
You can drag the difference spectrum up and down to compensate for any global volume difference that might exist between the reference and processed input track. Shift the spectrum so that differences above and below the center line are roughly the same. Double-click the spectrum to reset.
Spectral Balance

For making coarse adjustments to the bass, mids and treble, it is best to first use the output Gain sliders on the individual bands of the compressor section. Adjusting these has no impact on signal quality and is thus preferable to EQ.
Keep an eye on the right / bottom normalizer to check that your adjustments don't bring the level too far down or into clipping.
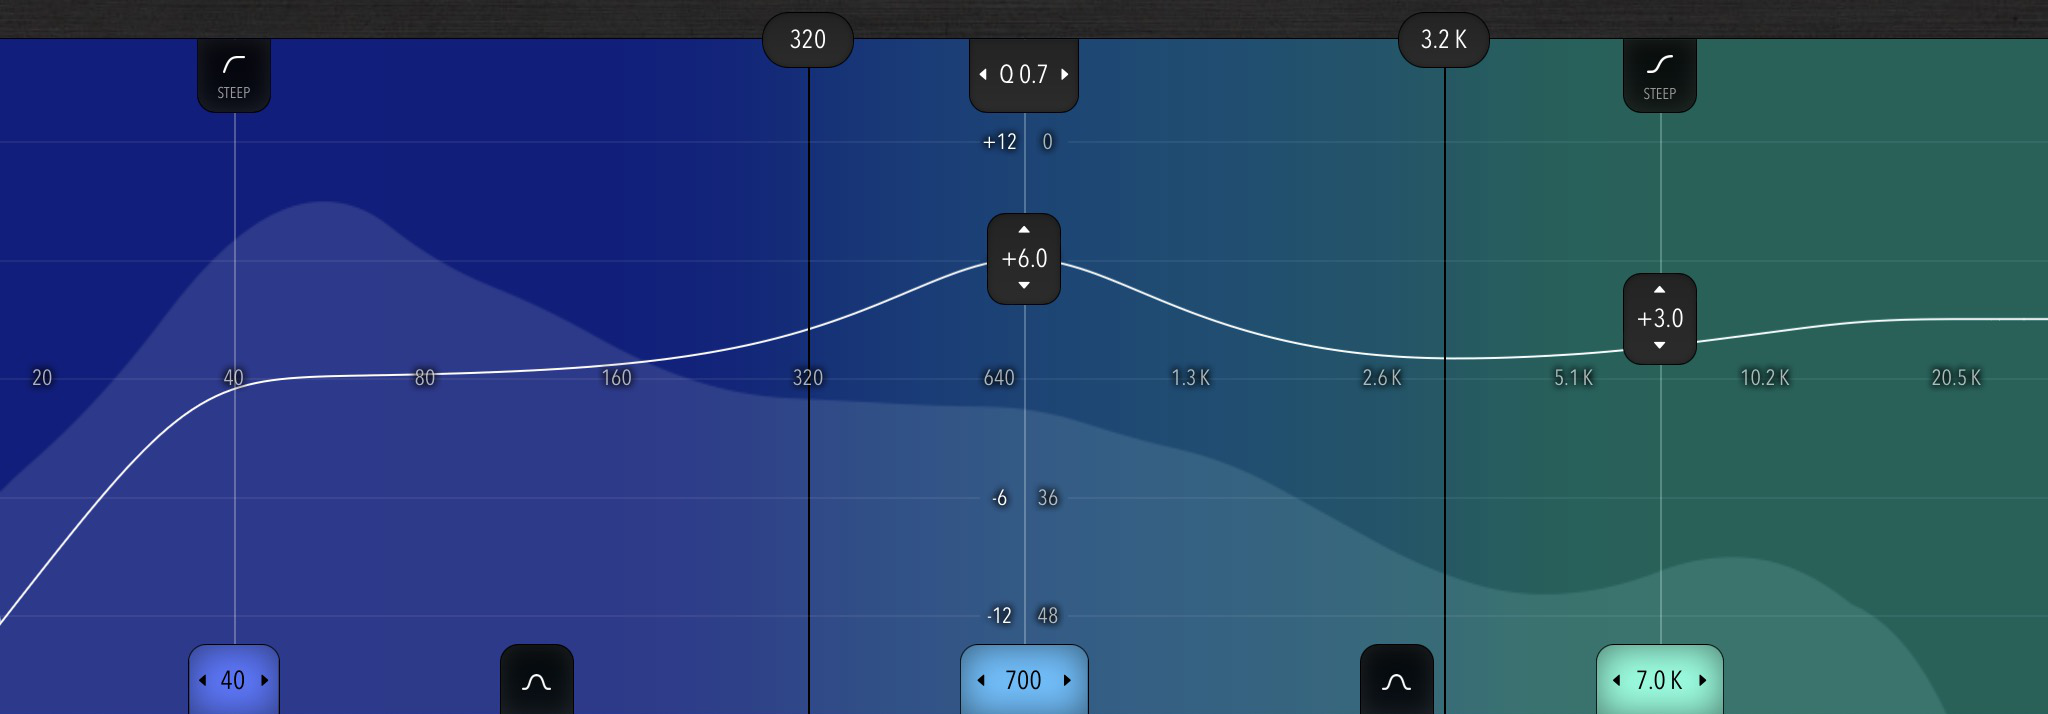
Equalization
Equalization (EQ) serves three main purposes in Trinity:
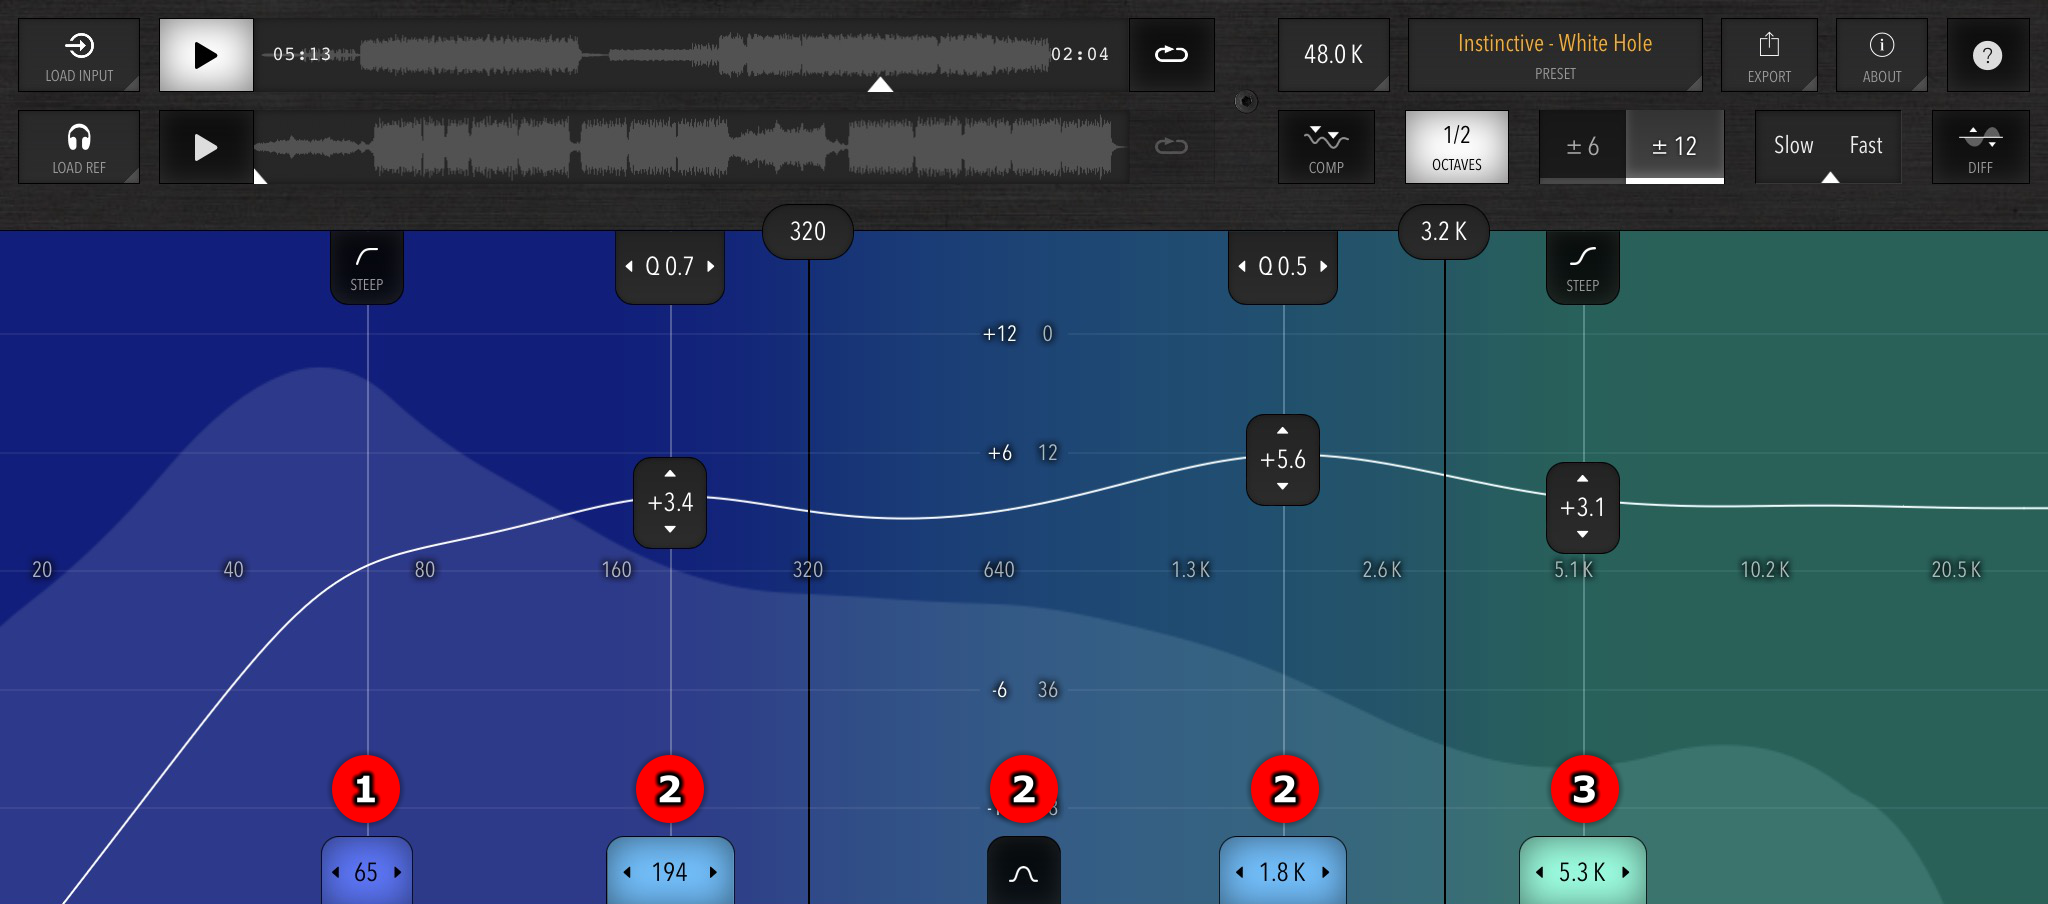
- Get rid of unnecessary bass energy that needlessly reduces available headroom and loudness, using the smooth low-cut filter (1) with two selectable slopes
- Add a bit of brilliance in the highs if desired, using the high-shelving filter (3), again with two selectable slopes
- Fix any localized spectral imbalances that you couldn't fix by using the Gain sliders in the compressor, using Trinity's up to three general-purpose peaking EQs (2) for finer adjustments
To adjust the EQs:
- Click the button at the bottom to enable/disable each EQ, or drag to change the frequency.
- Drag the button in the middle up/down to adjust gain (strength) of each EQ.
- Drag the button at the top to adjust the Q (width) of the curve of the peaking EQs.
How to use each EQ
- Low-Cut: Frequencies below around 40 Hz are almost inaudible on most speakers and headphones, but can take away a large amount of headroom ("loudness availability") and interfere with compression and limiting in various ways. The Low-Cut can remove these frequencies in a transparent way. Start with the cutoff frequency all the way to the left (almost no frequencies are taken away), and then gradually move to the right until you start hearing a difference. This is probably around the sweet spot to use. You can of course also use your reference track as a guide here – just look at the difference spectrum and minimize the differences below ~ 60 Hz. Enable the Steep mode at the top if you want a more surgical cutoff.
- High-Shelving: The high-shelving EQ on the right offers a straightforward way to boost treble and/or brilliance. To add brilliance, slide to a higher frequency like 10 kHz and adjust the gain slider to around +3.0 dB. To include more frequencies and add more presence to the mix, slide the frequency further to the left, more towards 3 kHz. You can also use your reference track as usual for guidance. If you want slightly more surgical processing, this filter also has a Steep toggle.
- Peaking: The three general-purpose peaking EQs are very flexible and can be used for any kind of adjustment, broad or narrow, big or small. Use them to cure any problematic spectral imbalances you may see or hear. Their shape (width) can be adjusted by sliding the Q button at the top (it won't move, but the width of the EQ's curve will change).
The EQs come before the normalizer and compressor in the signal chain, so drastic changes here will affect normalizer and compression levels. It's a good idea to re-check the normalizers and compressor bands to make sure that the compression and levels are still okay.
Stereo Imaging
Trinity offers a simple and effective way to subtly enhance the stereo image of your mix while preserving the balance and prominence of instruments.
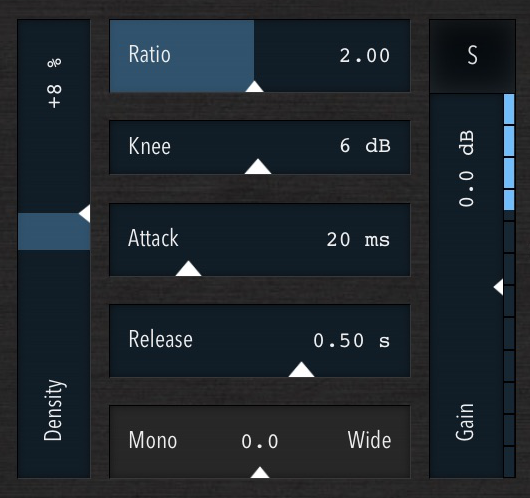
Each of the three frequency ranges has a separate stereo width control (see screenshot), so you can adjust the stereo image for bass, mids and treble individually. All three controls are internally fine-tuned to give predictable results and preserve the overall perceived loudness at any setting.
The mid band is the most useful here as the brain is most sensitive to positional information in this frequency range. Adjust the middle Mono | Wide slider to the right until you hear the sound stage widening.
The bass and treble bands can also be widened, but the effect is often harder to discern. Just experiment and if you like the result, it's probably okay!
Trinity's stereo processing is very transparent and does not use any kind of phasing / Haas or selective EQ approach. However, this also means that if your input file does not contain any stereo information to begin with, Trinity cannot widen it, as no additional stereo information is generated.
You can also make the stereo image narrower (all the way to mono) for a certain band. This can be useful in the bass range to give eg. the kick drum more "punch" and localize the bass energy in a central spot in the mix.
Mono Compatibility
The wider your stereo image, the more important it is to make sure it still works on mono systems, i.e. phones, Bluetooth speakers etc. that only have one speaker (the two channels are mixed together here).
The main problem is that as the stereo field gets wider, there may be signals that are "out of phase" between channels. When these are summed in a mono reproduction system, they will (partly) cancel out and be much quieter or even inaudible.
Trinity lets you check on this easily, thanks to its Mono toggle and basic Goniometer:
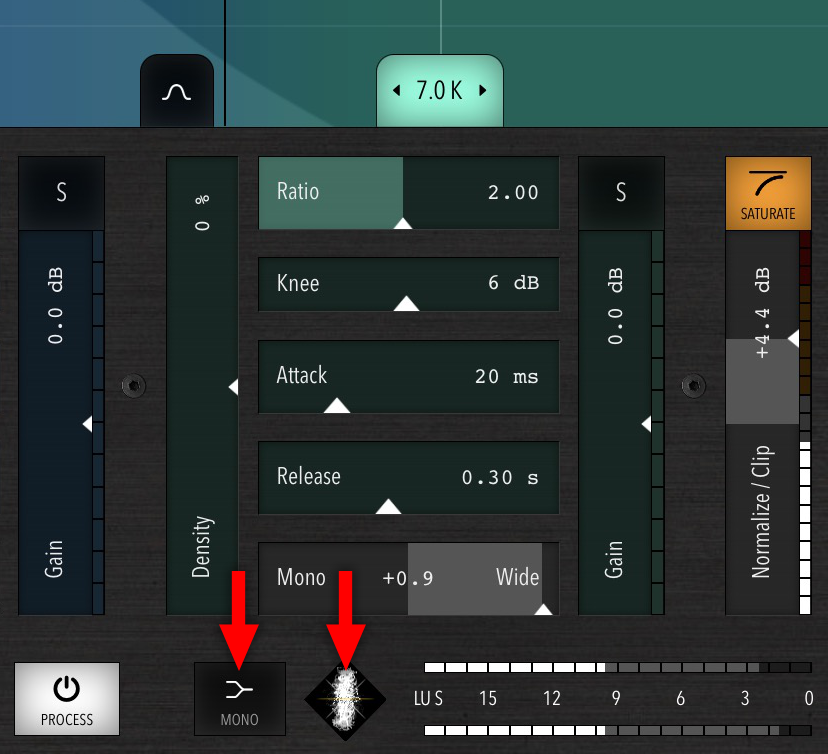
The Mono toggle simulates what would happen if the track is played on a single-speaker system: Both stereo channels are summed and you'll hear the mono reproduction.
While adjusting the Mono | Wide sliders, keep toggling this button to compare. If you notice any issues with some instruments becoming too quiet or disappearing from the mix with Mono enabled, pull back some of the Mono | Wide sliders to see if the situation improves.
The Goniometer shows a visual representation of the stereo image:
- Signals that occupy mostly the vertical axis are narrower or even mono (thin line). These are unproblematic.
- Signals that are panned either hard-left or hard-right would appear as either of two diagonals. These are also unproblematic.
- Signals that occupy mostly the horizontal axis are anti-phase between the stereo channels and would be very quiet or even inaudible on mono systems – so make sure that the goniometer image doesn't become too wide. It should hardly ever become more wide than tall.
The goniometer always shows a mix of many signals, so you cannot easily judge individual instruments on it. But the overall "fluffball" image is generally enough to check if there are any problems.
Shape your Master
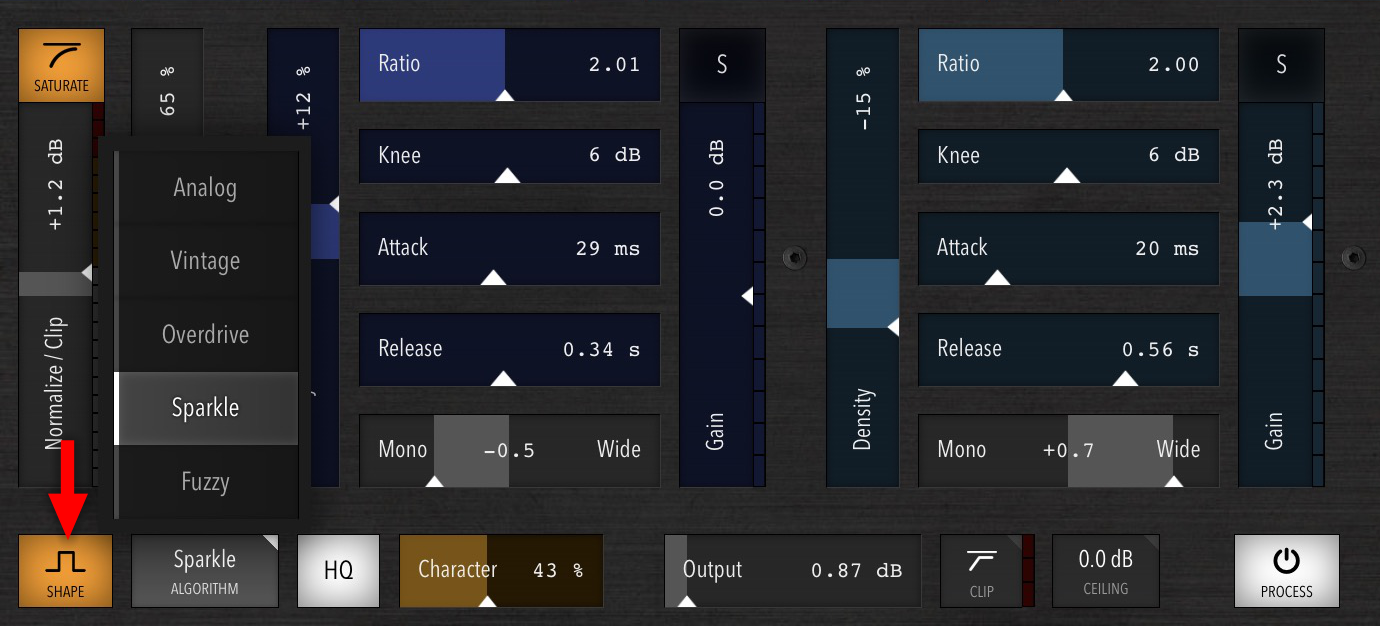
If you want to add some additional sparkle, grit or analog warmth to your master, you can use the Shape section to add subtle (or obvious) distortion, harmonics or overtones according to taste.
Use the Character slider to adjust the strength of the effect. The HQ toggle enables 4x oversampling, which makes the sound slightly less harsh. However, harshness might also be what you're looking for, so try toggling this setting while experimenting with the algorithms and Character slider.
Trinity offers 5 different algorithms:
- Analog: As the name implies, an analog tape-saturation style distortion, mostly kicking in when the input gets louder.
- Vintage: A variation on Analog, but with a slightly different sound.
- Overdrive: A sound that you would typically get from overdriven EQs or input stages on an analog mixer, for example.
- Sparkle: Special algorithm that adds sheen and harmonics even and especially at lower volumes – very nice to add crispyness to softer parts of the track.
- Fuzzy: A variation on Sparkle, but with a slightly "rounder" sound.
When the Shape toggle is enabled, some algorithms give a slight coloring of the sound even with the Character slider at 0%.
Output level
You're almost done! The last step is to adjust the final output level of your master and optionally squeeze a final bit of loudness out of it. Fortunately, Trinity has all the right tools for this job.
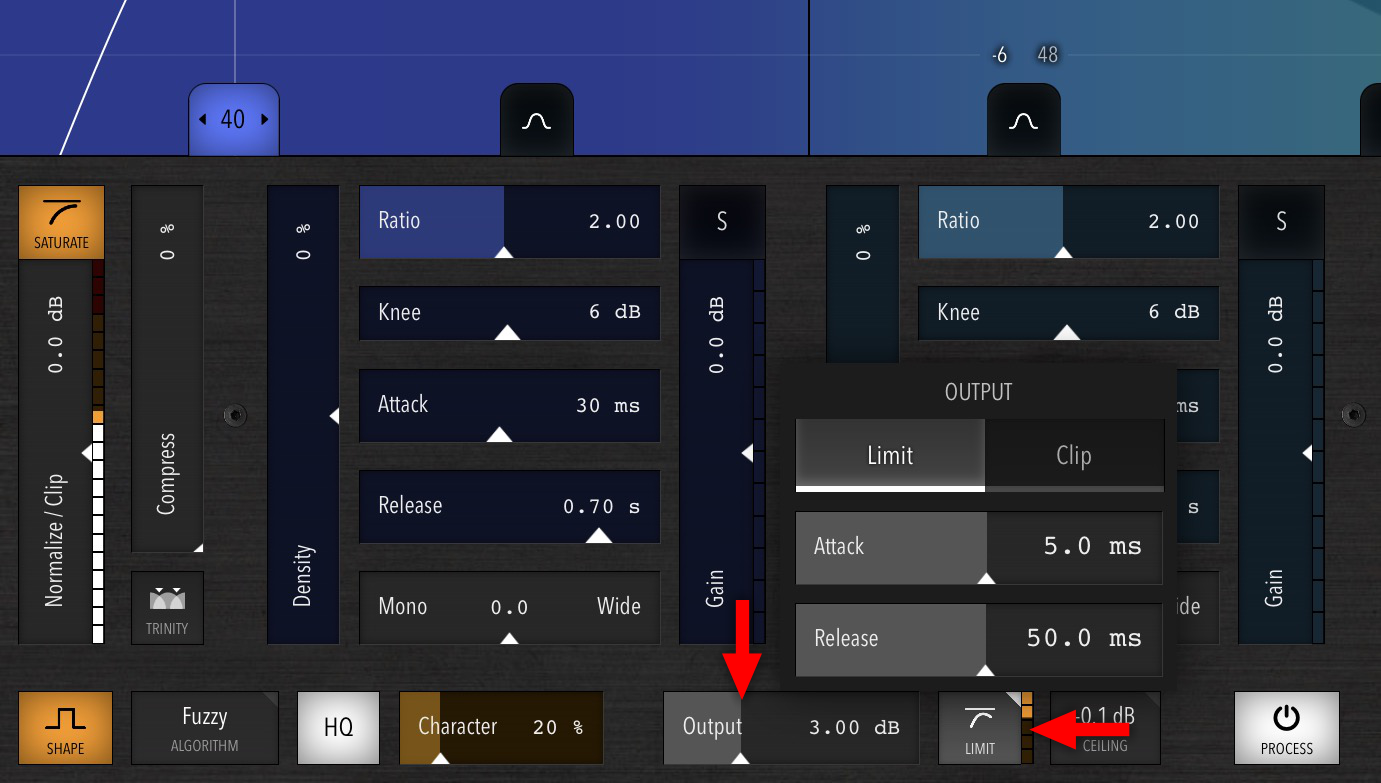
Limit or Clip
As the final level control stage in Trinity, you can either choose a Limiter or a Clipper. This gives you an additional boost in volume in case you want or need it.
This stage also has a reduction meter on the right of the Limit dropdown button, just like the compressor. There are 5 yellow segments in Limit mode, and 3 red segments in Clip mode.
Whether you use Limit or Clip depends on your taste and style of music. Both options are discussed below.
Use the Output slider to control how hard this section is driven.
The Limiter
The Limiter is like a very fast and aggressive compressor: If the input exceeds a certain level, it will almost immediately reduce the volume hard so that the level stays under control. It still achieves this with almost no audible distortion, in contrast to eg. the normalizers discussed earlier.
The Attack control works the same as in the compressor, but much quicker values are normally used. Play around with it and listen to the effect. If you raise the Attack control too far, you might get audible distortion as transients start to "escape" the limiter (and are hard-clipped to the ceiling). If it's too low, then the limiter can react so quickly that it distorts the actual waveform of the signal.
The Release control also works like in the compressor. Play with this control as well. If you go too high, you might get audible "pumping" as the automatic changes in volume become apparent, and the overall achievable loudness is reduced. If you go too low, just like with Attack, the release will become so fast that it changes the actual shape of the waveform.
Values around the center (defaults) are usually good and the limiter has been fine-tuned to work well in this range.
Adjust the Output slider to drive the limiter. You should normally not go beyond roughly 3 dB (one segment is 1 dB) of limiting on the yellow reduction meter. This gives you a nice additional loudness boost while being essentially inaudible.
The Clipper
If you set the Output menu to Clip mode, then the signal is driven into a hard clipper (just like the red range in the normalizers). This has a harsher and often audible sound compared to Limit mode, but you might actually prefer this depending on the style of music you're mastering. There is also no danger of "pumping" or other "artificial-sounding" artifacts here, which you might get from the Limiter depending on settings.
Adjust the Output slider to drive the clipper. You usually shouldn't go beyond 1 - 2 dB of clipping on the red reduction meter.
Ceiling
The Ceiling setting determines how much headroom Trinity leaves in the final output, and sets the threshold at which both the limiter and clipper operate. If this is set to eg. -0.1 dB, then neither the limiter nor the clipper will let the signal exceed this level, and thus the exported file (and also the live signal during mastering) will be 0.1 dB quieter than 0 dBFS (full scale).
This is useful or even required if you plan to send your master to streaming platforms or publishers, as further encoding of the track can occur down the line, and these encoders are sometimes sensitive to very loud (full-scale) signals and can introduce unwanted distortion.
A setting of -0.1 dB is usually enough, but verify with your streaming platform or publisher to be sure. If you are required to deliver a master with "-1 dB peak", for example, you'd use a ceiling setting of -1.0 dB.
Setting a ceiling makes your master that much quieter, so you might want to compensate for the loss of volume by adding some loudness through the use of the normalizers, limiter, or clipper. See also "Metering" below.
Trinity currently does not account for inter-sample peaks ("True" peak), so if you absolutely must make sure that not even inter-sample peaks exceed the ceiling, set the ceiling a few tenths of a dB lower.
Metering
Trinity offers accurate and state-of-the-art metering of your output to let you achieve the desired loudness level and compare to your reference track, and to meet requirements of streaming or publishing platforms.
The current peak level is always shown in grey.
The white segments can be set to 4 different metering algorithms by clicking anywhere on the meters. They are:
- LU M (LUFS momentary) shows the perceived loudness of the past 400 milliseconds of the audio.
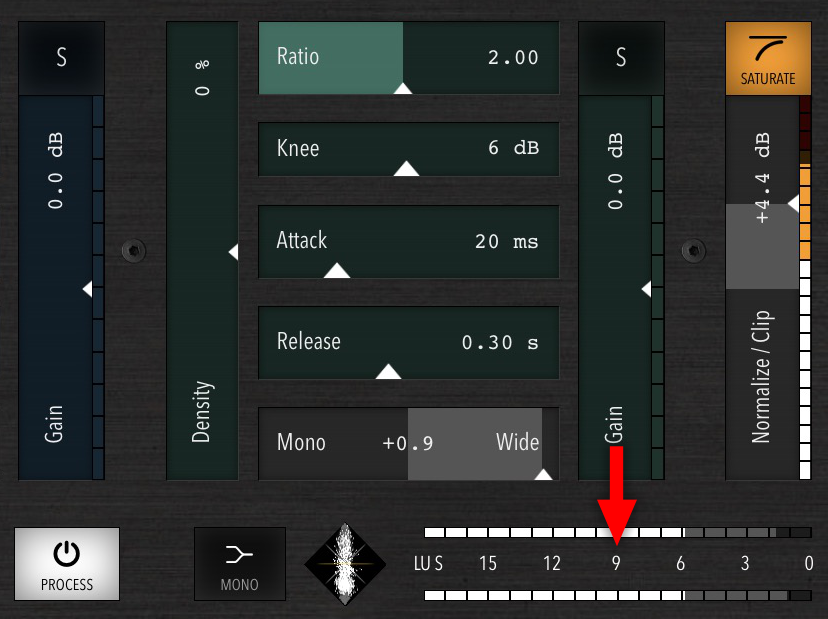
- LU S (LUFS short-term) shows the perceived loudness of the past 3 seconds of the audio. This setting is probably the most useful for achieving a desired loudness when working with a reference track.
- LU I (LUFS integrated) builds an average of the perceived loudness over the entire section you're playing. If you switch to this mode and then let the whole file play from start to finish, you'll know the integrated loudness, which is often an important target figure for streaming or publishing.
- RMS (Root Mean Square) is a more technical way to measure signal level and does not take the frequency-dependent perception of human hearing into account, so its utility is limited.
Exporting your final Master
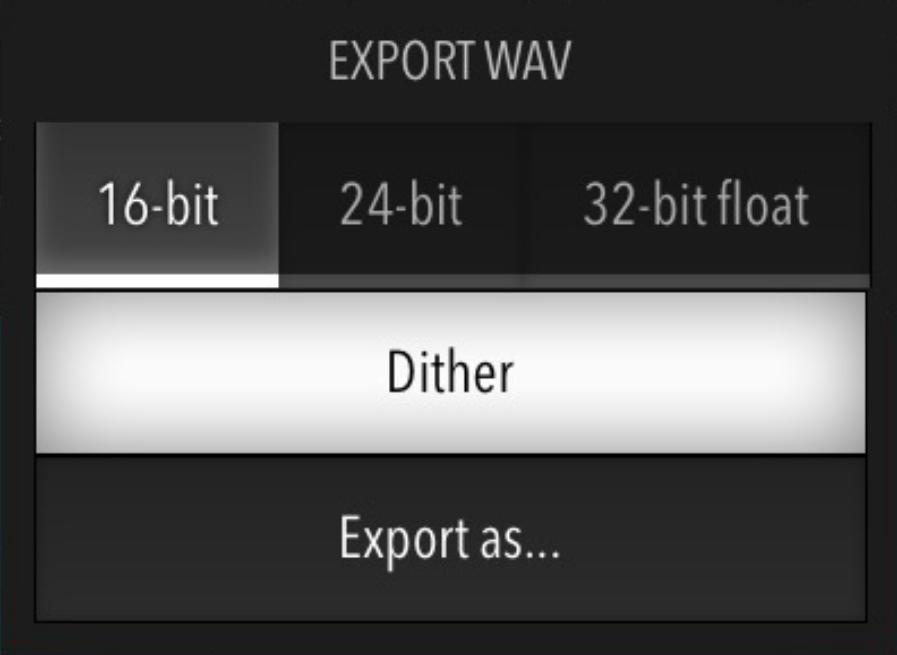
When you're happy with everything and would like to export (render) your master as a WAV file, click Export at the top right. The following options are available:
- 16-bit: This is the most common lossless format for audio data and is the only format that is universally supported by publishers, music players, etc., and in general offers more than enough fidelty.
- 24-bit: This format has a higher bit depth and thus dynamic range than 16-bit (256 times higher), while still being pretty compatible. Resulting files are bigger than with 16-bit.
- 32-bit float: This offers essentially infinite fidelty at the cost of even bigger WAV files and less compatibility.
- Dither: Enables optional dithering. This process will add a tiny bit of noise to the exported file that is just enough to cover so-called quantization noise that occurs when the signal level transitions in the least-significant bit. If you haven't understood any of that: In a nutshell, it very, very slightly improves the exported file's quality (less distortion) at the expense of a very, very tiny amount of additional (white) noise.
Presets
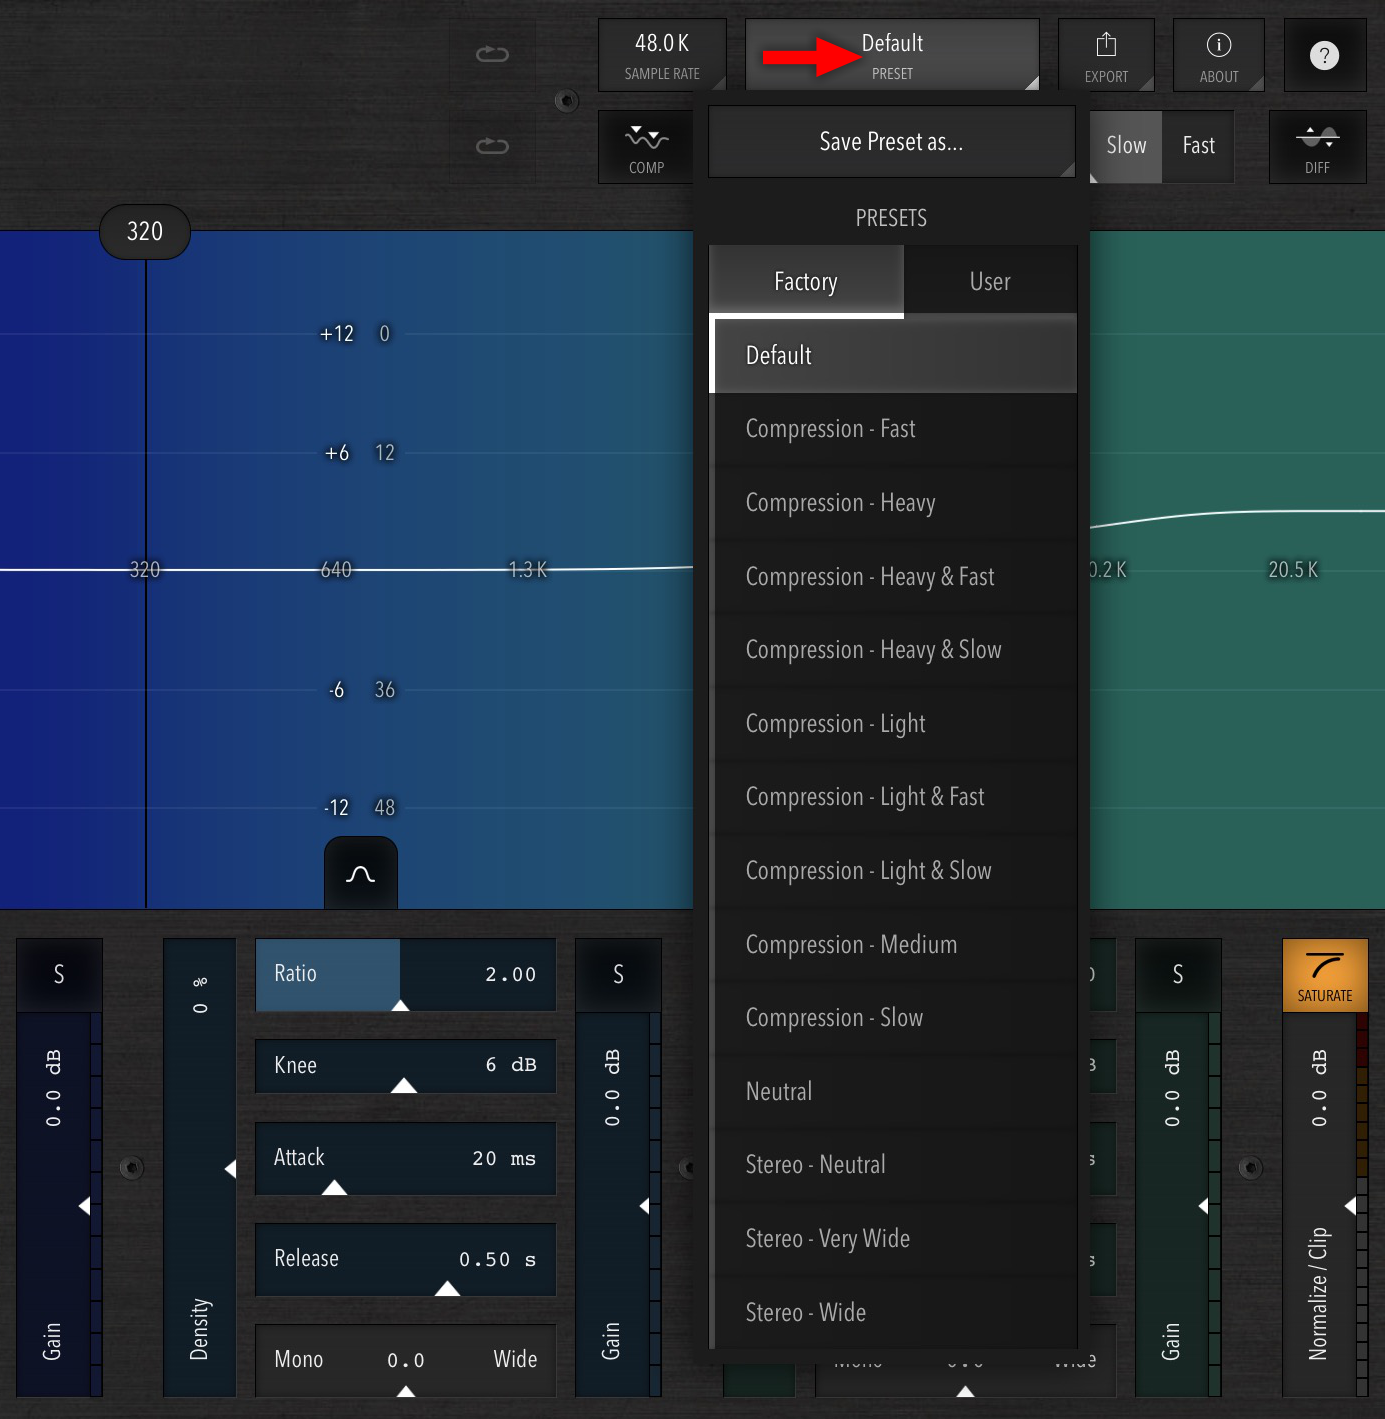
Trinity comes with a range of factory presets and the ability to save user presets as well.
Factory presets are mostly intended as good starting points for various parts of the app.
Most of the factory presets only replace certain groups of settings:
- Compression - * presets only load the main compressor settings: Compress, Density, Ratio, Knee, Attack, Release (for all bands). These are very useful for finding a good overall compression style for your track and have been carefully fine-tuned to give sensible results across all three bands. Try them out!
- Stereo - * presets only load the Mono | Wide sliders of the three bands, giving you a few starting points for stereo imaging.
Presets you save yourself appear under User and always contain all settings that are in any way sound-related. They are mostly intended for keeping the settings for each song you mastered so you can later come back to them if you want to re-master the same song, or as a starting point for another song in the future.
Importing preset (.trinpreset) files
To "install" a preset file you've downloaded or copied from a different device, copy or move the .trinpreset file to Trinity's "Presets" folder:
- On iPad / iPhone: Use the system's "Files" app to copy the .trinpreset file to "On my iPad / iPhone" -> "Trinity" -> "Presets". Note that this folder sometimes doesn't appear due to a bug in iPadOS / iOS. In this case, please reboot your iPad / iPhone and try again.
- On Mac: Open the "Preset" menu in Trinity and then click the "Finder" button. This will open Trinity's Presets folder in a Finder window, where you can paste your .trinpreset file(s).
The presets should then appear in Trinity's Presets menu under the "User" tab (you may need to close and re-open the menu).
A/B comparisons
Presets are also a good way to do A/B comparisons between different settings you come up with: Just save each configuration as a separate preset (for example, "Songname Airy" and "Songname Neutral"). Then, you'll be able to quickly switch back and forth between the two by clicking on their names to check which one you like better.
Any more questions? Suggestions for improvements? Let us know.