Introduction
Welcome to Xequence!
Xequence is a highly professional, fast & stable MIDI sequencer, arranger & controller for iPhone & iPad. It can be used to record, edit and arrange notes and controller movements, either using other apps that support Virtual MIDI / CoreMIDI (essentially, all of them), or external MIDI hardware like synthesizers, control surfaces etc.
It can also sync with other apps and devices using Ableton Link and can act as a MIDI Sync master, so that other apps or hardware can slave to Xequence, meaning that they run in perfect sync with it (they start when you press play in Xequence, they stop when you press stop, they move their song position if you move it in Xequence, etc.).
Xequence has full and rock-solid Audiobus support for all applicable Audiobus features.
This manual tries to give you an overview over important concepts and features in the app so that you can use it effectively and to its full potential. It is also intended as a reference for the more intricate and non-obvious features of the app.
If you're not into reading manuals, Xequence also contains extensive in-app "hints" that pop up whenever you touch a button or area for the first time. So, it may be best to just "dive in" and when anything is unclear, you can return here at any time to look it up.
Overview
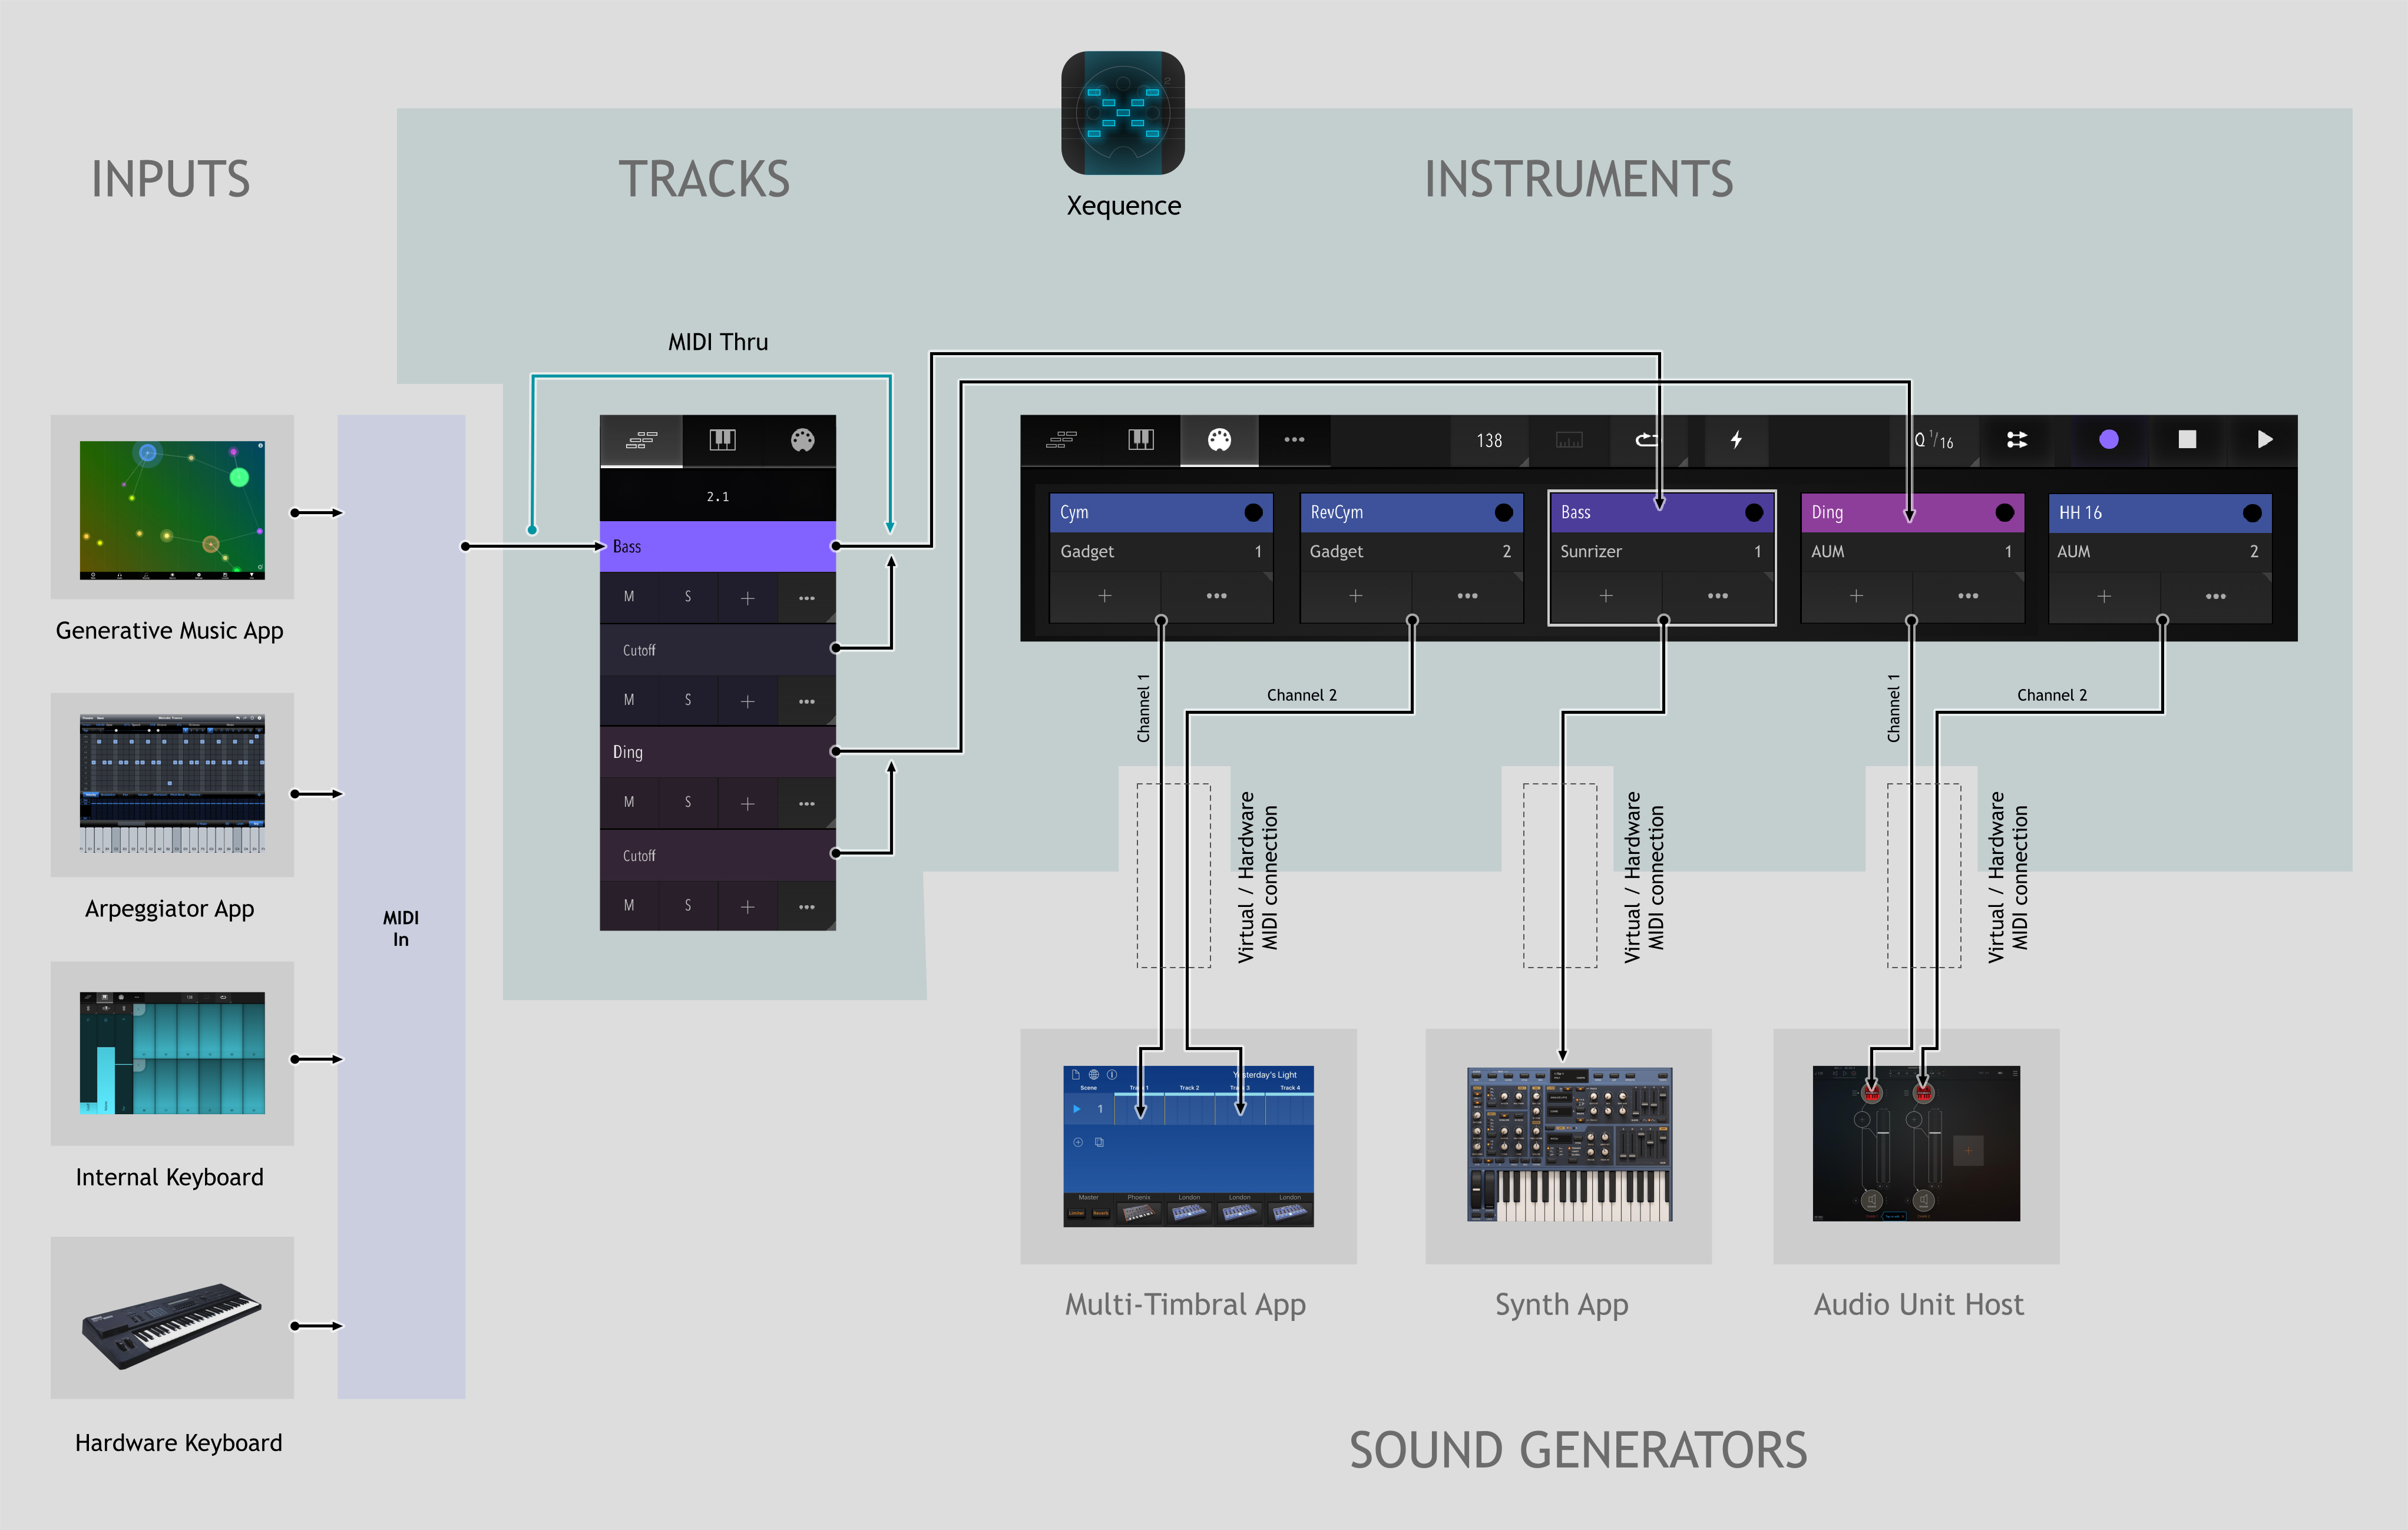
The following diagram gives you an overview of how MIDI routing between MIDI Input apps / controllers, instruments, and MIDI-capable apps / hardware works.

Instruments
An instrument in Xequence represents a configuration for something that actually produces sound, for example:
- a standalone synthesizer app like Poison-202, Animoog, or Gadget
- an external MIDI synth connected via any class-compliant MIDI interface
- an AUv3 synth hosted in a third-party Audio Unit host like Audiobus, AUM, or even AUM hosted in Audiobus.
Any time you want to add a new sound (timbre) to your project, you would create a new instrument.
Instruments have the following main settings:
MIDI Destination
Here you can select the MIDI output (or app whose sounds you want to use) for this instrument. This is saved with the project and when you reload it, all connections will automatically and reliably be remade, either at load or when the corresponding app is launched or interface connected.
If you use Audiobus, it appears as a destination here, too. See the separate "Audiobus" chapter for more information.
MIDI Channel (1-16)
For multi-timbral synths (apps or hardware that can produce multiple different sounds simultaneously), each sound is assigned one of 16 MIDI channels. Select the same channel in your synth and in this menu. If you only use one sound in the synth or if it doesn't support multiple sounds, just leave both at 1 or set the synth to Omni.
Another use case for channels is AUv3 hosts like AUM: As AUM only appears as a single app in Xequence, but can host multiple plugins, you would use channels to separately connect to them: In AUM, enable the "AUM Destination" MIDI Source for the plugin, and in "Channel Filter", enable just one of the channels, for example, 3. Then in Xequence, select AUM as the MIDI destination, and channel 3. This way, you can host up to 16 separate instruments in AUM and create corresponding instruments in Xequence.
For the Audiobus destination, the channel selector is replaced by a port selector for selecting one of Xequence's 16 Audiobus MIDI Outs.
Send Sync
Turn this on if (and only if) you want the timeline of an external DAW (for example, Loopy Pro — this is most useful if you want to use audio tracks in your project) or an external pattern sequencer / drum machine (for example, Ruismaker) to run in sync with Xequence.
Xequence sends the following sync information:
- Start
- Stop
- Continue
- Song Position Pointer
- Clock
Note that if you want an external app to sync to Xequence, you have to create a "dummy" instrument for it (with the "Send Sync" option enabled) even if you do not use any of its sounds (if you do use some of its sounds, just turn "Send Sync" on in one of the instruments. Sync is not channelized, so if you use the same app for several instruments on different channels, if you turn on "Send Sync" for one of them, it will turn on for all of them.)
There are two different modes that can be set in the "..." menu next to the "Send Sync" toggle:
- Absolute: This is most compatible with DAWs or sequencers that have a real timeline. It will try to synchronize the absolute time of the destination app / device with Xequence, so both run exactly in parallel. This mode may not be compatible with loop-based apps or devices. For those, use "Relative".
- Relative: This starts the destination app / device on the nearest whole bar position, and does not care about absolute timeline position. This mode is most useful and compatible with loop-based apps or devices, like Ruismaker.
Controllers
Xequence supports Continuous Controller (CC), AfterTouch (AT) / Channel Pressure, Pitch Bend and (N)RPN (as part of the Enhanced Pack) messages, the latter with either 7-bit or 14-bit (MSB/LSB) resolution.
Each instrument can have up to 150 controllers. These can be used to modulate parameters like filter cutoff, pitch, etc. in apps or synths that support it (i.e., nearly all).
To switch to the next page of controllers, tap on the right arrow button.
Many synths use the same controllers for similar parameters (e.g., CC 74 for "Filter cutoff"), so we have included a selection ofstandardized controllers in the menu which will often work out of the box. However, please check in your corresponding app or synth what CCs it uses for what parameter. Many synths also have "MIDI Learn" which you can enable for a certain parameter, then move the corresponding slider on Xequence's keyboard screen, and then the synth will have learned the CC number automatically.
Once you have set up the controllers for one of your apps or devices, you can also save the instrument configuration (In-App Purchase required) and later retrieve it so you don't have to set it all up again. We're also including a growing number of factory configurations for various devices and apps that are ready to go. See "Factory instrument configurations" below.
If the CC you want to control from Xequence is not included in the menu (say, you use a drum synth which uses CC 88 for the "Pan" knob of the HiHat), you can tap the "..." button at the end of the list, choose "CC" in the dropdown and enter the controller number (in this case, 88) manually.
Each controller has further options:
- Controller name: Especially for non-standard controllers, you can enter a name of your own here (for example, "Kick Drum Pan"). This name will be used in all menus, buttons etc. that deal with that controller.
- Display as: Xequence by default displays the actual MIDI values of a controller (0-127) in the vertical grids and ribbons. By setting this slider, you can scale the displayed values so that they match the destination parameter controlled (for example, if you're controlling a filter cutoff between 0 and 22050 Hz, set this slider to 22050 and you can see the actual filter cutoff values in Xequence instead of just 0-127).
- 14-bit: "Normal" CCs are 7-bit values from 0-127. (N)RPNs can be switched between 7-bit or 14-bit (MSB/LSB) with this toggle. Pitch Bend is always 14-bit.
- Centered: Enable this to have the controller centered around 0. Useful for Pitch Bend, Pan, etc.
- Return: Enable this to have the controller automatically "bounce" back to zero after lifting your finger off the ribbon on the keyboard screen. This is most useful for the Pitch Bend controller.
Non-Registered and Registered Parameters / (N)RPNs
Available as part of the Enhanced Pack.
In addition to "normal" CC messages, Xequence can also record, transparently edit and send (N)RPNs, either with 7-bit or 14-bit resolution. If 14-bit, values can be displayed or edited either as MSB/LSB separately, or as a single 14-bit number.
To assign an (N)RPN to a controller slot, tap the "..." button at the end of the list, then choose either "RPN" or "NRPN". Then toggle "14-bit" as desired.
The MIDI specification is quite loose on the correct handling of (N)RPNs, so there's potential compatibility issues with existing hardware and software. For this reason, Xequence has various options to fine-tune (N)RPN handling both for "live" MIDI and for MIDI file import/export. Please see the corresonding settings tab ("MIDI / Recording" -> "MIDI Input / Output") and the toggles in the MIDI file import/export dialogs for these. The defaults are very conservative and should work in most cases, but they do cause extra MIDI overhead.
Automatic detection of controllers
If Xequence detects controllers or (N)RPNs during recording that are not yet configured on the target instrument, a dialog will appear offering to add those controllers automatically.
Use of colors throughout Xequence
In Xequence, "colors belong to instruments", i.e., you can assign a color to each instrument, and that color will then be used for all user interface elements (tracks, pianoroll notes, keyboard keys, etc.) that affect that instrument.
For example, if you create an instrument for your bassline synth, and assign it the color "Blue":
- That instrument's track and any sub-tracks will be blue
- All clips on those tracks will be blue
- Notes and controllers in the editors are shown in blue
- On the keyboard, keys will be blue
- The "Record" button will be blue as well if you have one of that instrument's tracks selected
This always gives you a sense of context.
Factory instrument configurations
Available as part of the Enhanced Pack.
Since Xequence 2.4, the app comes with a selection of factory instrument configurations for various devices and apps, which will significantly reduce friction when setting up your MIDI destinations in case your device or app is included!
Tap the "Load" button in the instrument settings of an existing (or new) instrument to bring up the file selector and take a look at the "Factory" folder to see if your device or app is available.
You can also save your own instrument configurations, which will be available in all Xequence projects so that you don't have to set up the same controllers, destinations etc. every time you use an app or device. Just tap the "Save" button in an instrument's settings dialog and then load that instrument whenever you need it in a different project.
The selection of factory instrument configurations will be significantly expanded in the future.
Arranger
The Arranger is used to edit and lay out the global structure of the song. The basic concepts and navigation features are described below.
The Arranger contains a multitude of features for selection, processing and arrangement of clips in the bottom toolbar. This chapter only gives a high-level overview of the basic concepts.
Tracks
Every instrument is represented by at least one track in the Arranger.
These tracks each contain any number of clips, which are little boxes that can be moved around, duplicated etc. to construct the song. Each clip in turn contains notes, controller movements etc. that can be drawn in, recorded, and edited in the Pianoroll or Controller Editors.
Other sequencers also call these boxes parts or patterns.
You can also create additional tracks for each instrument. This is useful, for example, when you want to record both notes and controllers: this way, you can keep them neatly separated — use the main track for the notes, then create another track below it (the "+" button) for the first controller, another one for the second, etc.
You can record both notes and controllers on the same track into the same clips and then switch between them in the Pianoroll / Controller editor, but it is often much easier to work with separate tracks.
Track settings
Tap on the "..." button to open the track settings menu of each track (you might need to zoom in to reveal the button)
- Title: Tracks normally display the name of the instrument they belong to. A custom title can be entered here. Useful, for example, if you want to use an additional track for controller data that controls filter cutoff in the target synth. You could set its title to "Cutoff" then.
- Delay: If set, all notes and controllers on this track are shifted by this many milliseconds during playback. Useful for shifting claps or basslines slightly backwards in time, for example, or to adjust for latency of the synth / app on this track. This setting does not modify the actual data, it just affects playback.
- Swing: Performs swing quantization.This setting does not modify the actual notes in the clips on the track, it just affects playback. You can fine-tune it as often as desired.
- Multitrack recording source (only shown when Multitrack Recording is enabled): Xequence can record from multiple sources (apps, hardware controllers etc.) and/or channels simultaneously onto separate tracks. You can set any track to always record from one specific source and channel here. Please see the "Multitrack Recording" chapter for more details.
- Instrument settings: Tap the MIDI icon to directly open the settings for the instrument the track points to (so you don't have to go through the instruments screen first).
Mute / Solo
The "M" button mutes a track, i.e., its events won't be played back anymore. If the "S" button is active on one or more tracks, those tracks are soloed: only events on those tracks will be played back.
As soon as any track is in solo, the global "S" button in the ruler area (if visible) will be lit. Tap this button to un-solo all soloed tracks at once.
Scrolling the tracklist
We designed the Arranger so that you can only scroll vertically by swiping in the editor area on the right, not on the tracklist. This is on purpose: We wanted the "M" and "S" buttons to react instantly when tapped, however, in order to detect if a touch is meant to be a swipe (scroll) or a tap, Xequence would first have to wait until the finger is lifted or moved.
Editor
The editing area to the right of the tracklist contains your arrangement, i.e. all the clips that make up the complete song. The playhead moves from left to right.
- Slide your finger across the editor to scroll.
- Pinch with two fingers to zoom in or out.
- Tap and hold to start rectangle / marquee select. This will select all clips touched by a rectangle drawn with your finger. But see "Selection mode", below.
- Double-tap in an empty area to select or deselect all clips (this can be changed to single-tap in Xequence's settings, but we chose double tap so that you don't accidentally erase your whole selection while adding multiple clips to the current selection in Selection "Add" mode).
- Tap a clip to select or deselect it (the exact behavior depends on the Selection mode, see below).
- Double-tap a clip to open up the Pianoroll or Controller editor to edit its contents. You can also tap the toolbar button in the lower right corner instead.
Selection mode
There are two modes for selecting clips, using either tap or rectangle selection:
- Add: Use for selecting multiple clips by tapping them in succession, or drawing multiple rectangles. Tapping an already selected clip deselects it.
- Replace: When selecting clips either by tapping or drawing a rectangle, all previously selected clips are always deselected first. This is the mode that is probably more practical for most situations.
Grid
The editing grid can be changed by tapping on the button with the "three lines" icon in the bottom toolbar. When moving clips (or changing their lengths if "Ends" is enabled), movement will be constrained to this grid (for example, if it is set to "1/4", clips will move by quarter notes).
If the "Ends" toggle is enabled, then the adjustment of clip lengths will also be affected by the grid.
The "Rel" (relative) toggle changes how clips snap to the grid: normally, Xequence will make sure that all clips always stay on the selected grid no matter what. However, in "Rel" mode, clips will actually move in grid size increments, but not necessarily snap to the grid. So, for example, if you have a clip that starts one 16th note away from the beginning of the song, and you have the grid set to "4", if you now move the clip one increment to the right, it will actually end up one quarter note plus one 16th note from the beginning, not one quarter note.
The "Auto" toggle enables automatic grid adjustment depending on horizontal zoom level.
If you would like to use the grid as a visual reference only, you can turn off the "Magnet" toggle.
Moving, cropping, extending and timestretching clips
Once one or more clips are selected, they can be moved, cropped, extended, or stretched in various ways using the handles at the screen edges:
- Drag the horizontal handle to move the selection along the timeline. The selection's start point will snap to the current grid, or, if "Rel" is enabled in the grid settings, it will move by grid increments.
- Drag the right arrow handle to extend or crop the selected clip(s) at the end. The end points will only snap to the grid if the "Ends" toggle is enabled in the grid settings.
- Drag the left arrow handle to extend or crop the selected clip(s) at the beginning. The start point will snap to the current grid, or, if "Rel" is enabled in the grid settings, it will move by grid increments.
- Drag the vertical handle to move the selection to different tracks.
All cropping operations are non-destructive, i.e. a clip can be shrunk and then later extended again and the "cut-off" events will re-appear.
Xequence also supports easy time-stretching of a selection of clips:
- While holding either of the left-arrow or right-arrow handles, use a second finger to toggle the time-stretching switch that appears in the middle of the handle.
- You can now stretch the selected clips either from the beginning or from the end using either of the arrow handles.
While Xequence's timestretching algorithm is very smart and tries to yield musically sensible results, it is often helpful to start with clips already aligned to the grid in one way or another — it is best to experiment a little bit here.
Timestreching changes the data inside the clips, so if a timestretched clip has linked clips elsewhere in the song, it will be automatically unlinked first. However, if multiple clips that are already linked between each other are stretched, they will retain their "linkedness" with each other.
The timestretching toggle is normally turned off after each operation. However, Xequence can also remember its state (separately for the arranger and pianoroll/controller editors) if you turn off the "Auto-Disable time stretching" setting on the settings screen, Interface -> Editing.
Follow song
Both the arranger and pianoroll/controller editors have an optional, automatic "Follow Song" feature which will automatically keep the current song position in view, while trying to cause minimal disruption to editing workflow.
To enable or disable, open the "View" menu and tap on "Follow". The setting is remembered separately for Pianoroll and Arranger.
If you do not like the automatic following, you can still tap the "Current" button in the "View" menu at any time to bring the current song position into view manually.
Program Change and Bank Select
Any number of program changes (instruction to another synth which preset to use) can be inserted per track. Xequence also has robust support for Bank Select.
To insert a program change:
- Select a track by tapping its name in the track list.
- Move the song position pointer to the position where you would like the program change to occur.
- Tap the "+" button at the bottom left to open the "Insert" menu.
- Tap "Program change".
- In the dialog, enter the program number, and the bank number. You can either enter the full bank number (MSB and LSB combined), or MSB and LSB separately. Xequence will automatically fill the other fields as appropriate.
To edit an already existing program change, just double-tap it as you would a regular clip, or with the program change selected, tap the bottom-right "Edit" button.
Program changes use backtracing just like controllers, i.e. when the song position changes, Xequence automatically searches for the nearest previous program change and sends it to the instrument.
Pianoroll Editor
Double-tap a clip to open up the Pianoroll editor.
Clips remember which editor (Pianoroll or Controllers) was open for them previously, so if the clip you're opening doesn't show notes, just tap the "Data Type" button in the bottom left and then select the "Note" icon to switch to the Pianoroll.
This editor lets you draw or edit notes (move, change lengths, transpose, etc.) and their velocities (loudness). Selecting and navigating around the view works the same as in the Arranger.
When you're done editing, just tap the checkmark button at the bottom right to exit the editor.
The Pianoroll Editor contains a multitude of features for selection and processing of notes in the bottom toolbar. This chapter only gives a high-level overview of the basic concepts.
Grid
The editing grid can be changed by tapping on the button with the grid icon in the bottom toolbar. When moving notes (or changing their lengths if "Ends" is enabled), movement will be constrained to this grid (for example, if it is set to "1/16", notes will move by 16th notes.
If the "Ends" toggle is enabled, then the adjustment of note lengths will also be affected by the grid.
The "Rel" (relative) toggle changes how notes snap to the grid: normally, Xequence will make sure that all notes always stay on the selected grid no matter what. However, in "Rel" mode, notes will actually move in grid size increments, but not necessarily snap to the grid. So, for example, if you have a note that starts one 16th note away from the beginning of the clip, and you have the grid set to "4", if you now move the note one increment to the right, it will actually end up one quarter note plus one 16th note from the beginning, not one quarter note.
If you would like to use the grid as a visual reference only, you can turn off the "Magnet" toggle.
For newly created clips (i.e. when recording, creating clips with "Insert" -> "Empty clip", etc.), the grid settings default to the current quantization settings configured in the top toolbar's "Quantize" menu.
Moving, cropping, extending and timestretching notes
The handles in the editor work almost the same as in the Arranger, which is covered in the previous chapter.
When using the vertical handle, notes are transposed according to the scale of the current instrument. Xequence will preview the new pitches live (this behavior can be configured in settings).
To quickly move the selection one octave up or down, open the "Process" menu and tap on one of the "Oct" up/down buttons.
When using a drum map on the current instrument, selected notes are shifted to other drum pads according to the names listed on the left.
Velocity handle
To quickly edit the velocities of the selected notes, drag the velocity handle at the right screen edge up or down.
More detailed editing is available in the Controller Editor (see below).
Global clipboard
The global clipboard can be accessed by tapping the "+" button at the bottom left to open the Insert menu.
This clipboard works inside the same clip, across clips or even across projects so you can copy and paste notes from one project into another.
The following options are available:
- Copy: Copies all currently selected notes into the clipboard.
- Paste ("plus" symbol): Pastes all notes currently on the clipboard. The notes are pasted at the gridline nearest the song position pointer.
Notes outside the current scale or drum map
When editing a clip, only those notes (and "mini keyboard" keys) which are part of the instrument's scale are shown (for drum instruments, the equivalent applies). If you switch to another scale / drum map after already having recorded or drawn notes and the new scale / map doesn't contain all of the pitches of the existing notes, a warning dialog ("Wrong scale") will pop up, offering you to disable the scale, switch to the Chromatic scale, or make a custom scale.
Custom scales
In addition to the dozens of included scales, you can make your own custom scale easily.
To do that, select any number of notes in the Pianoroll editor, then tap on the "Insert" menu and choose "Scale from selection".
If you instead want to create the scale from scratch, just switch to "Chromatic" or "Black Keys" on the Keyboard screen, go back to the Pianoroll and then draw in the desired notes using the Draw tool, then select the drawn notes and now tap on "Scale from selection".
Scale / key changes mid-song
You can of course use changing keys or scales throughout the song, as the selected scale and key only affect which keys are visible on the keyboard screen and in the editor, but do not affect playback. However, you may encounter the aforementioned "Wrong scale" warning when opening the Pianoroll editor and some of the pitches in the edited clip are not contained in the scale that is currently selected in the instrument (the scale selected in the keyboard screen is remembered per instrument).
To avoid having to switch scales and keys all the time for editing, you can just create one instrument per desired scale / key, and set each of them to the same MIDI destination and channel, but choose different scales / keys on the keyboard screen. For each scale / key you want to use throughout the song, just make sure to use the corresponding instrument's track for each scale / key. You can also name the instruments or tracks accordingly (for example, "Bass E Maj" and "Bass D Maj") so that you see at a glance which track is intended for which scale.
Transposition
When transposing selected notes using the vertical handle, transposition is always scalar, i.e. all recorded notes always stay inside the current instrument's scale. For example, when you transpose one step upwards, one note might get transposed 1 semitone, while another might get transposed by 2, always ensuring that all transposed notes are still part of the scale.
Drum editing
If the instrument played by the clip being edited is in "Drum map" mode, the corresponding drum names will be shown on the left instead of the note names.
"Ghost" notes and controllers
Xequence makes lining up notes and controllers easy thanks to its ability to draw notes and/or controllers from other clips (or tracks) as "ghosts" in the background.
To configure this feature, open a clip for editing either in the Pianoroll or Controller editor, and then open the "View" menu in the bottom toolbar, then tap "Show in background".
By default, Xequence will include both notes and controllers. Either of these can be disabled by toggling "Notes" or "Controllers" in the menu.
Xequence will also include notes or controllers from other clips that share the same target instrument. To disable this in case it becomes too cluttered, just toggle "Other tracks for this instrument".
You can also include any other track from the project in ghost drawing: Tap "Select track" and then select one (multiple selection is not currently possible).
Controller Editor
Double-tap a clip to open up the editor, then tap the "Data Type" button at the bottom left to switch to controller data (or velocities). A menu will pop up that shows all data types that can be edited:
- Controllers (name and number): All controllers that have been assigned to the current instrument are listed here. Tap one to select it (controllers that have data in the current clip are shown in color).
- Velocities (down arrow icon): Brings up velocity editing mode. When switching to this mode from the Pianoroll Editor with one or more notes selected, only those notes will be available for editing. Velocities are shown as vertical bars: the higher bar, the higher the velocity. The usual editing tools can be used to draw or change velocities. If you have multiple notes that overlap at the same position (for example, in a chord), and you want to edit the velocity of only one of them (say, the top-most note), then select only that note before entering velocity mode, and only that note's velocity will be shown.
- Notes (note icon): Switches back to the Pianoroll Editor.
The Controller Editor contains a multitude of features for selection and processing of controller data in the bottom toolbar. This chapter only gives a high-level overview of the basic concepts.
While editing notes of a clip that contains MPE data, you can either edit the controllers of an individual note by selecting it before switching to the controller editor, or on the global channel by not selecting any notes before switching. More information is available in the separate MPE chapter.
Moving and scaling controllers
The handles in the editor work almost the same as in the Arranger, which is covered in the respective chapter.
- Use the center handle on the right to move the selected controller events up or down.
- Use the up or down handles on the right to scale (stretch) the selection up or down. The highest or lowest point will be used as a fixed point when scaling.
- Use the center handle at the bottom to move the selection left or right (overlapping existing controller data at the new position will be removed).
- Use the left or right handles at the bottom to scale (timestretch) the selection. The leftmost or rightmost selected event will be used as a fixed point.
The actual controller events are visualized as thin bright lines. The "bar" that follows each line is just a visual aid so that it is easier to see how long the last "real" event affects the controller value (until it is again changed by next event).
Editing values directly
The lowest and highest values (or only one if only a single event is selected) of the current selection are shown as buttons on the left next to the controller ribbon. Tap a value to edit it. If multiple events are selected, the selection will be scaled to accomodate the new value, while leaving the unedited value unchanged.
14-bit values can be edited either separately as MSB/LSB, or as the compound value.
Global clipboard
The global clipboard can be accessed by tapping the "+" button at the bottom left to open the Insert menu.
This clipboard works inside the same clip, across clips or even across projects so you can copy and paste controller data from one project into another.
The following options are available:
- Copy: Copies all currently selected controller events into the clipboard.
- Paste ("plus" symbol): Pastes all events currently on the clipboard. The events are pasted at the gridline nearest the song position pointer.
Keyboard and Control Ribbons
Xequence's keyboard controller is very versatile and offers a highly configurable, scale-aware keyboard with over 70 included scales selectable from almost a dozen categories (a chromatic scale (all notes) and "normal" mode with black keys are also included). It can be either single or dual and can be "velocity sensitive" (tap a key's bottom for full velocity, or the top for nearly no velocity). Two velocity curves are available on the Settings screen. The key size is freely adjustable using the "Width" slider.
The keyboard always controls the currently selected instrument, or, if launched while in the Pianoroll / Controller editor, the instrument of the clip being edited.
Scales
In music theory, scales are selections of notes that work well together and give off a certain "mood".
A full octave contains 12 semitones. Most scales, like the Major or Minor scales, contain only 7 of those, which work well together. There's also scales with less notes, like the Pentatonic scales, which contain only 5 notes.
There's 2 special options in the Scales menu:
- Black keys: Disable scales altogether and display black and white keys instead (like on a traditional hardware keyboard or piano)
- Chromatic: Also effectively disables scales, as the chromatic scale is the scale which simply contains all notes (12 semitones).
Playing and editing drums
Xequence has sophisticated support for fully customizable drum pads and editing. Please see the dedicated "Drum Maps" chapter for more details.
We also include a large selection of over 40 factory drum maps for all kinds of apps and gear so you can start drumming right away.
Alternatively, if you would like to use and edit drums without drum maps, use the Chromatic scale, as it contains all notes and you're guaranteed not to "miss" any drum sounds your destination instrument / app might have on some note.
Glide, Scroll, and Lock
Two toggles in the bottom toolbar of the keyboard screen control the scrolling / gliding behavior of the keys:
- Glide: When this button is enabled, sliding across the keyboard will play each key as soon as your finger slides over it, and releases it when your finger leaves it. If it is not enabled, then sliding your finger across the keyboard will instead scroll it horizontally.
- Lock: Enable this to prevent horizontal scrolling of the keyboard.
Controllers
Any controllers of the current instrument can be shown as ribbons to the left of the keyboard by tapping the "CC" button.
You can choose which controllers to display in the "..." menu at the bottom.
In the same menu, you can also choose to either display them vertically stacked (uses less screen space and you can "twitch" them more easily – iPad only), or next to each other.
All of these settings are remembered per instrument.
To move a controller, just touch its ribbon and then slide up or down (it will start from the current value, not the value where you first touched it). You can reset a controller to zero by double-tapping it. Controllers that have the "Return" option enabled will return to zero once you lift your finger.
Enhanced control modes
Xequence offers a palette of advanced ways to use controllers while playing live, outlined below.
Device Motion Control
All controllers can also be moved by rotating your device. Enable this option by tapping on the menu button above the slider, and then tap the "Landscape Phone" icon.
The first controller will be moved by rotating your device towards or away from you. If you enable Motion Control for more than one controller, the next axis that will be used is the "around the device itself" axis, and the next one would be the "tilt the device around its vertical center line" (if that makes any sense!).
Gate mode
A controller can also act like a button and thus be "played" like a keyboard key. Enable this mode by tapping the menu button above the slider, and then the "Pulse" icon.
In this mode, when tapping the slider anywhere, the controller will immediately jump to the value at that position (for example, if you tap it right at the top, it will jump to 127), and when you release your finger, it will jump back to the position it was at before activating Gate mode.
There's at least two use cases for this mode:
- For emulating a Sustain pedal (set the controller to 0 in normal "Slide" mode, then switch to "Gate" mode and tap near the top to simulate the sustain pedal.)
- For creating the proverbial "trance gates" (by using CC 7 / Volume).
Note that when recording in this mode, controller data is quantized according to the "Quantize" setting at the top (including the "Ends" toggle there), just like keyboard keys. Of course, you can turn "Quantize" to "Off" if you do not want quantization in this mode.
Key position mode
In this mode, touching a key will set the corresponding controller depending on the vertical position where you touched the key (or keys). This is done before playing the actual note, so the target synth has time to adjust the controller's value before playing the sound. This mode is very useful for synths that do not support mapping velocity to controllers, etc.
Xequence's internal keyboard currently does not support MPE, i.e. even if you choose one of the advanced "per-key" control modes, the generated data is still "global", i.e. not per-note. This might be enhanced in a future version.
Key slide mode
In this mode, the controller can be moved by sliding your finger up and down on a key (or keys) after touching the key.
Key slide + position mode
This mode combines the previously mentioned two modes.
Recording over existing controller data
If you use the internal keyboard to record controller movements, Xequence will try its best to automatically erase any previously existing controller data while the ribbon was touched. However, the following caveats exist:
- This can only work with the internal keyboard, as it is based on a touchscreen and can detect when the finger first touches the screen (start erasing existing controller data) and leaves it again (stop erasing). So, this will not work with external hardware controllers.
- It only works if you currently have a clip open for editing, as otherwise, Xequence wouldn't know where to erase controller data if there's multiple clips containing some.
Event chasing
Xequence automatically finds the nearest previous controller event in the clip that is at the current song position, and uses that for updating the slider and also sends it via MIDI. So, no matter what, when you set the song position, you will always see the correct slider position (event chasing only works inside clips for now, so if there is no clip at the current song position, the controller value might not be correct.).
Drum maps and Editing
Xequence has a sophisticated drum map and editing system:
- Up to 64 drum pads, in any desired layout (4x4, 8x8, 2x6 etc.).
- Fully customizable layout, drums can be moved around by drag and drop.
- Highly configurable velocity sensitivity, with various modes (maximum velocity at center / top / bottom) and velocity curves (these settings can be found on the "..." (Settings) screen at the top left).
- Glide mode.
- More than 40 factory drum maps included for various drum machines and apps. An unlimited number of user drum maps can be created and saved.
- Various map processing features such as Flip, Compact etc.
Activating drum maps for an instrument
To switch into drums mode, select a track that is assigned to a drum synth or similar, go to the Keyboard screen, open the "Layout" menu in the lower left corner (it will either show a single or dual keyboard icon), and in the dropdown menu, select the top option (drum map icon).
Xequence will load the "General MIDI" map by default, which contains the 47 standard GM drums including their names and notes.
Map size
You can configure any map layout from 1x1 (a single large drum pad) to 8x8 (64 pads) and anything in between by opening the "Map Size" menu on the right hand side of the bottom toolbar.
When you resize a map that already has drum pads assigned and the new map size is smaller than the previous one, Xequence will try to keep the visual layout and shrink the map size horizontally so that the existing pads stay centered, and vertically so that bottom pads stay at the bottom.
If this is not possible, there can be two scenarios: If in theory, the existing pads would be able to fit the new size (say, you have 35 drum pads and you select 6x6), but not with the current visual layout, then Xequence will offer you to automatically compact the map so that all drum pads still exist, but without their previous layout. Otherwise, say if you have 30 pads assigned, but the new map size is 3x3, then Xequence will ask to discard those drum pads that cannot fit in the new size.
If you select a larger size, then existing pads will stay centered at the bottom, and new grid cells will be added at the top and/or to the left/right.
Single-Pad Zoom
You can zoom in on a single pad at any time for better finger drumming / positional velocity.
To do that, tap the "Single-Pad" button in the bottom toolbar, then tap the pad you would like to use. You can return to the full layout by tapping the "Single-Pad" button again.
The zoomed pad is remembered for each instrument and across sessions.
Editing the map
To start editing a map, activate Edit mode by tapping the "Edit" toggle at the bottom.
You can then:
- Tap any pad or empty cell to edit or add a pad. Each pad has a title and a note / octave. When selecting the drum note, Xequence will actually send the selected note via MIDI so you can find the correct drum without reading manuals. You can also clear a pad if you do not want anything to trigger at that cell position.
- Tap and hold a pad to move it around. If you drop it on an already existing pad, the pads will swap positions.
"Process" menu
This menu offers various features that affect the entire drum map:
- Clear: Clears all pads, leaving an empty drum map.
- Compact: Moves all assigned pads to the bottom, starting from the left and then going up in rows.
- Fill: Can be used to automatically generate drum pads with ascending notes, starting from the selected root note (the entire existing drum map will be overwritten).
- Flip H/V: Flips (mirrors) the drum map. Useful for changing between right-handed and left-handed use, etc.
Factory drum maps
Xequence comes with a selection of over 40 preset drum maps that have the corresponding notes, labels and layout for various popular drum machines or synths.
Tap the "Drum Map" button in the lower left corner to load a drum map.
You can also save your own maps, which will be available in all Xequence projects. Just take an existing drum map, edit it as desired, and then tap "Save" in the "Drum Map" menu.
Exchanging drum map presets between devices
Drum maps are stored in Xequence's Documents folder in the "Drum Maps" subfolder. They have the extension ".xeqdrums". These can easily be copied between your various devices using the iOS / iPadOS Files app.
Note: This currently does not apply to the AUv3 plugin, where user drum maps are currently not accessible externally. We're working on that!
PolyHymnia
Generative Music
PolyHymnia is an advanced generative music module. It can create complex melodies and chord progressions automatically using tweakable algorithms.
The results are mostly very musical, and PolyHymnia includes several "Auto-Generate Settings" features that will produce interesting results even if you don't want to learn the individual settings and options it offers yet.
All settings can be changed live while playing and are saved in the corresponding clip, so you can always come back later and tweak the algorithm you used to create a clip's notes.
Opening PolyHymnia
Note: It is best to set a scale on the instrument you will be using for PolyHymnia so that generated pitches are more predictable and "go along" nicely. For a start, a Hexatonic or even Pentatonic scale will work best (choose the scale as you normally would, in the Keyboard screen).
You can find PolyHymnia in the Pianoroll editor. Just create an empty clip by using Draw mode (a length of 4 bars is a good start), and tap the edit button in the lower right corner to open the pianoroll editor.
Next, tap the "+" button in the lower left corner, and choose "PolyHymnia".
You will now see a sequence of notes generated using the default settings (which are actually quite boring). Note that PolyHymnia by default replaces the currently selected notes, and keeps doing that each time you change one of its settings, so you can keep tweaking and have the contents of the clip update automatically. If you would instead like to add another set of notes without overwriting the existing ones, just deselect all notes before changing settings or tapping "Add / Update".
Setting a pitch range
The first thing you'll want to do is set a reasonable pitch range. To do that, go to the "Pitch" tab, enable "Sync to view" if not yet enabled, and then pinch and scroll the pianoroll (while keeping PolyHymnia open) so that the area between the colored horizontal lines roughly covers 2 octaves in a useful pitch range.
The "Global" tab
This tab contains the most often used options and actions, so we will discuss this first:
- Shuffle All: This is probably the most important and fun button of all: Tap it to auto-generate interesting settings for almost all configurable parameters in PolyHymnia, in all 4 tabs (Pitch, Length, Distance, Velocity). You will immediately see the sequence in the background change to something more interesting. Tip: Set the clip to loop (top toolbar, "Loop" icon, tap "Clip") and then press Play and leave it running in order to hear all changes immediately. A clip length of 1 to 4 bars works best for a start, but this is of course up to you.
- Repetition: This slider affects the settings generated by the "Shuffle All" button. Higher values generate settings which produce more repetitive melodies. Note that you need to tap "Shuffle All" again after changing this slider.
- Complexity: This slider also affects the settings generated when tapping "Shuffle All". Higher values mean more intricate, complex melodies. Lower values give simpler, more predictable sequences.
- Voices: PolyHymnia can generate polyphonic sequences in a smart manner. Change this slider to choose the polyphony of the generated melodies.
- Variant: You'll find "Variant" sliders throughout PolyHymnia. These change the phase of the mathematical functions used to generate the sequences. i.e., the "character" of the melodies will basically stay the same, however, you can "shift around" the algorithm in time.
- Shift: This adds a constant shift per generated voice. This can be used to generate more predictable chords. For example, if you leave "Variant" at 0° and increase "Shift" instead, you will get predictable chords that are always the same, while doing the opposite will let PolyHymnia vary the generated chords using advanced algorithms.
- Auto-Replace Selection: When this is enabled, whenever a setting / slider is changed or one of the "Shuffle" (flask) buttons is pressed, PolyHymnia will automatically delete the current selection and replace it with the new generated sequence, so you can keep tweaking and shuffling the parameters while hearing the results in real time (leave the song loop running!).
- Add / Update: When "Auto-Replace Selection" is disabled, you can tap this button to add a sequence manually using the current settings. This is useful when you want to add another sequence with different settings to the already existing one: Just deselect all, change settings, and then tap "Add / Update" to add another sequence on top (you could then re-enable "Auto-Replace Selection" and then further tweak parameters). PolyHymnia will then keep updating the new sequence, as it will always first erase the current selection and then replace it with the new sequence.
The "Pitch", "Length", "Distance" and "Velocity" tabs
PolyHymnia uses advanced mathematical algorithms to generate musical sequences. The algorithms and parameters available are basically the same for all four properties, and they can be edited separately in the corresponding tabs.
Each tab consists of basically three sections:
- Flask (Shuffle): This button generates interesting settings for the current tab only. Otherwise, it works the same as the "Shuffle All" button in the "Global" tab. This is useful if for example you're satisfied with the melody (pitches) you're currently getting, but want to change its rhythm: You could then go to the "Length" or "Distance" tabs and tap the "Flask" button there for getting variations.
- Range: At the top, each tab contains settings that set the range of the generated values, i.e. minimum and maximum pitches, lengths, distances, or velocities. This setting is not affected by the "flask" buttons.
- Operators: Below, each tab contains three operators. These are mathematical or pseudo-random functions that output values which affect the generated notes' pitches, lengths, or distances. The operators are internally summed or multiplied (see next bullet point) and then clipped to the selected range, using an algorithm that makes the results exceptionally musical (most of the time). The individual operators are discussed below.
- Equation: At the top right, it is possible to configure the way the individual operators are combined. The operators are numbered 1, 2 and 3 (visible in the "equation" and in the respective LED of each operator). Selecting "+" adds the outputs. Selecting "×" multiplies them, so that (at 100% influence of the second operator) if the second operator is 1, the first operator fully "gets through", while when it is 0, the output is zero as well. This can be used to "gate" or "scale" the preceding operator. Note that the normal mathematical precedence (multiplication before addition) is not applied, so the order of precedence is always (1...2)...3.
- Offset: Further below, the summed output of the operators can be shifted up or down (before being clipped) to fine-tune the outcome, or drive the values hard into the clipper (useful, for example, in the "Pitch" tab to drive the notes down to the lowest note, which might be the root note of the current key), so that most of the values are the same. This slider is not affected by the "flask" buttons.
Operators
Each operator has four or more settings:
- Waveform: selects the basic waveform: off, Pulse (with adjustable width), Sine, Triangle, Sawtooth, and Sample & Hold (random). All waveforms have several variants, like rectified and positive-cycle-only.
- Period: Sets how often the waveform repeats, in 32th notes.
- Variant: Shifts the phase of the generated waveform. i.e., the basic character stays the same, but the values are shifted in time.
- Influence: Sets how much this operator affects the end result. By setting negative values, the operator's output can be inverted.
- Width ("Pulse" waveform only): Sets the pulse width.
- Seed ("Sample & Hold" only): Selects one of 77 available pseudo-random sequences. The sequence always stays the same once selected.
The current output value (at the current song position) of each operator is visualized by a LED next to it. Negative values are shown in inverted color.
Likewise, the summed output value of all operators of the current tab is visualized by a LED below the "Offset" slider, and also at the top of its respective tab button.
The "Pitch" tab
The "Pitch" tab is special because it offers an interactive way to set the range of generated notes (pitches).
As soon as you open PolyHymnia, you will see two colored horizontal lines in the Pianoroll editor. These enclose the range of pitches that PolyHymnia can generate. If you enable "Sync to view" and then zoom in and out vertically by pinching in the editor (or just scroll vertically), you can adjust this range freely. The center key will have a little arrow on it.
The most interesting results can be achieved by having the root note of the current scale either at the bottom, top or at the center of the selected pitch range.
The "Length" tab
This tab controls the lengths of the generated notes. You can select a minimum and maximum length at the top, which will be mapped to the values generated by the operators.
The "Distance" tab
This tab controls the distance (pauses) between generated notes. Sequences generated by PolyHymnia never overlap. If you don't want pauses between notes at all, just set both "Min" and "Max" to "Off".
PolyHymnia and the editing grid
Regardless of the settings in the "Length" and "Distance" tabs, PolyHymnia always quantizes all generated notes to the editing grid (set in the bottom toolbar of the pianoroll editor).
The "Velocity" tab
This tab controls the velocities of the generated notes. The values generated by the operators are mapped to the velocity range set by the "Min" and "Max" sliders at the top. If you do not want any velocity variation at all, just set both sliders to the same value (double-tapping a slider will set it to the default velocity configured in settings).
Re-editing PolyHymnia clips later
All settings are saved into the corresponding clip once you leave the pianoroll editor. That means that you can come back at any later point and re-open a clip that contains a PolyHymnia sequence, and when opening PolyHymnia, all settings will be where you left them. Note though that if you manually edit notes after closing, PolyHymnia will not be able to recognize the existing notes as a sequence it generated, and thus will add a new sequence on top once you open it. To avoid that, select all notes before opening PolyHymnia, as it always replaces the current selection.
Tips and hints
- Create an empty clip at most a few bars long, set the song loop to it, hit "Play", and then start tweaking the parameters to hear the outcome live.
- You can use Undo and Redo (bottom right corner) while in PolyHymnia to go back and forth between all settings and presses of the "flask" buttons to freely experiment.
- PolyHymnia will never create duplicate or overlapping notes. So if you open a clip that has notes that were previously generated by PolyHymnia and haven't been edited, then opening PolyHymnia will not generate any new notes. Instead it will select all existing notes so you can seamlessly start tweaking the existing sequence.
- Select a scale on the keyboard screen, preferably a hexatonic or pentatonic scale. This will limit the possible pitches and yield more melodic results.
- The amount of possible sequences is practically infinite. Keep tapping the "Shuffle" (flask) buttons until you find one that is likeable, and then tweak the sliders if necessary, or, if only a certain aspect of the sequence bothers you (melody, rhythm, pauses etc.), try to go to the corresponding tab and just use that tab's flask button.
Demo sequences
Xequence comes with a demo project that contains various interesting melodies created with PolyHymnia, along with their settings so you can tweak them further.
Tap on the "..." button at the top left, navigate to the "Demos" folder, and then load the "PolyHymnia Demos" project. Each track contains a clip generated with PolyHymnia. You can assign a sound source on the instruments screen, and then just solo each track in succession to hear the corresponding sequence.
To edit and tweak, just double-tap a clip, open PolyHymnia, and start modifying settings.
Metronome, Tempo and Time Signature
Metronome
Xequence has a very flexible Metronome with two basic modes:
- Audio: Audible clicks are generated and routed to the current default output. You can change the volume on the Settings screen in "MIDI / Recording" -> "Metronome" -> "Volume".
- MIDI: In MIDI mode, the metronome does not produce a sound (click) by itself. Instead, it just sends MIDI notes to a MIDI synth of your choice (you can select the metronome destination and channel on the Settings screen in "MIDI / Recording" -> "Metronome" -> "MIDI destination"). This gives you maximum flexibility by using another app for generating the metronome sound, which might let you choose different outputs, sounds etc.
Xequence always uses the root key of the current instrument for playing the metronome (if the instrument is in E, it will play E4 for bars and E3 for beats). So it is best to choose a tonal (not atonal / drum) sound for the metronome.
Tempo and Time Signature
The slider sets the project tempo in BPM. The "Snail" toggle can be used to temporarily set the tempo to half the displayed value, which can be very useful during recording in fast (e.g., EDM) music.
The next two dials set the time signature (upper dial 3, lower dial 4 = 3/4). Any reasonable time signature is supported.
Tap tempo
Xequence has a very advanced tap tempo feature which lets you input the desired tempo by tapping rhythmically on a button.
Open the tap tempo menu using the "Tap" button, and then just start tapping on the pad. You will see the detected tempo in the toolbar above, and it will get more accurate the longer you tap. You will also hear a metronome to assist you in finding the right tempo.
When you're happy with the detected BPM, just stop tapping, and the menu closes automatically.
Recording
Press the Record button to start live recording. This will record:
- Keys played on the Keyboard screen
- Controller movements on the Keyboard screen, no matter by which kind of input mode (slider, motion, key position etc.) they might have been generated
- Keys played in or notes sent from other apps or hardware if "MIDI In" is enabled in settings, and the source app is enabled in the "Sources" panel, or "Xequence Destination" is enabled and has been selected as the destination in the source app or MIDI interface.
- Controllers sent from other apps or hardware. Controllers (CCs) that are not yet configured on the current Xequence instrument are automatically added if "Auto-add controllers" is enabled (a list of detected new controllers will be shown after recording finishes).
To properly record from an MPE controller, please see the separate chapter on MPE.
Automatic quantization
Recorded notes will be quantized automatically according to the settings in the "Quantize" menu in the top toolbar (you can choose the "Off" option if you do not want quantization, or if you want to quantize manually later).
Recorded controllers will not be quantized, except if the controller is in "Gate" mode. You can always quantize controllers after the fact by using the "Process" menu in the Controller editor.
Recording into the Arranger
If you start recording while in the Arranger, or in the Keyboard screen and you previously had the Arranger open, then a new clip will be created on the currently selected track, and all events will be recorded into it. The clip will be automatically trimmed to the nearest bar. It will be deleted again on stop if no events were recorded.
Multi-Take Recording
If the song loop is enabled while recording, Xequence can either overdub the same clip each time the loop wraps, or it can record each take onto a new, separate track.
The desired behavior can be chosen in Settings ("..." at the top left) in the "MIDI / Recording" tab under "Loop Recording in Arranger":
- Overdub: Only one clip is created, and notes and controller data are simply added to the existing clip for every new loop.
- Separate tracks: A new sub-track is automatically created for every loop (even the first one) below the selected track, and will be muted (the "M" toggle). After recording all your takes, you can then listen to all your takes in succession by unmuting each and checking if you want to keep it (see below). Xequence is very smart about only creating a new track for a take if anything has actually been recorded during that loop iteration.
After recording multiple takes and finding the best one by unmuting / muting, you can tap on the "..." button of the corresponding track, and then on "Use this take". This will automatically delete all other tracks created during that recording, and also move the clip to the originally selected track (when you started recording), so everything is neat and tidy again.
Xequence will also automatically detect if only one single loop contains a recording, and in that case execute "Use this take" automatically.
Recording into the Pianoroll or Controller Editor
If you start recording while editing a clip (or had the editor open before switching to the Keyboard screen), then everything will be recorded into the currently open clip. No new clip will be created.
Recording from multiple MIDI sources simultaneously
Normally, Xequence will merge all MIDI from all sources onto the current track. However, it is also possible to record from multiple sources simultaneously onto separate tracks. Please see the "Multitrack Recording" chapter for more details.
Count-In and Metronome
If you press Record while Xequence is stopped, the song position will be moved backwards by one or more bars (configurable in the Settings screen) so you have time to prepare. Any events (notes, controller movements) that arrive while in count-in will only be recorded if you are recording into the Arranger. If you're recording into the Pianoroll, events during count-in will be dropped.
If you enable the "Always during Count-In" option in the "Metronome" section under "MIDI / Recording" in Settings, then the metronome will automatically be enabled during count-in so that you can "get into the rhythm" even if there isn't anything recorded yet to guide you.
Likewise, the metronome can also be set to always sound while recording by enabling "Always during recording".
Multitrack Recording
Xequence has advanced, fully automatic multi-track MIDI recording functionality.
Enabling Multitrack Recording
Important: Multitrack recording is only available on the Arranger screen, not in the pianoroll or controller editors!
To enable, tap the "Two arrows" icon in the top right corner. Also, be sure to enable all MIDI sources that you would like to record from. Go into Settings ("..." at the top left), and then in the "MIDI / Recording" tab, tap on "Sources" and enable all desired sources.
For multitrack recording, it is good practice to configure your source apps (or hardware MIDI ports) to present themselves as a MIDI source rather than having them send to "Xequence Destination". This is to ensure that Xequence can see them all separately including their names, which is helpful in auto-naming recorded clips (see below), and to avoid having to use separate channels.
You can see that you configured your sources correctly if they appear as separate, named buttons in the "Sources" panel, and the MIDI In LED flashes even if "Xequence Destination" is disabled there.
Recording and automatic detection of sources
Multitrack recording in Xequence is fully automatic and "just works".
After enabling the multitrack recording toggle, just hit the Record button and send MIDI from multiple sources.
You should see Xequence automatically add a new track for each combination of a source and MIDI channel as soon as data from the various sources arrives, including live previews of the recorded data.
The newly created tracks remember their source and channel, and on the next recording, the tracks will be re-used (no redundant tracks will be created). All tracks are created as sub-tracks of the currently selected track.
If you would like to have more control over which tracks receive from which source, you can also set-up the recording sources manually for each track before recording (see "Manually configuring or changing sources", below).
The clips that are created during multitrack recording are automatically named according to the source and channel. You can remove or change the name by selecting them, tapping on the "Process" menu, and then on "Name".
Tracks that are automatically created during multitrack recording have an explicit recording source set (see below). These tracks will always be "armed" for recording, even while they're not selected.
Multitrack recording from Audiobus
For multitrack recording to work with Audiobus inputs, a separate MIDI lane must be created in Audiobus for each input (source) you would like to record. Each lane must contain your corresponding source app (and appropriate sub-output, if any) as its input, and Xequence with a separate MIDI In number selected as its output.
Manually configuring or changing sources
Although Xequence adds and configures the sources of tracks as needed automatically during recording, you can also configure sources manually:
- Tap on the "..." button of a track to open its settings
- Tap the button below "Multitrack recording source"
- All available (i.e. enabled) MIDI sources are listed at the top. Choose one of them by tapping on it, or tap "None" to disable multitrack recording on this track. The "Keyboard" source represents Xequence's internal keyboard controller.
- Tap the desired channel (or for Audiobus, the desired MIDI In) to record from (this setting is not available for the "Keyboard" source).
- Tap "Done" when you're finished.
Any track that has a multitrack recording source selected will always be "armed" for recording, even when it is not the selected track. This is different to single-track recording, where only the selected track records.
If you use MIDI Thru, it currently does not respect the Multitrack Recording settings, including the sources selected for the individual tracks. It always routes to the current instrument. This is something that we will look to improve in a future version of Xequence.
MPE (MIDI Polyphonic Expression)
Available as part of the Enhanced Pack.
Xequence has comprehensive support for MIDI Polyphonic Expression (MPE), including:
- Recording of multi-channel note and expression data from MPE-capable hardware (or software) controllers, including MPE-specific RPNs
- Efficient editing of per-note expression data
- Manual drawing of MPE notes / expression data and flexible (including automatic) channel assignment
- Robust editing workflow that is aware of and intelligently preserves the relationships between notes and their expression data in all operations (moving, transposing, time-stretching, quantization, etc.)
- Import / Export of MPE data as MIDI files
Enabling and configuring MPE for an instrument
Xequence does not store MPE settings per MIDI input source, but instead per instrument. This may sound counter-intuitive, as you'll probably more closely relate instruments to outputs instead of inputs, but it does lead to a more streamlined workflow and integration into the instrument concept used in the app.
So, once you have added an instrument on the Instruments screen (MIDI icon at the top left) that you would like to record and playback MPE data for, open its settings menu by tapping the "..." button, enable the MPE toggle, and then tap on the "..." button next to it to open the MPE settings.
The following configuration options are available:
- Zone: This selects the lower (global channel: 1) or upper (global channel: 16) zone. Most instruments and controllers are set to the lower zone by default.
- Member channels: The number of member channels can be set to less than 15, in case two zones are used on the same instrument, or the same MIDI connection shares both MPE and non-MPE data. For the lower zone, channels 2 and upwards are used. For the upper zone, channels 15 and downwards are used.
Automatic channel (re-)assignment
When new notes are drawn or recorded, or existing notes moved, Xequence can automatically assign free channels to them. This is useful, for example, if you don't have an MPE-capable keyboard, but still would like to expressively control an MPE-capable instrument: you can just draw or record notes "normally", but have Xequence assign channels to them so each note's expression (controller) data can be edited individually after the fact.
It would also be necessary to prevent unwanted channel overlaps from editing operations like moving notes or changing their lengths, which would destroy the proper relationship between notes and their controller data and thus make them mostly uneditable.
Automatic channel assignment can be configured for the following scenarios:
- When drawn: Assign free channels when drawing new notes.
- When moved: Assign free channels when moving, lengthening, quantizing or legato-ing notes and the operation would create a channel overlap with other existing notes. If there was already an overlap before the operation, no re-assignment will take place as the existing overlap will be considered intentional.
- From Keyboard: Assign free channels when using the in-app keyboard.
- From MIDI (Global): Assign free channels when receiving MIDI from an external non-MPE keyboard on the Global Channel.
- From MIDI (Zone): When enabled, notes received on Zone Channels will be re-assigned new channels if overlapping with existing notes in the opened clip. Any received controller data will also be moved to the new channel. Useful when overdubbing new MPE data over existing notes in the Pianoroll editor and the channels have no special meaning for this instrument.
When assigning channels to new notes, Xequence determines if a channel is "free" by looking at all other notes in the same clip, and if no notes with the same channel "overlap" the note, the channel is assumed to be free for assignment.
A small overlap (given in seconds) is added for safety and can be adjusted using the "Overlap margin" slider.
Only overlapping notes in the same clip will be taken into account. Clips on sub-tracks of the same instrument are not considered, so it is best to keep all relevant notes for an MPE instrument inside the same clip.
Recording and editing MPE
To record from an MPE-capable controller, make sure the MPE settings (zone and number of member channels) of your controller match those that you configured on the instruments screen.
Then, select the instrument's track in the arranger by tapping on the track header, make sure that Multitrack Recording is disabled ("two arrows" toggle in the top toolbar off) and start recording by tapping the "Record" button.
To edit the recorded data, open the Pianoroll editor by double-tapping the recorded clip.
You will notice that each recorded note contains the channel number that it came from. When you select notes, any expression data (such as Pitch Bend) will be drawn inside the note.
You can use all editing operations like move, time-stretch, duplicate, quantize or delete as usual -- expression data will stay attached to the notes as it should.
Editing MPE per-note expression data
To edit a particular note's expression data, select exactly one note, then tap on the "Data Type" button in the bottom toolbar, and choose the data to edit (for example, Pitch).
You can still edit global controller data as usual by making sure that either no notes or more than one note is selected when choosing a controller in the "Data Type" menu.
You will notice that only the controller / expression events for the selected note are drawn (and available for editing).
You can use all the usual tools of the controller editor without limitation to edit the data.
You can also quickly switch to a different note by just tapping on one.
Pitch Bend editing
When editing "Pitch" data, Xequence will take into account the base pitch of the selected note and visualize what pitch that note would be bent to on the control ribbon on the left side of the display, making editing a breeze.
To bend a note to an exact pitch value, just select the corresponding data points and tap on one of the buttons on the left-hand ribbon and enter a pitch (for example, "-2").
Re-assigning MPE channels to notes and expression data
You can manually change the channels of existing notes and expression data, or even have Xequence automatically assign free channels.
This might be handy if you have existing projects which you would like to use on an MPE instrument, or if you have imported a non-MPE MIDI file, for example.
To do so, select any number of notes, then tap on "Process" in the bottom toolbar, then on "Assign channels".
The global channel is denoted by a "G", and non-zone channels (if any) are greyed out. Conflicting channels (i.e., ones where other notes on that channel overlap) are – fittingly – denoted by a "no parking" sign.
You have the following options:
- Assign a specific channel (1-16): This will just assign that channel to the selected note(s), and move any expression data that belonged to those notes to the new channel too. If a particular channel would result in overlapping expression data, it is denoted by a "no parking" sign and should not be used. Otherwise, the expression data will merge in a "destructive" manner and probably be unusable.
- Auto: This will automatically assign non-overlapping channels to all selected notes where necessary, and move any existing expression data to the new channels. It will try to preserve existing channels if no overlaps exist, in case your instrument assigns a specific meaning to each channel.
- Clear: This will remove the channel information from the selected notes, essentially converting them to "normal", non-MPE notes. Any attached expression data can be either dropped or converted to global data.
Song loop
The Song Loop feature can be used to play a certain part of the arrangement over and over again. As soon as the loop's endpoint is reached, Xequence simply rewinds the song position to the loop's beginning. The looping is "perfect", i.e., no timing offset or jitter when wrapping around.
The loop can be set in various ways:
- Selection: If you are in the Arranger, this sets the loop points so that they encompass the currently selected clips. Probably the most used (and useful) option. If you are in the Pianoroll, this sets the loop points so that all currently selected notes or controllers are inside the loop. Very useful for quickly concentrating on a small part of the notes.
- Clip: If you're editing a clip in the Pianoroll, this will set the loop points to encompass that clip. Very handy if you just opened a clip and decide to work on it more closely, as you don't have to exit, loop, and open it again.
- Dragging: You can also drag the handles on the left and right side of the loop area in the ruler to change the loop points.
- Finally, the loop can be turned on and off using the "Song loop" toggle.
Notes about song looping
- The loop points by default snap to whole bars. They can also snap to beats, the arranger grid or the grid of the currently open editor. You can find these options in Xequence's Settings screen ("..." at the top left) under "Interface", then "Snap Loop Points to".
- If you change the selection later on, the loop points stay the same, i.e., they don't follow the selection.
- If you want to loop an arbitrary part of the song (where there are no clips or not exactly where you want the loop), just use the Draw tool to quickly draw an empty clip where you want the loop to be, then set the loop to "Selection", then delete the clip again. Or, if there is already a loop close to where you want it to be, just drag the handles in the ruler.
Copying, linking, and looping clips
Duplicated and Linked clips
Please read this section carefully, as it is central to the way arranging in Xequence works:
- Duplicate: The Duplicate button ("Plus" symbol) creates an independent copy of all currently selected clips, and places it at the end so that the beginning of the first copied clip is at the end of the last selected clip. You can keep tapping this button to make various copies, one after another, but see below:
- Duplicate & Link: If you use the right button ("Chain" symbol), clips are copied just as well, but the notes and controllers inside them are linked to the original. That means that if you edit any of the copies in the Pianoroll or Controller editor, the original and all copies are also modified, and vice versa. This is probably the more useful option in most cases, as often, when you have a central hook or melody, you want to repeat it throughout the song in various places, but if you later decide to make a modification, it is enough to change one of the linked clips and you do not have to delete all the copies and copy them all over again.
- Duplicate & Join: This will duplicate the selected clips and then join the copies with the originals. This is especially useful in the context of electronic music where often, you will have a short idea that is eg. 1 bar long, but you arrange your song in "sections" of eg. 8 bars. So if you have your one-bar idea, just select it and tap this button three times to convert it into an 8 bar clip that repeats the idea 8 times.
Linked clips are an extremely powerful arrangement feature that can save you lots of work when changing central ideas of your song later in the process.
All clips in the arrangement show a number on them, which is like a "group number" in that all linked clips show the same number. This lets you easily see at a glance which clips are linked to others.
Also, whenever you open a linked clip in the Editor, a brief message "xx linked" will pop up, informing you of the fact that the edits you're about to do will affect several other clips as well. You can tap the "Unlink" button below this message to instead make this clip an independent copy (however, you can also do it from the arranger without opening a clip, see below).
Copying several linked clips
If you have several clips selected that share the same data (for example, three clips with number 77), and you use the "Duplicate" (not "Duplicate & Link") button, then the new clips will be independent of the originals, however, they do still maintain their "linkedness" between each other. So, the three copied clips might then, for example, all have the number 78.
Unlinking clips
If you later on decide that you do want to independently edit a linked clip, you can select it and then choose "Unlink" from the "Process" menu. This will make the selected clips independent of others (however, the selected clips will still maintain their "linkedness" between each other, if they had shared the same number before unlinking).
Global clipboard
The global clipboard can be accessed by tapping the "+" button at the bottom left to open the Clipboard and Insert menu.
This clipboard works even across projects so you can copy and paste clips from one project into another.
The following options are available:
- Copy: Copies all currently selected clips into the clipboard. The selection can span multiple tracks.
- Paste ("plus" symbol): Pastes all clips on the clipboard at the current song position (nearest gridline). The new clips are independent copies of the original clips and do not change when the originals change. If the clips on the clipboard are from the same project, they will be pasted to the same tracks they came from. If they are from a different project, they will be pasted onto the currently selected track and below. If not enough tracks are available, they will be created.
- Paste ("chain" symbol): Same as above, however, if the clips on the clipboard are from the same project, the pasted clips will be linked to the original clips so modifying the originals will also change the new copies.
Looping clips
Clips in Xequence each have a "Loop" switch which can be turned on or off for one or more clips by selecting them and then toggling "Loop" in the "Options" menu.
When a clip's "Loop" switch is on:
- The clip repeats itself as if you had used the "Duplicate & Link" feature on it various times.
- It stops repeating either where it bumps into another clip on the same track, or at the end of the song (which Xequence considers to be the end of the last clip plus 64 bars). If it encounters another clip midway through itself, it will be cut off.
- The looped copies can't be selected (they're not "real"), however, they can be edited in the Pianoroll by double-tapping them (note however that all repetitions are still linked to the original: making changes to the notes or controllers in one of them will change all the others).
Usage examples
Looping clips is a very powerful feature, for example:
- If you have a hihat line that continues the same through the entire song anyway. Just place one clip at the beginning, select it, and tap "Loop on". No need to copy.
- If you have a very short segment (i.e., 1 bar) of notes or controllers that you want to repeat many times, but don't want to keep tapping the "Copy clips" function forever.
- If you want to make changes to the rest of the arrangement later, but do not want to keep deleting and cloning repetitive clips in the process. Looped clips automatically adapt to the arrangement.
- If you later on decide you want only a shorter segment of your idea to loop, you can just shorten the "source" (original) clip, and all the repetitions will also shorten (but still stay adjacent to each other).
- If you want to try various ideas while recording, but do not want to "overwrite" your ideas on each Song Loop iteration: Instead of using the Song Loop, just select those clips that you want to hear during recording, set them to "Loop on", and then keep recording linearly.
- If you want to experiment with rhythmic variations of an idea easily, you can just keep cropping or extending the clip both at the beginning and end, the loop will automatically adapt, giving rise to interesting new variations.
Ending the loop
As mentioned, looped clips stop looping when they hit another clip on the same track. So, if your hihat line is supposed to end at some point, just draw a short empty clip there, and you're done.
Converting loops to clips
If you decide you want to make changes to the repeated clips (delete some of them, move them, or edit the notes only in some of the clips), then you can use "Convert loops to clips" in the "Process" menu. This will convert the loop into actual (but still linked to the original) copies. You can now move them around, delete some of them, etc.
Note, however, that these clips are still linked to the original, so editing the notes inside them will modify all converted clips and the original. If you want to change the data of only one single clip of them, select it and then choose "Unlink" from the "Process" menu, which will make it a truly independent copy (it will also get assigned a new number, visible on the clip).
Muting clips
Any number of clips can also be muted independently. This is a very flexible arrangement tool because it allows you to copy (and link) a number of clips on different tracks a few times, and then play with muting them individually to check how the transitions / combinations feel — all without moving, copying and deleting clips around.
To mute or unmute clips, select them, then open the "Options" menu and tap "Mute".
All buttons in the Options menu work in a similar fashion:
- If all selected clips have one of the options turned on already, then the corresponding button will be lit, and tapping it will turn off that option for all those clips.
- If only some selected clips have an option turned on and others don't, then its button will be "half-lit", and tapping it will turn off the corresponding option.
- If an option isn't turned on for any of the selected clips, the button will be off and tapping it will turn the option on for all selected clips.
When you have "arranged" your song using muting / unmuting and are happy with the result, you can delete all muted clips by opening the "Select" menu and then tapping on "Muted", and then on "Delete" in the bottom toolbar. You will then have a clean arrangement which you can fine-tune further.
MIDI Input and Thru
MIDI In
Xequence can receive MIDI data from other apps or hardware keyboards / controllers. This means that you can, for example:
- Use a hardware keyboard instead of the integrated on-screen keyboard
- Record notes from an Arpeggieator app like StepPolyArp, or generative music tools like NodeBeat, into Xequence's Pianoroll
- Record from Audiobus apps when Xequence is loaded in a MIDI Output slot
- ...and many other uses
For this to work, you would first need to enable MIDI Out in the other app, and, depending on the app, choose Xequence Destination as the destination for MIDI Output. You might also need to enable "Background audio", again depending on the app, so that it stays active in the background when you switch back to Xequence. If you use a class-compliant external keyboard or controller, it also depends on the particular device, but many work out of the box.
In Xequence, go to the Settings screen ("..." at the top left), "MIDI / Recording", "MIDI Input", and enable "MIDI In". Then tap on "Sources", and enable "Xequence Destination" if not yet enabled.
Now try sending notes or controllers from the other app or device. The "MIDI In" button should flash when you press keys or move controllers in the other app or device. You can also try to record notes or controllers into the Arrangement or Pianoroll, and check if they have been recorded correctly.
If you don't get any blinking or notes / controllers being recorded, try selecting the MIDI Source explicitly:
Explicitly setting the MIDI In Source
Some apps or devices need a different approach and you have to enable them explicitly as inputs in Xequence.
To do that, go to the Settings screen again, and tap on "Sources". In the popup, your other app or device should have a button (which is deactivated). Activate it, and now again try sending notes from the other app or device and see if the MIDI In button blinks and events get recorded.
If this doesn't work either or your other app or device doesn't appear in the "Select MIDI sources" popup, please drop us a mail so we can investigate further!
Recording controllers (CCs) from external sources
Xequence can also record controller (knob, etc.) movements from external apps or devices. Controllers whose CC (or NRPN) number has not yet been set up for the corresponding Xequence instrument will be added automatically if "Auto-add controllers" is enabled on the Settings screen.
If that doesn't make any sense just yet, read on:
The screenshot shows an instrument that has controllers (CCs) 74 and 7 set up. As far as Xequence is concerned, these two controllers are the only ones that "exist" for this instrument. However, as long as "Auto-add controllers" is enabled on the Settings screen, Xequence will detect each new incoming controller that has not yet been set up on the instrument of the track being recorded to, and add it automatically.
A list of all newly detected controllers will be shown after recording finishes.
If you disable "Auto-add controllers", then "unknown" incoming controller data will simply be discarded.
MIDI Thru
MIDI Thru is a feature that lets you use Xequence as a central "hub" for your MIDI setup.
If you enable MIDI Thru, all MIDI notes and controllers that are received by Xequence are immediately forwarded to the current instrument, and thusly, to the MIDI destination configured in that instrument.
This means that if you setup your MIDI source (hardware MIDI keyboard, Arpeggiator app, etc.) to only send MIDI to Xequence and not to the actual synth apps or external synths, with MIDI Thru enabled in Xequence, you will never have to change any MIDI connection or channel again, because your keyboard, Arpeggiator etc. will always automatically play the instrument / track that is currently selected in Xequence.
Needless to say, Xequence will of course also record the notes received as well.
So, to recap:
- Setup your MIDI source (hardware keyboard, Arpeggiator app, generative music tool etc.) to only send its MIDI Out to Xequence.
- Enable MIDI In in Xequence, and either enable "Xequence Destination" in the "Sources" panel, or select your MIDI source explicitly, whichever works.
- Enable MIDI Thru
Now, your external keyboard or app acts as the "Master controller" for all of the other synths/instruments configured in Xequence. Select a different track, and your keyboard plays that track's instrument.
MIDI Thru currently does not respect the Multitrack Recording settings, including the sources selected for the individual tracks. It always routes to the current instrument. This is something that we will look to improve in a future version of Xequence.
Bluetooth MIDI
Xequence can seamlessly connect to any MIDI-enabled Bluetooth devices nearby. Please make sure that your iPad or iPhone has its "Bluetooth" toggle enabled in Control Center!
To connect a Bluetooth device, go to settings ("..." button at the top left), then tap on the Bluetooth icon, and then on "Find & connect to other devices". Then, tap on the device you want to connect. It should now say "Connected" on the right.
The device is now available as a MIDI destination or source in all the usual places (instruments, MIDI In, etc.).
Using another iPad or iPhone running Xequence as a Bluetooth MIDI controller
You can also send or receive MIDI from Xequence running on another device over Bluetooth! For example, you could use Xequence's excellent keyboard and controller as a secondary MIDI input device.
To do so, just run Xequence on your secondary device, enable Bluetooth, go to Xequence's Bluetooth tab and tap on "Make this device available to other devices". Then, enable "Advertise MIDI Service".
Back on your main device, your secondary device should now appear as a regular Bluetooth controller in "Find & connect to other devices", and thusly, in all relevant places as a MIDI destination or source.
MIDI File Import and Export
Xequence can import and export standard MIDI files (.mid), including notes, controllers, track names, program changes and information like BPM and time signature.
Loading a MIDI file as a new project
Using the Files app:
- Put the file into Xequence's Documents folder by using the Files app to copy it to "On my iPhone/iPad" -> "Xequence" > "MIDI Files".
- Go to the Settings screen ("..." button at the top left) and navigate to the "MIDI Files" folder.
- Select the file and tap "Load".
Using "Open In" / "Share":
- In the app which has the MIDI file (for example, Mail or Dropbox), tap the standard "Share" icon (box with up arrow) or "Share", then in the dialog that lists all available target apps, tap on "Open in Xequence" (sometimes, it will also say "Copy to Xequence", that doesn't matter)
- Xequence should now launch and will ask you what to do with the MIDI file. Tap "Load as new" (if there's currently a project open that has not been saved, Xequence will first ask you for confirmation).
MIDI Import options
Next, a dialog will appear which lets you change various options for the import. These options are remembered the next time you import a MIDI file.
- Controllers: If enabled, import controllers like Volume, Pitch, Modulation, etc.
- MPE: If enabled, controller data will be attached to any imported notes that share the same channel and time range, and any instruments created on import will be set to MPE. Otherwise, controller data will be imported as "normal" (global) data. Enable this option if you know that the imported MIDI file contains MPE or has been exported as MPE.
- Separate track for controllers: If enabled, Xequence will import the notes from each track in the MIDI file onto one arranger track, and all controllers onto a separate sub-track. So, if the MIDI file has 8 tracks, 16 tracks will be created in Xequence. If you would like all data from each MIDI file track to be in a single clip on a single track in Xequence, disable this option.
- One track per controller: Xequence can also import each controller onto its separate sub-track, so that for example, Volume, Modulation and Pitch would each get their separate arranger track (in addition to notes). This can quickly yield a huge number of tracks as many MIDI files use a large amount of separate control change numbers. For example, when importing a MIDI file with 10 tracks, each with automation for Volume, Pan, Pitch, Effect 1 and Sustain, 60 tracks would be created in Xequence (one for notes and 5 for controllers, for each MIDI file track).
- Program changes: Import Program Change and Bank Select events as well. These are often a vital part of the data in MIDI files as most files are tailored towards General MIDI synths (like, for example, Roland Sound Canvas), with each of the program numbers calling up a standardized sound (for example, program 0 is always "Piano").
- Split by markers: Many MIDI files contain markers that separate the song into different parts (like verse, chorus etc.). Xequence can use these markers to split the clips it creates during import (note that MIDI files do not contain any other kind of information for splitting up the data into clips, so you may end up with one very long clip for each track. This is a limitation in the MIDI format and not in Xequence).
- MIDI Destination for created instruments: Xequence automatically creates one instrument per MIDI file track. It can automatically assign each of those to the destination you select here, which could for example be an app that is General MIDI capable (one example is Roland Sound Canvas). Channels are also assigned automatically based on the information in the MIDI file.
When you tap "Import", Xequence loads the MIDI file as a new project (it does not append it to the currently open song). This way, you can first clean up the imported data as necessary, and then use Xequence's Global Clipboard (described earlier in this manual) to copy and paste any number of clips from any number of tracks into another project, as desired.
However, you can also import a MIDI file directly into an existing project, see below.
Separation into clips
Note that the MIDI file format does not support splitting the data into clips, so most of the time, you will end up with one long clip per track after import. Xequence tries its best to trim the created clips at the beginning and end and also split it according to "Markers" potentially stored in the MIDI file. However, some manual cleanup will be required.
Inserting an entire MIDI file directly into the current project
For quickly inserting single clips or small MIDI files, direct import into the timeline is available.
The MIDI file will be imported at the nearest gridline from the current song position, and starting at the currently selected track.
Xequence is extremely smart about automatically preparing, cropping and cleaning up the MIDI file for this feature, so it will work well in many cases.
When inserting a MIDI file directly, the last used options from the regular "Import MIDI file" dialog will be applied. You can change these at any time by simply loading a MIDI file in the fileselector, changing the options in the import dialog, and then just tapping "Cancel" instead of "Import".
Inserting a MIDI file using the Files app:
- Put the file into Xequence's Documents folder by using the Files app to copy it to "On my iPhone/iPad" -> "Xequence" > "MIDI Files".
- In the arranger, open the "Insert" menu and choose "MIDI file".
- Navigate to the "MIDI Files" folder.
- Select the file and tap "Load".
Inserting a MIDI file using "Open In" / "Share":
- In the app which has the MIDI file (for example, Mail or Dropbox), tap the standard "Share" icon (box with up arrow) or "Share", then in the dialog that lists all available target apps, tap on "Open in Xequence" (sometimes, it will also say "Copy to Xequence", that doesn't matter)
- Xequence should now launch and will ask you what to do with the MIDI file. Tap "Insert".
Exporting a project or individual clips as a MIDI file
The currently open project (or individual clips) can be exported as a MIDI file. For each of the project's instruments, one MIDI file track will be created. Only instruments which actually get used in the project (eg. whose tracks have clips on them) will be exported.
The following options are available when exporting:
- Include track delay: When enabled, the "Delay" setting of each arranger track will be honored when exporting. Otherwise, the exported events will have the exact times as they appear in the pianoroll or controller editor.
- Include track swing: Same as above, but applies to the "Swing" setting.
- Separate sub-tracks: When enabled, each arranger sub-track is exported as a separate MIDI file track. Otherwise, all tracks for each instrument will be merged into a single MIDI file track.
- Only selected clips: When enabled, only the currently selected clips will be considered. Clips on all other tracks (and their corresponding instruments) will be skipped, and the resulting MIDI file will only contain the time range encompassed by the selection.
- Always write (N)RPN number: When enabled, for maximum compatibility, the (N)RPN number will be written along with every value change. If the environment where the exported MIDI file is going to be used keeps track of the last used (N)RPN number correctly, then you can disable this option to only have the (N)RPN number written when necessary (when it changes), thus minimizing MIDI file size.
- Reset (N)RPN number after: When enabled, Xequence will write Parameter Number 127, 127 after writing an (N)RPN value. This may prevent old (N)RPN numbers being "stuck" in receivers of the MIDI file data.
After export, the file will be placed in Xequence's "Documents" (in the subfolder you exported it to) and can be accessed through the iOS / iPadOS Files app for use in other apps, or directly opened in another app by selecting the file in Xequence's fileselector and tapping the "Share" icon (box with up arrow).
Audiobus
Xequence supports full integration with Audiobus including:
- Audiobus sidebar
- Sidebar transport and remote controls
- Audiobus State / Preset saving
- MIDI input as a MIDI destination in Audiobus MIDI lanes
- Up to 16 independant Xequence MIDI sources in Audiobus MIDI lanes
- Full synchronization (start, stop, phase / beat, tempo (no tempo ramps)) with Audiobus apps (Ableton Link must be enabled globally)
Getting started
To use Xequence along with Audiobus:
- Open Audiobus.
- Tap on "MIDI" to go to the MIDI screen.
- Tap on the left (or top) "+" button to add a MIDI source.
- In the following dialog, tap on "Xequence".
- Xequence offers 16 separate Audiobus MIDI outs. Select "MIDI Out 1" for now.
- Add a destination app by tapping on the other "+" button.
Xequence Instruments and Audiobus
To use a Xequence instrument with your newly created Audiobus MIDI lane:
- Switch to Xequence by tapping on its icon in Audiobus.
- Go to the instruments screen by tapping the MIDI button at the top left.
- Tap the "..." button to open an instrument's settings.
- Tap "Select MIDI Destination" or the name of an already selected destination.
- In the dropdown menu, "Audiobus" should appear as an option. Tap it. (not "Audiobus 3"! This is unfortunately a bit confusing as Audiobus also exposes a "normal" virtual MIDI destination under that name, but that is not what we want in this case)
- The channel selector for this instrument is now being replaced by an Audiobus MIDI Out selector, as Audiobus uses separate ports instead of channels. Select the port (in our example, MIDI Out 1) you just assigned to your MIDI lane in Audiobus.
You can now use this Audiobus lane like any other MIDI instrument.
Xequence will also display the name(s) of the destination app(s) connected to the instrument's Audiobus MIDI lane, so you can immediately see on Xequence's instruments screen (and in the arranger!) what you are sending to. Of course, you can still assign your own instrument and/or track names, if desired.
Using multi-timbral destination apps / hosts that only have a single Audiobus MIDI input
At the time of this writing, some apps, for example apeMatrix, are Audiobus-capable and can host multiple other apps, but only expose a single Audiobus MIDI input port. As Audiobus does not use MIDI channels, it might seem impossible to use more than one sound / destination app through such an app through Audiobus (Xequence -> Audiobus -> apeMatrix -> [Multiple Hosted Apps].
However, this is very easy to do by just routing the MIDI directly to the multi-timbral app, bypassing Audiobus:
- Load the multi-timbral app (for example, apeMatrix) as a source on the left / top side of the AUDIO screen (not as a destination on the MIDI screen!).
- If necessary, setup your multi-timbral app to listen on its normal MIDI inputs.
- In Xequence, the app should now appear normally as a MIDI destination in your instrument's settings ("..." button). Do not choose "Audiobus" as the destination. Instead, tap on the app's name.
- Now, use MIDI channels as you would normally with a non-Audiobus app (if necessary, setup filtering by MIDI channel in the app to route the correct MIDI channel to the correct sound).
Sidebar
The Audiobus sidebar can be used to switch quickly between all connected apps. It also exposes transport controls (Play, Stop, Rewind, Record, etc.) for all apps that support them (Xequence included).
To show or hide controls for a particular app, tap its icon.
Xequence is the first Audiobus-enabled app that can automatically detect the sidebar and move its own control widgets / handles out of the way if necessary.
Audiobus Presets / State Saving
Xequence has full support for Audiobus Presets. When saving a preset in Audiobus, the entire current state of the Xequence project, including its filename and any changes made since the last save, is stored.
You can thus share your entire setup and Xequence project easily via Audiobus. There's no additional setup or steps required. The device on which the preset is opened does not even need access to the project file.
Note: Should you encounter a situation where loading an Audiobus preset does not restore the corresponding Xequence project correctly (nothing seems to happen in Xequence), please just try loading the preset again. If this doesn't help, please send us the preset and we will take a look at it and if the problem is in Xequence, fix it in an update.
MIDI input via Audiobus
Xequence can be loaded into the destination / receiver slot (on the right / bottom side) of up to 8 Audiobus MIDI lanes as well, thus receiving any MIDI data that might be sent / filtered by other apps on those lanes.
To receive MIDI from an Audiobus MIDI lane:
- Insert Xequence as a receiver by going to the Audiobus "MIDI" screen and tapping the "+" button on the right / bottom. Then select one of the 8 MIDI Input ports.
- In Xequence, go to the settings screen ("..." button at the top left), then to "MIDI / Recording".
- Under "MIDI Input", make sure that "MIDI In" is enabled.
- Tap on "Sources" and enable "Audiobus" (not "Audiobus 3"!).
Any MIDI data arriving via an Audiobus MIDI lane should now be recognized by Xequence in the usual manner, including the ability to record it. Of course, if MIDI Thru is enabled, Xequence will also pass along this data to the target instrument of the currently selected track.
If any of the other sources in the "Sources" panel is also enabled, Xequence will merge all events automatically.
Synchronisation (start, stop, phase / beat, tempo)
Xequence supports full synchronisation with all other Audiobus-enabled apps. This should normally work automatically without you doing anything special.
To globally start or stop the transport, tap the "Play" button in the Audiobus sidebar under the Audiobus icon, or while in the Audiobus app, use the corresponding in-app "Play" button. The other transport controls work in a similar fashion.
Should this not work as expected, try the following:
- Load Xequence on the Audiobus MIDI screen as a source, if not already loaded.
- Open Xequence's tempo menu in the top toolbar, tap on "Link", and make sure Ableton Link is enabled. Also enable "Sync Start/Stop".
- In Audiobus, tap the "..." button to open the settings, then tap on "Sync Settings", and make sure Ableton Link is enabled there as well (also "Sync Start/Stop").
- Repeat the same for all apps loaded in Audiobus.
Manual track management
Normally, Xequence automatically manages arranger tracks according to the instruments you create, so each instrument has at least one track (you can create additional sub-tracks as needed), and the sorting of tracks and their instruments stays in sync.
However, you can also manage tracks manually, which gives you more freedom and easier switching of instruments for tracks (say, if you very quickly want to try out different instruments for a track).
Xequence 1 users will be familiar with manual track management, because that is the only way available in v1. So, if you're more used to working like this, then you might want to read on.
Disabling automatic track management for a project
You can disable automatic track management for the loaded project by going to the "..." screen, and in the "Project" tab, disengaging "Automatically manage tracks".
You can also re-enable this for any project at a later time, and the project will be converted back to automatic track management.
When re-enabling automatic track management on a project, it is possible for your track order to be changed by Xequence, because when automatic management is enabled, all tracks belonging to a certain instrument need to be in one "block", which is not the case when manually managing tracks. So you might want to make a backup of the project before re-enabling automatic tracks.
Differences
The following features work differently when in manual mode:
- All arranger tracks are equal, i.e. there are no "child" or "parent" tracks.
- You can manually create as many tracks as you want, either below a track with the familiar "+" button in the track header, or the new "+" button at the bottom.
- You can manually assign a different instrument to each track by opening the track settings ("...") and tapping on an instrument in the list.
- Arranger tracks can be re-ordered at will.
- It is also possible for an instrument not to have any tracks, for example, a "dummy" instrument only used for sending MIDI sync.
- However, the opposite is not true, i.e. it is not possible to have a track that isn't assigned to any instrument.
- When naming a track, its instrument's name will still be visible on the left, and the track name will be on the right.
- The order of instruments and tracks is independent, i.e. if you change the position of an instrument or track, the other won't be affected.
Managing files
Using the iOS / iPadOS Files app
You can access and manage all of Xequence's files with the Files app from your home screen.
After launching the Files app, tap on "On My iPhone" or "On My iPad", and then on "Xequence". You can freely move, copy and rename files / projects locally or between your devices.
Using "Open In" / "Share" from other apps
Xequence can also open project files (.xeqproj) and MIDI files (.mid, .midi, .kar) directly from other apps using their "Open In" / "Share" menu (often represented by a box with an up arrow button, or the menu entry "Share"). A list of apps will appear, which will contain an entry "Open with Xequence" or "Copy to Xequence".
Sending files from Xequence to other apps
On Xequence's settings screen, the fileselector contains a button with the "Share" icon which you can use to directly send any selected project or MIDI file to another app that can open it.
Demo projects
Xequence includes two demo projects "Alpha" and "Beta" which you can load from the "Project" tab in the Settings screen ("..." at the top left, then navigate to the "Demos" folder) so that you can quickly get a feel for the possibilities and handling in Xequence.
These are full-blown electronica productions with lots of tracks, looping and controller ramps so they showcase some of Xequence's potential.
Of course, if you hit play, you probably won't hear anything, as Xequence doesn't have built-in synths.
However, these projects were produced using sounds from Korg Gadget, and we have put the corresponding Gadget projects online, which you can download, load into Gadget, and then actually fully work with the demo projects.
The Gadget projects are in our downloads section.
We've used some In-App Purchases in Gadget for some of the sounds, so you may not hear every instrument unless you've purchased the same Gadget IAPs in the past.
Example setups
Using just a single synth app: Poison-202
-
Launch Poison-202, and in its "Settings" menu:
- Set "Virtual Midi In Port" to "Enabled".
- Set "Background Audio" to "Enabled".
- In Xequence, create a new instrument.
- Tap "Select MIDI Destination", and then "Poison-202".
Using a multi-timbral app with multiple MIDI channels and sounds: Korg Gadget
Let's say you want to use three instruments from Gadget in Xequence, on three separate tracks:
-
Launch Gadget, and then:
- In its settings menu (cogwheel), set "MIDI Input" to "Advanced"
- Open "Other settings", you will be dropped into the system "Settings" app
- Enable "Background Audio" there, and return to Gadget
- Create three instruments, and for each, tap on the "All" button at the bottom left, and then in the "MIDI Input" menu, choose "Gadget (Virtual Port)" as the Source (you may need to tap on the "Up/Down arrow" icon in the top right corner to reveal the mixer).
- Tap on the back arrow, then on "All Channels", and assign each instrument its own separate channel, i.e., Ch. 1 to Ch. 3.
- Back in Xequence, create three instruments
- Set each instruments' MIDI Destination ("Select MIDI Destination") to "Gadget"
- The channels should be assigned automatically, but if not, assign the same channels you have assigned in Gadget (1 to 3).
Using an Audio Unit Host to control multiple AU plugins: AUM
Let's say you want to use three separate instances of Poison-202 in AUM, on three separate tracks:
-
Launch AUM, and then:
- Create three AUM "Audio" channels.
- Load a synth plugin into each of the channels by tapping its circled "+" button.
- Tap the menu button at the upper left (=)
- Under MIDI SOURCES, select "'AUM' Destination".
- Below the "CHANNEL FILTER" menu, tap "NONE".
- Now under "CHANNEL FILTER", select the MIDI channel you want to use (1 for the first AUM channel you created, 2 for the second, 3 for the third).
- Back in Xequence, create three instruments
- Set each instruments' MIDI Destination ("Select MIDI Destination") to "AUM"
- The channels should be assigned automatically, but if not, assign the same channels you have assigned in AUM (1 to 3).
Using an Arpeggiator app: StepPolyArp
This will let you use StepPolyArp to play and record any Xequence instrument, including recording the arpeggiated notes:
- Launch StepPolyArp, tap its settings menu (the MIDI Icon at the top right), and under "Midi out", select "StepPolyArp Midi out" (not "Xequence Destination"!).
- Back in Xequence, go its settings menu (the "..." icon at the top left)
- Switch to the "MIDI & Recording" tab, and unter "MIDI Input", enable both "MIDI In" and "MIDI Thru"
- Tap "Sources", disable "Xequence Destination" (if enabled), and enable "StepPolyArp".
You can now go back to StepPolyArp, and whichever instrument is currently selected in Xequence will automatically be played by StepPolyArp, and its notes recorded, if you tap the Record button.
Using Xequence + Audiobus + AUM together
The above combination is very useful to get a complete, integrated control, composition, arrangement & mixing environment:
- Xequence is the central control, composition and arrangement hub.
- Audiobus is used for fast switching between apps, for central transport control, and storing and recalling the entire project from a single location.
- AUM is used for hosting the actual synths and provides a comprehensive mixing environment.
To set this up, we recommend the following steps:
- Start with a blank Audiobus session.
- Go to the Audio screen, and load AUM into an Input (left / top) slot.
- In AUM, setup an "Audio" channel for each synth you want to use and load the plugin. Go to its menu, enable "AUM Destination", tap "None" under "Channel Filter", and then enable one of the 16 MIDI channels for each synth you load.
- Back in Audiobus, go to the MIDI screen, and load a single Xequence instance into an Input (left / top) slot (it doesn't matter which MIDI Out you select).
- Tap on the Xequence icon and go to its Instruments screen (MIDI icon at the top left), and for each synth you created in AUM, create an Instrument.
- For each instrument in Xequence, tap "..." to go to its settings, and tap "Select MIDI destination". In the dropdown, do not select "Audiobus". Instead, route the MIDI to AUM directly, and select the same MIDI channels you assigned in AUM.
To save your project, all you need to do is tap the folder icon in the bottom right corner of Audiobus, and then save a new Preset.
Everything is saved into this single preset: All Audiobus settings, the entire Xequence project, all connections between the apps, and the complete AUM setup! This can then even be shared easily using cloud services, and restores on any other device with a single tap.
While strictly speaking, no saving is required neither in AUM nor Xequence, we still recommend saving important projects (especially the Xequence project) separately using each app's normal "Save" function. Audiobus presets are very convenient, but not as robust as an actual save to a separate file.
Recording multiple AUv3 MIDI plugins hosted in AUM into Xequence
Xequence itself does not have support for AUv3 MIDI plugins, but you can use any other AU host (like, for example, AUM) to route them into Xequence. Here's an example routing two plugins from the Rozeta suite into Xequence and recording them both at once, perfectly synced and on separate tracks:
- Launch Xequence.
- Launch AUM and add two MIDI plugins (for example, Rozeta Bassline and Rozeta LFO) by tapping the "+" button and choosing "MIDI", then the appropriate plugin.
- Open the plugins and set one of them to channel 1, the other to channel 2.
- Choose / Generate a pattern in Rozeta Bassline so that it sends notes.
- Open the routing matrix (top right "snake arrow") and create connections from both plugins to "Xequence Destination".
- Back in Xequence, open the tempo menu in the top toolbar, and enable Ableton Link (including "Sync Start/Stop"). Then in "MIDI / Recording", enable "MIDI In". Tap on "Sources" and enable "Xequence Destination".
- Go back to the arranger (top left button) and enable Multitrack recording ("two arrows" toggle in the top toolbar). Then hit Record. Xequence should now create two new track lanes and record the input from both Rozeta plugins live.
Bonus tip: Syncing StepPolyArp to Xequence
You can also use Xequence's MIDI sync feature to have StepPolyArp automatically play in time with Xequence when you press keys in StepPolyArp, so that recordings are always in perfect sync.
To do that:
- Go to the Instruments screen (MIDI Icon at the top left), and add a new instrument. Choose StepPolyArp as the MIDI destination (it won't be used as a real instrument: you only add it so that Xequence is aware of it and can sync it).
- Enable the "Send Sync" toggle, and in the "..." menu next to it, choose "Relative" mode.
- In StepPolyArp, go to the MIDI menu (MIDI icon in top right corner), then to "Sync", and enable "Follow song position".
StepPolyArp will now acquire the BPM and relative song position from Xequence whenever you hit play, and play in sync with it.
Frequently asked questions
Why am I getting jitter / inaccurate timing, I thought Xequence is rock-solid?
Xequence sends its MIDI data in advance with so-called timestamps which are accurate to a few nanoseconds. However, many apps that receive MIDI (synths, hosts, etc.) do not utilize these timestamps or discard them. Instead, they try to receive MIDI events in real time, which is less accurate, especially under high system load.
If you notice this problem with an app, please contact the app developer and tell them to listen for incoming MIDI events in advance and use their timestamps to insert the generated audio with sample-accuracy. They're also welcome to contact us directly in order to get further help in implementing these changes.
Why does MIDI export merge several of my arranger tracks into a single track?
MIDI files exported by Xequence merge all sub-tracks of each instrument into one MIDI file track by default. If you have multiple sub-tracks which you would like to export separately, just enable the "Separate sub-tracks" option in the MIDI export settings.
Does Xequence have a marker track?
There is no marker track per-se, but it is quite easy to get very similar functionality:
- Make a new instrument and call it MARKERS.
- For each section of the song you want to "mark", draw an empty clip onto the "MARKERS" track, or use any other means of creating clips.
- Optional: With a "marker clip" selected, tap on the "Process" menu, and tap "Name" to name your section.
You now have a labelled overview of the different sections of your song.
You can also loop any of your sections by tapping the corresponding "marker clip" and then tapping on the "Loop" menu and then on "Selection".
How can I fix overlapping clips?
If you moved clips on top of one another or recorded a new clip on top of others, there's several easy ways to untangle them:
When an overlapping clip is created during recording, Xequence will automatically offer you various merging options right after recording.
- Add another sub-track below (tap the "+" button on the header of the track with the overlapping clips). Then select the topmost clip by tapping it, and move it down one track using the vertical handle on the right. You can repeat these steps for any remaining overlapping clips.
- Or merge the overlapping clips: Select all of them by tapping and holding on them until the selection rectangle appears, then move your finger until all overlapping clips are highlighted. Then, in the "Process" menu, select "Join".
How can I overdub an existing clip without creating a new one?
Just open the clip by double-tapping it, then start recording. While the Pianoroll or Controller Editor is open, Xequence will record into that clip without creating a new one.
How can I do an audio mixdown of my project?
As Xequence does not generate the audio itself (it is generated by the apps that are controlled by Xequence through MIDI), it is not possible to mixdown directly in Xequence.
However, it is quite easy to do a mixdown if you host all your sound generators in an app that can record its master channel.
For example, if you use AUM to host your instruments, you can just arm recording on your master channel, and then tap "Play" in Xequence, and wait until the song has played completely.
Back in AUM, you can then find the recorded file under "Recordings" in its "Files" section in the menu, crop it, and you have the mixdown ready.
Can I control Xequence via MIDI? (MMC etc.)
Transport or other remote control is currently not available. However, you can control Xequence via the Audiobus sidebar while Xequence is loaded in an Audiobus MIDI lane, and by extension via the Audiobus Remote app. Also, Xequence is compatible with Ableton Link.
How can I play in Glissando / Glide on the keyboard?
To enable Glissando / Glide, just tap on the "knotted arrows" toggle in the bottom toolbar on the keyboard screen.
What's Xequence's MIDI resolution (PPQ)?
Xequence has a MIDI timing resolution of 24576 PPQ, the highest possible resolution that can be sensibly implemented while staying compatible with MIDI files. At 120 BPM, that is a timing resolution of roughly 0.1 milliseconds.
Can I control several different instruments with a single Drum Map?
Not directly, but you can use a tool like MIDIFlow to re-map the different notes from a drum map to different MIDI destinations. Select MIDIFlow (or another app that can process MIDI) as the MIDI destination for your drum instrument, and then configure your MIDI processor to route the MIDI to different destinations depending on note or note range.
I cannot select Xequence in my synth app, it isn't listed. What am I doing wrong?
It actually works best the other way around: For each synth app or other destination that you would like to use in Xequence, you create an instrument on the Instruments screen (the MIDI button at the top left).
Then tap on the instrument's "..." button, and on "Select MIDI Destination" (or if the instrument already has another MIDI destination assigned, tap on that). Your target app should then be listed there for selection. Just tap it.
If your target app isn't listed in the menu, make sure that the app stays active in the background. Many apps have a "Background audio" or similar toggle which enables this behavior.
If this doesn't help either, then the target app probably doesn't create a virtual MIDI destination. But all is not lost: The app might still be able to listen to a virtual MIDI source, which can optionally be created by Xequence.
Go to the settings menu ("..." at the top left), then to the "MIDI / Recording" tab, and under "MIDI Output", activate "Virtual source". Then, on the Instruments screen (MIDI icon at the top left), tap the "..." menu for the instrument you want to route to the app, and under "Select MIDI Destination", select "Xequence Source".
In your destination app, now try to enable virtual MIDI Input or select "Xequence Source" as the input. It should now be able to receive from Xequence.
Can Xequence slave to MIDI sync (clock)?
Xequence can currently only be the master, i.e. send MIDI sync (clock, SPP, start, stop, continue) to other devices / apps.
However, if you don't need absolute song position synchronization, then you can use Ableton Link sync to get phase, tempo, and start/stop (play) synchronization by enabling Ableton Link (and "Sync Start/Stop" in its settings) in Xequence (open the tempo menu in the top toolbar and then tap on "Link") and all other apps you would like to use.
How can I use different scales / keys for an instrument in different parts of the song?
- For each additional scale / key you would like to use, create a duplicate of the instrument: tap the "+" button on the instrument header, tap the "..." button, and then assign the same MIDI channel (and if you like, the same color). Tap on the instrument's name (or "Instrument name...") to include the name of the scale / key so that it's easier to find.
- Open the keyboard screen for each of the newly created instruments, and select the scale / key you would like to use.
- When recording, be sure to select the track with the correct scale / key beforehand.
Where are the black keys?
On the keyboard screen, tap on the "Key / Scale" menu, and then select "Black keys".
How can I create smooth controller ramps?
- In the controller editor, activate Draw mode by tapping the pencil icon at the bottom left.
- Tap somewhere to place the first value of the ramp.
- Tap again at a second point to place the end.
- Tap on the Selection menu (the checker icon in the bottom toolbar), then tap on "All" to select all.
- Tap on the "Process" menu, then on "Ramp", then on the desired ramp curve.
Note that the ramp feature uses the current grid setting to define the ramp's resolution. For the highest possible resolution, set the grid to "Off" before using the ramp feature.
Why does Xequence drain my battery while in the background?
For various reasons, Xequence needs to constantly stay active in the background in order to be prepared for processing several events and situations. Any attempt at reducing background activity would compromise stability and reliability, which is why we have opted to implement Xequence in this way.
When you are operating on battery and you know you will not be using Xequence for anything for the next few hours, please completely quit it by using your device's app switcher (this is accessed differently for every device model, operating system and OS version) to "kill" it (swipe it away). The app switcher is often accessed by a double-click on the Home Button (if available), or by a "half-swipe up from the bottom and then hold".
Why can't I open some projects / MIDI files from other apps or locations?
In some cases, opening Xequence projects or MIDI files via "Open In" or "Share" can result in a generic error. This is especially true of network locations.
If this happens, please first copy the corresponding file to local storage (anywhere in "On My iPhone" / "On My iPad", preferably in "Xequence 2") and then open it from there.
Xequence outputs notes in the wrong octave!
Actually, this is just a matter of naming convention: some apps call the lowest octave in the MIDI note range "-2" or "1", while others (like Xequence) call it "0". Xequence does support the full MIDI note range (128 notes).
The problem can be a bit disorienting especially while creating drum maps, so we plan to include a setting to change the displayed octave numbers in a future update.
In the meantime, if your other app happens to use a different numbering convention, just open the corresponding clip, select all notes, and then transpose them up or down the correct number of octaves so that the notes between Xequence and your other app match (you can quickly transpose by whole octaves by tapping on "Process" and then the "Oct" buttons).
My notes are output slightly too short / missing portamento
If the MIDI notes sent by Xequence are shorter than expected, try going to the Instruments screen (MIDI icon at the top left), then tap the "..." button on the problematic instrument to open its settings, and make sure "Shorten Notes" is set all the way to the left (Off).
This used to be a global setting in "MIDI / Recording" and was called "Length Correction". However, we felt it made more sense if it were configurable individually for each instrument. To prevent old projects from suddenly sounding different than before, we've made Xequence apply the last used global value to instruments in old projects, while new projects will automatically default to 0 (Off) for all instruments.